Health
How to Keep a Bladder Diary

Overactive bladder (OAB) is an umbrella term for several urinary symptoms. The most common symptom is a sudden urge to urinate that you can’t control. Other symptoms include leaking urine, frequent urination, and waking up at night to urinate.
OAB is a common condition, affecting as many as 40% of women and 30% of men in the United States. It can usually be managed with lifestyle changes, prescription medications, botulinum toxin (Botox) treatments, nerve stimulation, and, in severe cases, surgery.
Whether you’ve already been diagnosed with OAB or you suspect you have it, you may want to consider keeping a bladder diary. This can give you clues about what’s behind your OAB symptoms and even help you manage them.
“The bottom line is, these are very easy to do,” says Howard Goldman, MD, a urologist at Cleveland Clinic. “They don’t cost anything, there’s no risk, and many of the guidelines on how to treat overactive bladder suggest that a keeping a diary before starting treatment can be very helpful.”
There are several reasons you may want to start a bladder diary.
To gather data for yourself: “If you think something might be going on, keeping a bladder diary could be really helpful just to see how often you’re really going to the bathroom and when you leak urine,” says Margaret Mueller, MD, a urogynecologist at Northwestern Medicine in Chicago.
That said, Mueller notes that women in particular tend to think that they urinate too frequently because “their bladder is interfering with their being able to do 100 million things in a day.” In reality, she says they’re often within the range of normal. A bladder diary can show this and give you reassurance.
To take to your health care provider: If you decide to see your health care provider about your symptoms, it’s helpful to have a bladder diary completed. For instance, keeping track of how much you’re urinating can give your provider a much better sense of how much your bladder can hold and how much you’re actually going to the bathroom. “We have patients who think they’re going all the time, but you see their diary and they’re only going five times,” says Goldman. “It’s a big difference if someone’s holding just 6 ounces in their bladder versus 15 ounces.”
To pinpoint behaviors that you can change: Maybe you’re having bothersome symptoms like having to go to the bathroom too often or needing to run to get to the bathroom in time. Goldman says a bladder diary may show you some behaviors that you can change on your own before you even go to the doctor.
For example, you might see that you’re drinking a lot right before you go to bed or consuming more Diet Cokes a day than you thought. “Sometimes, part of the OAB problem is that someone may be taking in too much fluid or too much caffeine, which may be an underlying contributing factor,” Goldman says.
When your health care provider requests it: Goldman has his patients keep a bladder diary when he first sees them. “It’s most important right at the start to get some idea of what’s going on,” he says.
Both Mueller and Goldman also sometimes have their patients keep a bladder diary when they start a new treatment or to measure their response to treatment. “There are some therapies where we may do a trial. In those cases, we may do a diary beforehand and then during the therapy to get a sense of how much it’s helping,” Goldman says.
Mueller uses a bladder diary to see how often her patients leak urine with a strong urge to go to the bathroom and how often they leak urine with coughing, sneezing, etc. She also wants to see how often they’re urinating. This combination helps her determine what treatment may be needed.
“Let’s say there’s no leakage, but they’re going to the bathroom every 30 minutes,” Mueller says. “You might be able to do an intervention called timed voiding, which is basically retraining the bladder. This has been shown to be effective.” In this example, you would try to stretch out going to the bathroom to an hour instead of 30 minutes. Gradually, you would keep adding another 30 minutes until you’re urinating every 2 hours.
When you get up multiple times during the night: A bladder diary is important for people who urinate often at night “because we can see if they’re putting out more urine at night than they should,” says Goldman. Typically, you should urinate less than a third of your total volume of urine at night, he explains. If you’re voiding more than that, this could indicate other medical problems that are causing your body to put out more fluid in the evening.
One of the more common causes of making too much urine at night, known as nocturnal polyuria, is obstructive sleep apnea. “When you have obstructive sleep apnea, you make less antidiuretic hormone because the body thinks it’s daytime and makes urine like normal,” says Mueller. If someone has risk factors for sleep apnea such as snoring, overweight, or obesity, “we’ll typically have them referred for a sleep study to see if that might be part of the picture,” she says. “The benefit is that sleep apnea is reversible and getting treated for it can really reduce those bladder symptoms.”
Pick your tracking method. You can write your bladder diary in a notebook, download a template and print it out (Goldman recommends this one), or find an app for your phone. There are even companies that sell cups that measure your urine and automatically upload your volume to an app, according to Goldman. “Your average person probably doesn’t need to be that fancy though,” he says.
Keep the diary for 3 days. One day isn’t enough because things can change too much from day to day, Goldman says. “There have been studies that show that a 3-day diary isn’t much different than longer diaries, so 3 days is short enough to get a sense of what’s going on but long enough to give you an accurate idea,” he explains.
Use 24-hour periods. Start tracking when you wake up in the morning. You don’t have to track for 3 days in a row, but you should do 24 hours at a time. For example, if you get up at 7 a.m. the first day, fill out your diary until 7 a.m. the next day.
Measure your urine. You’ll need a cup unless you have a collection device from your health care provider. A measuring cup is a good choice so you can see exactly how much you’ve passed. You’ll need to rinse the cup or collection device with water after every use. Be sure to measure and keep track of how much urine you pass both during the day and at night.
Use a bladder diary to track information and symptoms such as:
- How much fluid you drink
- How often you drink
- How often you urinate
- How much you urinate
- How often you feel an urgent need to urinate
- When and how much urine you leak, if applicable
Goldman stresses that it’s important to have your health care provider check everything out if you have OAB symptoms. “There’s everything now, from certain exercises to plenty of medications to Botox injections and pacemakers,” he says. “We can do all kinds of things, so OAB is not something people should have to live with.”

Part 2
In Part 1, I shared my challenges with depression, the fact that the suicide rate for males is so much higher than it is for females, and how these realties have impacted men and their families. Here we will look more deeply into the underlying causes and potential solutions to this world-wide problem.
The Most Underappreciated Fact About Men and Why Males Are the Risk-Takers
Dr. Roy Baumeister is one of the world’s leading social scientists. Understanding his work can better help us understand a lot about why men are the way they are and specifically why men are the risk-taking gender.
Baumeister is the author of more than thirty books and four hundred scientific articles. In his groundbreaking book, Is There Anything Good About Men? How Cultures Flourish By Exploiting Men, he says,
“If evolutionary theory is right about anything, it’s right about reproduction. Nature will most favor traits that lead to success at reproducing. But for thousands of years, men and women have faced vastly different odds and problems in reproducing. On this basic task, women faced good odds of success, whereas men were born to face looming failure.”
Given that all humans are mammals, there is a basic biological fact of life. It is the female who carries the baby in her womb and will always be 100% sure that any offspring carry her genes. Males can never be 100% certain, hence the truism, “mother’s baby, father’s maybe.” Further, through evolutionary history more females than males reproduced.
Dr. Baumeister tells us that
“Of all the people who ever reached adulthood, maybe 80% of the women but only 40% of the men reproduced. Or perhaps the numbers 60% versus 30%. But one way or another, a woman’s odds of having a line of descendants down to the present were double those of males.”
Baumeister goes on to say,
“That’s a stunning difference. Of all humans ever born, most women became mothers, but most men did not become fathers.”
The result is that throughout human history men became the risk-takers, competing with other men to be chosen by a woman to mate with him. Some successful males (think Genghis Kahn) fathered hundreds of children. Some men stuck out completely.
Women’s motto became: “Life has handed you a good thing; don’t blow it. Play it safe.”
Men’s motto was the opposite: “The odds are against you. Better take your chances.”
Says Baumeister,
“That’s why we are descended from playing-it-safe women and risk-taking men.”
Help-Seeking vs. Risk-Taking, The Empathy Gap, and Implications for Male Suicide
My father didn’t seek help with his depression until he was forced to do so and the help available at the time was inadequate. This is still true for many men today.
“Perhaps it is not surprising that, if there are large gender differences in risk-taking and protective behavior,”
says Dr. Martin Seager who we met in Part 1,
“there will also be correspondingly large gender differences in help-seeking. An individual or group that is more likely to take risks to protect others is also by definition less likely to seek help or self-protection.”
As my father found, he was not only driven to take risks to work in a challenging profession in order to take care of his family, but this indication was supported and encouraged by the society at large.
“The evidence also indicates that society is correspondingly calibrated to expect this difference and is consequently less empathic towards male death and injury,”
says Seager.
“If this is the case, then it must follow logically that men will be on average more driven than females to take their own lives because of:
a. A greater instinct to ignore personal safety and confront danger
b. A greater instinct to protect others (and greater shame at failing to do so)
c. A lower sense of entitlement to receive help or protection from others.”
Towards a More Scientific and Effective Approach to Reducing Male Suicide
Dr. Seager’s approach offers importance guidance for clinicians as well for men and their families.
By simply allowing archetypal gender differences to be researched, understood, and honored, gender-specific solutions to male suicide can indeed be found. Here are some important points:
- Carl Jung talked of archetypal patterns evolved within the human species and shared within a “collective unconscious.”
- Jung’s thinking was clearly influenced by ancient Chinese conception of “Yin” and “Yang” in which femininity (one aspect of “Yin”) is seen along with masculinity (one aspect of “Yang”) as complementary system of opposites within the natural universe.
- Dr. Seager proposes the following simple and practical instinctual, evolutionary-based, male archetypes:
- Fighting and winning.
- Providing and protecting.
- Maintaining mastery and self-control.
- These archetypes contribute to a sense of masculine identity, honor and strength. To the extent that a man feels these elements are missing, he will feel the opposite of masculine shame and failure.
My own experiences and research has convinced me that men’s inherent proclivity to maintain emotional self-control helped men be successful hunters during the millions of years humans were hunter-gatherers. Men needed to fight potential threats from other men in order to protect our families. Men needed to take-risks in order to compete with other men in our own tribes so that we would be chosen by women. These evolutionary-based instincts are built-in and though they don’t control our behavior, we still make individual choices, they cannot be ignored.
Calling masculinity “toxic” or blaming the “patriarchy” just serves to divide and alienate us. We create more conflict between left and right, males and females, Republicans and Democrats, Us and Them. We need more bridges not more walls.
I met the internationally acclaimed scholar, futurist, and activist, Riane Eisler shortly after her book, The Chalice & the Blade was published in 1987. We have been friends and colleagues ever since. She said,
“Underlying the great surface diversity of human culture are two basic models of society. The first, which I call the dominator model, is what is popularly termed either patriarchy or matriarchy—the ranking of one half of humanity over the other. The second, in which social relations may best be described as the partnership model. In this model—beginning with the most fundamental difference in our species, between male and female—diversity is not equated with either inferiority or superiority.”
Why an Archetypal Approach to Male Depression and Suicide Works Better
For some clinicians, men’s innate desire to fight and win, to protect women and children, and to control our emotions, are seen as “toxic” or “harmful.” They try and encourage men to change and express themselves in different ways. Dr. Seager’s approach is different:
“If we assume that men on average are more likely than women to be driven to ‘fight, protect’ and ‘retain mastery/self-control,’ then it is clear that trying to encourage men collectively to ‘open up, be vulnerable’ and ‘seek help’ potentially violates deep-rooted masculine instincts. Such an approach may even increase a sense of masculine shame and failure.”
Dr. Seager concludes that we have a choice between two divergent approaches:
- Socially challenging and reconstructing masculine behavior and masculinity itself as a negative stereotype through educational methods with the aim of teaching males to seek help and share emotions more openly (i.e. change masculinity).
- Changing the social attitudes and responses of society towards men and boys to create more empathy for masculinity as a positive part of the human spectrum, while providing male-friendly services for men and boys that both honors the male archetype and offer new and better ways of expressing it (i.e. change society).
In advocating for the second of the two approaches, Dr. Seager says,
“I am saddened that our profession seems to be no better than the rest of society in being blind to the fact that men and boys also have needs and problems arising from their gender. Raising this subject always incurs unreasoned resistance and even at times hostility. This in itself shows the need to keep promoting the issue.”
My father was fortunate to have survived a health-care system based on the first approach that never worked for him, he finally found his way to one that accepted his inherent drive to take risks in support of his family. I wrote about his journey in my book, My Distant Dad: Healing the Family Father Wound and an article, “My Father’s Stay at God’s Hotel: A Slow-Medicine Approach to Healing Mental Illness.”
The Moonshot For Mankind: Male-Positive Programs For Men and Their Families
I launched MenAlive in following the birth of our first son, Jemal, on November 21, 1969 and our daughter Angela, on March 22, 1972. Fifty years ago, there were very few programs that focused on men’s mental, emotional, and relational health. Now there are many. Three years ago I invited a number of colleagues who I knew were offering new and effective approaches for helping men to join me in creating a central hub for the thousands of organizations that are now available.
Come visit us at our website, MoonshotForMankind.org. Here are a few of the organizations that have joined our movement:
ManTherapy.org: Man Therapy is an evidence-based, decades-long, multidisciplinary effort to break though stigma, improve help-seeking behavior and reduce male suicide. And they’ve got the stats to back it up. Learn more here.
MenLiving.org: MenLiving delivers programs and experiences to help create a world of healthy, intentional, connected men who can heal and thrive. Learn more here.
Men and Boys Compassion Initiative (MBCI) is an international movement to help men and boys cultivate their compassionate selves. This also requires the cultivation of courage and wisdom to heal the male crisis of disconnection.
You can learn more about the work of Martin Seager at the Centre For Male Psychology.
We need more programs for men that are evolutionary-archetypally informed. You can learn more at MenAlive.com and MoonshotForMankind.org. If you like articles like these, I invite you to become a subscriber.

Whether you’re looking for your fastest mile ever, itching to cook your friends on the court in pickup or pickleball, or cooking through a sprint workout on the track like an Olympian, you need a rock-solid abs.
“If you have a straight stick, and you throw its end on the ground, it’ll bounce back up; but if there’s bend in the stick, it might bounce in any direction,” says Team USA’s Noah Lyles, a favorite to win gold in the 100m at the Paris Olympics. “It’s the same thing when you’re running. If you don’t have a tight midline—a stable, well-structured core—when you make contact with the ground, you’re not using all the power you’re producing.”
Few athletes know more about building power and speed than Lyles. To create the explosive stride that’s led him to eight track and field world championship and Olympic medals—including double gold in the 100 and 200 meters at the 2023 world champs—the 27-year-old sprinter spends four days per week in the weight room, doing workouts that focus on building power: Exercises like cleans, hex bar deadlifts, front squats, back squats, and power throws.
To make sure he’s converting his power into speed with each step, Lyles also sweats through a core workout in just about every session, building that springy, power-saving stiffness in his middle that lets him unleash the power he builds through his barbell work and track sessions.
As part of his partnership with CELSIUS energy drinks, Lyles spoke with Men’s Journal to share one of the core routines he uses to help build gold medal abs. There are also some easier alternatives for each exercise for non-Olympians who need to scale down.
Try this workout at the end of your next strength training session, or as a workout on its own. For each move in this six-exercise routine, rest 1 to 2 minutes between sets.
1. GHD Machine Hollow Hold

Westend61/ Getty Images
Why It’s Effective
You may have done hollow holds before on the floor, but Lyles’ version adds an extra challenge: Instead of on the ground, this move is performed on the glute-ham developer bench. A staple in CrossFit gyms, this machine can be used for butt and leg development, as the name suggests, but is also popular for intense, full-range situps and other core moves.
How to Do It
- Get into the GHD with your feet in the foot pad area, your legs straight and your butt sitting off the GHD’s large pad, to start.
- Sit up so your body forms a 90-degree angle. Reach your arms straight up overhead (you can also gentle hold the back of your head).
- Maintaining a flat back, slowly lean back to open your hip angle. Lean back as far as you can—as close to horizontal as possible—hold your body steady by bracing your core.
- Once you’ve found the depth you can hold, maintain the hollow position for 30 seconds.
- Perform 4 x 30-second holds.
Easier Variation: Hollow Body Hold

Justin Steele
The closer your torso is to perpendicular, the easier the move will be. And if you don’t have access to a GHD machine, you can perform hollow holds on the floor.
How to Do It
- Lie on your back with your arms and legs fully extended, squeezing everything tight, to start.
- Press your lower back into the ground and slightly lift your legs and upper back off the floor.
- If you’re a beginner, hold this position. If you’re more advanced, rock forward and back—holding the shape of a banana.
2. Toes to Bar

James Michelfelder
Why It’s Effective
Toes to bar does more than just build a six-pack: Studies have shown this type of move is one of the most effective for strengthening the obliques, even when done without twisting. Lyles does the full toes to bar variation.
How to Do It
- Hang from a pullup bar with straight arms set slightly wider than shoulder-width. Draw your shoulder blades back and down, to start.
- Keeping your feet together and legs straight, engage your core to hinge your hips, raising your legs until your toes touch the bar.
- Control your descent back to the starting position. That’s 1 rep.
- Perform 4 x 7-10 reps.
Easier Variation: Hanging Knee Raise
- Hang from a pullup bar with straight arms set slightly wider than shoulder-width. Draw your shoulder blades back and down, to start.
- Bend your knees and bring your thighs up until they’re parallel with the floor.
- As you advance, move on to a straight-leg raise, where your legs are extended straight from hips.
3. V-Up
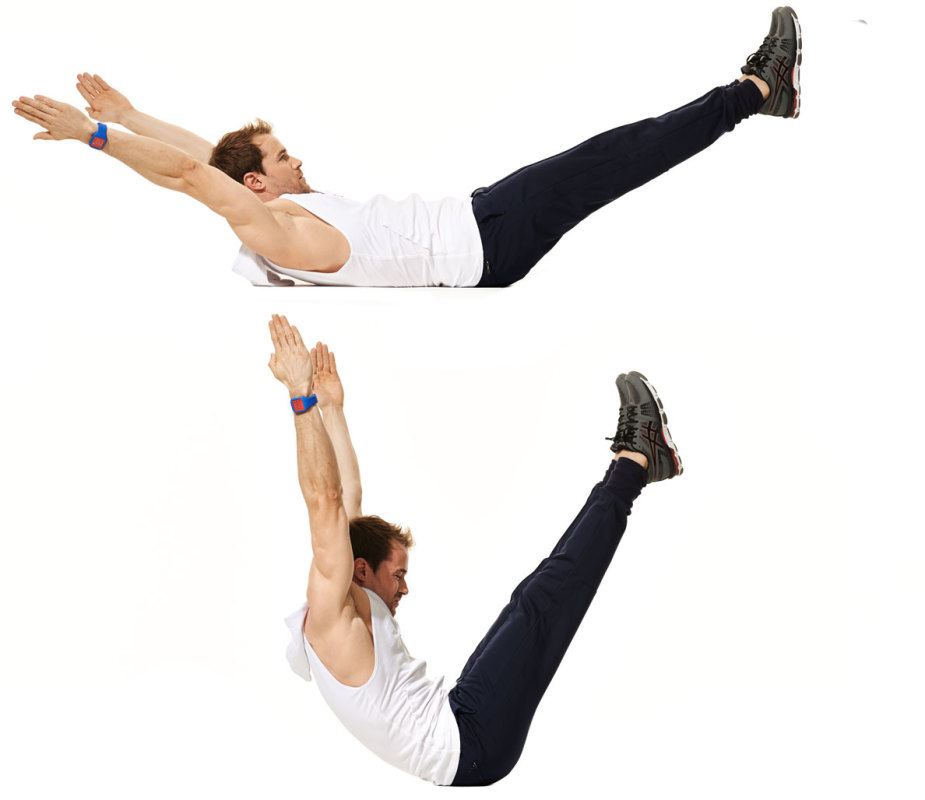
Why It’s Effective
For someone as strong as Lyles, this advanced sit-up might seem easy. To keep it challenging, he says, he’s uncompromising on form: “It has to be that V shape in the middle, and you have to be touching your toes,” he says, in order to get the full benefit.
How to Do It
- Lie on your back with your legs straight and arms overhead.
- Without bending your elbows or knees, contract your abdominal muscles, fold your body up by lifting your legs off the floor and stretch your arms toward your toes. Keep your back straight. As you rise, your body will form a “V” shape, and will then close like a venus fly trap.
- Pause, then return to the starting position. Do four sets of 20 repetitions.
Easier Variation: Deconstructed V-Up
If you’re flailing and throwing your torso up and down, split the move in two: Perform the upper body portion of the V-up, doing a situp with a straight back. Then do the lower body portion, raising your legs from the ground while your upper body is flat on the ground.
4. Star Plank

sergio_kumer/ Getty Images
Why It’s Effective
This move, Lyles says, is probably the most important in his core routine because it engages the core and the glutes at the same time. Running requires front and posterior muscles to work together in balance, and this trains just that.
To help fire up your glutes in this move, try getting into the side plank in a different way: Instead of lifting your hips off the floor laterally, do so from a position where your knees are slightly bent, and your feet are a little closer to your waist than they will be in the full side plank position. As you raise your body up, squeeze your butt to press your hips forward and take the bend out of your knees. As you do this, your feet will slide a bit on the ground into position.
How to Do It
- Get into a classic side plank position: Lie on your left side with your forearm on the floor directly under your left shoulder, with your legs and feet stacked. Have a slight bend in your knees.
- Prop yourself up on your elbow, and squeeze your glutes to straighten your legs as you assume the forearm side plank position so that your body forms a straight line from ear to ankles. To make this harder, perform the move with your left arm straight beneath you, balanced on your hand instead of your forearm.
- Straighten your top arm so that your torso forms a “T” shape.
- Without letting this rigid body line slacken and without bending your knee, raise your top leg (right) up away from your bottom leg. Your arms and legs will form an “X” or star shape.
- Hold this position for 15 seconds, then repeat on the other side. Perform 4 x 15-seconds holds.
Easier Variation: Side Plank
Too hard? Skip the star shape. Stop at step 3, and perform the four 15-second holds on each side.
5. Forearm Plank

Beth Bischoff
Why It’s Effective
Don’t just hang out in a plank, Lyles says. Engage your core by drawing your belly button towards your spine. Feel your lats in your back firing. Squeeze your glutes. And grip the floor with your fingers. This, he says, will turn this “easy” move into a challenge.
How to Do It
- Assume a classic pushup position, but on your forearms: Prop yourself up so that your elbows are directly beneath your shoulders, palms facing down. Form a straight line from your head to heels.
- Engage your core, glutes, legs, and lats, and hold this rigid body line for one minute. Repeat for four total holds of one minute each.
Easier Variation: Plank From Knees
You can also perform planks on your knees. Instead of a rigid line from head to heels, maintain a rigid body line from head to knees.
6. Glute Kickback Machine

Getty Images
Note: This image depicts cable glute kickback, which is an alternative if you don’t have access to a glute kickback machine.
Why It’s Effective
“A lot of people think that this machine is about how far you can throw the weight up using your hamstring, but they’re missing the point,” Lyles says. “Your core should be more turned on than your hamstrings.”
Lyles says to concentrate on doing this move with purpose. “Go at a slower pace, and push the weight up and down with the same intent and same speed. You should feel every muscle working,” he says.
How to Do It
- Stand in the machine with your forearms resting on the pad, your hands on the handles, and one foot behind you against the plate. You should be bent forward at the hips. This is the starting position.
- Brace your core, and feel it engage as you press the weight back by using your glutes, not your hamstrings. Push back slowly.
- Return to the start, maintaining this same pace. Do four rounds of 6 reps on each side.

My prune puree for baby recipe will quickly become one of your little one’s favorites. With a perfect creamy texture and sweet taste, it’s packed with vitamins, minerals, and dietary fiber that help keep baby regular. Plus, with my simple recipe, learning how to prepare prunes for baby is easy!

Ah, prunes. Prunes get such a bad rap – but they’re actually quite delicious! They’re basically just dried plums that look like massive raisins and babies love the flavor.
You can easily make just plain prune baby food, but I found that the addition of some Fuji apples adds another dimension and makes it taste even better. It’s one of my most popular baby food recipes!
🥄 When Can Babies Eat Prunes?
Babies can start eating prunes as soon as they begin solids, typically around 4-6 months of age. I generally recommend my homemade prune puree after your baby has tried about 4 to 5 mild vegetables like carrots, sweet potatoes, green beans, and peas.
This helps your baby get used to less-sweet first foods. Babies are already familiar with sweet tastes from breastmilk and formula, so it’s important to introduce vegetables early to ensure they don’t reject them later on.
When I started solid foods for my kids, around 6 months of age and after they had already had a bunch of veggie purees, I gave them small amounts of this prune baby food to help keep them regular.
👶 Does Prune Baby Food Help With Constipation?
Yes, my apple and prune puree can help your baby when constipated. Prunes are high in fiber and they also contain sorbitol, which helps get things moving by pulling water into the digestive tract. In fact, I like using pureed prunes better than prune juice since it works just as well but won’t typically cause diarrhea the way prune juice might!
I recommend starting with 2-3 tablespoons of prune puree for baby constipation and increasing as needed. It typically takes 12 to 24 hours for the prune baby food to take effect.
My prune baby food recipe is delicious and a great first food all babies love, with no added sugar. It’s also a fantastic mix-in for oatmeal, yogurt, and other veggies for toddlers and older kids.
I’ve found that homemade prune baby food can be healthier than store-bought baby food pouches, as it contains no added sugar, fruit juices, artificial colors, or flavors. Prunes are a great addition to your baby’s diet as they are full of antioxidants and fiber, as well as an excellent source of Vitamin A, Vitamin B6, potassium, and Vitamin K (source).
Plus, all that dietary fiber helps to keep your baby regular. My prune puree is a natural remedy for constipation that works well for the whole family.
And I promise, learning how to make prunes for baby is so easy! My simple baby food recipe is made with just three ingredients and comes together in 30 minutes or less.
But the best part is that it’s fantastic for busy parents. I would often make a big batch of my prune puree for baby to store in the refrigerator or freezer for months – so I always had some homemade baby food on hand when I needed it!
Latest Recipe Video!
🥘 Ingredients
My prune recipe for baby uses simple ingredients easily found at your local grocery store. See the full recipe card at the bottom of the post for the exact amounts and nutritional information.

Organic Prunes: I recommend using dried prunes with no added sugar (you should only see one ingredient on the package – prunes!). You can also use fresh prunes, as a prune is simply a dried plum.
Organic Fuji Apples: Fuji apples, with their sweet flavor and pinkish flesh, pair perfectly with prunes. While you don’t have to include apples in my prune puree recipe, they help mellow out the flavor for babies. It’s important to choose organic apples since they’re on the EWG’s Dirty Dozen list.
Water: Used to cook the fruit and give this apple prune puree a smooth consistency that your baby can easily eat.
🔪 How To Make Prune Baby Food
Anyone can learn how to make prune puree for baby with my simple recipe. Watch my video below to see the step-by-step instructions in action!
Prep The Fruits: To begin, I wash the apples, cut them in half, and remove seeds and stems. Then I cut each half into 4-6 pieces and remove the pits from the prunes. Next, I put the apples, prunes, and water into a large pot, cover with a lid, and turn the burner on high.

Cook: I cook the fruit for 8 minutes until tender, stirring occasionally.

Puree: Once cooked, I pour everything into a blender and puree the fruit until smooth. For babies 4-8 months, a totally smooth puree is the ideal texture. Once your baby gets older (9-12 months) you can make a chunkier puree.

Store Or Serve: After it’s blended, I pour the smooth puree into ice cube trays and allow it to cool. Then I cover or wrap the trays and pop them in the freezer. You can also serve some of the puree to your baby right away.

My #1 Secret Tip for my prunes baby food recipe is to use a really good blender, preferably a high-powered blender like a Vitamix. This is so important to getting that perfectly smooth consistency that your baby will love!
If you’re just using a regular blender or a food processor, you’ll get a slightly grainy consistency which is still fine for your baby to eat, but may not be as easy for them to eat as a super smooth puree.
Other Tips To Keep In Mind:
- Use Pitted Prunes: Save yourself time by using pitted prunes so you don’t have to remove the pits yourself.
- Keep Skins On: I always keep the skins on when making this recipe. If you remove the apple skin, you will lose some of the fiber and nutrients. The skins will blend easily once cooked down – your baby won’t be able to detect them in the puree.
- Blend In Batches: If you’re making a large quantity of prune puree for baby you’ll need to blend it in batches to avoid overloading the blender and ensure a smooth puree.
- Freeze For Later: I highly recommend making a large batch and using baby food freezer containers or ice cube trays to store for later. This will save you time and last you for several months.
📖 Variations
Mash: If your little one is older, instead of pureeing, you can mash the stewed prunes for baby and leave them chunky. They can then feed themselves and chew with their gums. I would do this for my kids once they were about 10-12 months old.
Breast Milk Or Formula: Before serving, stir in some breast milk or formula for added calories and nutrition. Do not add breast milk or formula before freezing or storing in the fridge (as it will spoil) — add it right before serving. When using a formula, I recommend using one of these organic baby formulas, which are a close formulation to breastmilk.
Baby Food Combinations: You can easily make prune puree combinations for baby by mixing it together with some other baby food like pureed banana, peaches, nectarines, or even pear puree.
Add Spices: If your baby is ready for more flavor, try adding a pinch of cinnamon, cardamom, pumpkin pie spice, or nutmeg. My kids loved this puree mixed with cinnamon and nutmeg.
🍽 Serving Suggestions
While I created this recipe for little ones, my baby prune puree is really versatile and doesn’t have to just be for infants!
Baby Led Weaning: There are a lot of great options when deciding how to serve prunes to baby for self-feeding. Spread a thin layer of the puree on toast or soft bread. Another great idea is to mix the puree with mashed vegetables or fruits, creating a nutrient-packed meal that is easy for your baby to pick up and eat.
Toddlers: When my kids were toddlers, I’d mix this into simple oatmeal, yogurt, or other fruit purees. Prune puree can also be added to baked goods like my peanut butter muffins and vegan chocolate chip muffins.
Older Kids & Adults: Use it as a topping for these air fryer pancakes or vegan protein waffles. It’s also a great addition to smoothies like my apple carrot smoothie or banana smoothie bowl.
🧊 Storage Directions
Fridge: Once cool, I transfer the puree to an airtight container and place it in the fridge. It will keep for up to 5 days.
Freezer: For longer storage, I let the baby food cool completely before transferring it to an ice cube tray with a fitted lid and then pop it in the freezer. You can also wrap it in plastic wrap to prevent freezer burn. Once frozen, I pop out the cubes and store them in a freezer bag.
Defrost: When ready, I thaw the cubes in the fridge overnight in a small bowl or warm them gently in the microwave until they reach room temperature, making sure they’re not too hot for my baby.
❓Recipe FAQs
Yes, you do need to cook prunes before feeding them to your baby. Prunes are thick and sticky, and difficult to chew. By cooking the prunes, you make them softer, and easier to mash in their gums. I recommend cooking and pureeing your prunes with water so that your baby can easily swallow them.
When introducing prune puree to a 6-month-old, I recommend starting with 1-2 tablespoons per serving, which is typically enough to help with constipation and provide nutritional benefits. You can gradually increase the amount as your baby gets used to it.
My prune puree for baby is not a choking hazard, but whole or dried prunes can be. Always serve prunes in a pureed form for babies, and ensure they are soft and easy to swallow. For older babies and toddlers, make sure prunes are chopped into small, manageable pieces to avoid choking.

Want to Save This Recipe?
Enter your email & I’ll send it to your inbox. Plus, get great new recipes from me every week!
By submitting this form, you consent to receive emails from The Picky Eater.

Love this baby food recipe? Please leave a 5-star rating 🌟 in the recipe below and/or a review in the comment section further down the page!
You can also FOLLOW ME on FACEBOOK, INSTAGRAM, and PINTEREST to see more delicious, healthy, family-friendly food, and if you have any questions, I’m here to help!
📋 Recipe Card
Prune Puree For Baby
My prune puree for baby recipe will quickly become one of your little one’s favorites. With a perfect creamy texture and sweet taste, it’s packed with vitamins, minerals, and dietary fiber that help keep baby regular. Plus, with my simple recipe, learning how to prepare prunes for baby is easy!
Servings: 16 ounces
Calories: 77kcal
Shop Ingredients on Jupiter- Use baby food freezer containers or ice cube trays to store this baby food. That way you can make one large batch that will last you and your baby for several months!
- Use a good blender, or food processor to easily blend the fruit puree.
- Use pitted prunes to save yourself time from removing the pits yourself.
- If you remove the apple skin you will lose some of the fiber, so keep the skins on! They will blend easily once cooked down.
- Thaw in the fridge the night before use, or thaw by putting the ice cube in a bowl over a bowl of hot water on the counter to defrost.
- Spice up your baby’s food! Add a pinch of cinnamon, nutmeg, or allspice to this recipe!
- 1 ice cube = 1 oz of food
- Adapted from BabyLove
Serving: 1ounce | Calories: 77kcal | Carbohydrates: 21g | Protein: 1g | Fat: 1g | Saturated Fat: 1g | Sodium: 2mg | Potassium: 189mg | Fiber: 3g | Sugar: 14g
Source link


France travel disruption expected to last for days
Lewis Hamilton Inspired by Friend to Make Olympic Attempt, Just Not For Motorsport

Homecoming: An Evolutionary Approach for Healing Depression and Preventing Suicide

Pep Guardiola: Manchester City boss could stay beyond 2024-25 season

Paris Olympics lift off with extravagant opening ceremony

Paris 2024 Olympic opening ceremony kicks off Games in unique style

‘Firenado’ spotted above explosive Park fire near Chico

ISPs are fighting to raise the price of low-income broadband

Groups360 Launches Enterprise Meetings Solution

How to watch, stream the Opening Ceremonies of the Paris Olympics live online free without cable

A Closer Look: Afro-Mexicans 🇲🇽

Black History Facts I had to Learn on My Own pt.6 📜
A Closer Look: Afro-Mexicans 🇲🇽

Major African Tribes taken away during the Atlantic Slave Trade🌍 #slavetrade #africanamericanhistory

Cameroon 🇨🇲 World Cup History (1962-2022) #football #realmadrid #shorts

Black History Inventors: Mary Kenner 🩸

No African pre-Columbus DNA? 🤯🤯 #history #mesoamerica #mexico #african

Origin Of ‘Cameroon’ 🇨🇲😳#africa

Mr Incredible Becoming Canny/Uncanny Mapping (You live in Paraguay 🇵🇾)

FEB 15TH: On This Day In Black History 📚✊🏿🖤 #bhm #shadrachminkins #each1teach1 #education #weoutchea

Evidence of African Nobility all over Medieval Europe.

african presence in mexico part 1

Did Africans Discover America Before Christopher Columbus?

The Black Presence in Renaissance Europe in 4K- Historical Paintings of Africans Brought To Life

Africans Visited the Americas Long Before Columbus | African History

Dr. Ivan Van Sertima – African Presence in Early Asia

African Presence in Early Europe – Dr Ivan Sertima – PART 1

History of Cameroon

Black History (It’s Yours) | Black History Month Rap Anthem | Animated Music Video

History of Africa from the 16th to the 20th Century
-
 African History5 years ago
A Closer Look: Afro-Mexicans 🇲🇽
-
 African History6 months ago
Black History Facts I had to Learn on My Own pt.6 📜
-
African History5 years ago
A Closer Look: Afro-Mexicans 🇲🇽
-
 African History1 year ago
Major African Tribes taken away during the Atlantic Slave Trade🌍 #slavetrade #africanamericanhistory
-
 African History1 year ago
Cameroon 🇨🇲 World Cup History (1962-2022) #football #realmadrid #shorts
-
 African History6 months ago
Black History Inventors: Mary Kenner 🩸
-
 African History1 year ago
No African pre-Columbus DNA? 🤯🤯 #history #mesoamerica #mexico #african
-
 African History1 year ago
Origin Of ‘Cameroon’ 🇨🇲😳#africa