Sleepless nights. Constant feedings. A whirlwind of unpredictable emotions. As a soon-to-be mom, you’re likely feeling it all. Anticipating the fourth trimester (both its sanctuary and sacrifice) is daunting. Rest assured, you’re in good company. I’m a mom of two—who recently emerged from the newborn haze. Speaking from personal experience, the last thing to fret over is cooking nourishing food. Enter this postpartum meal prep guide. These meals will be your lifeline, providing quick and nutritious options when you need them the most. They’ll help make the transition to motherhood a bit smoother, but the clock’s ticking. Before your bundle arrives, set yourself up for success.
Ultimately, now’s the time to lean on your village. And spoiler alert: your family, friends, and community want to help you. You’ll be so grateful you reached out! In turn, you can focus on what truly matters: bonding with your baby and taking care of yourself. This resource covers it all, including postpartum nutrients, how to organize a meal train, and a roundup of meal-preppable recipes.
Edie is the founder of nutrition coaching business, Wellness with Edie. With her background and expertise, she specializes in women’s health, including fertility, hormone balance, and postpartum wellness.
Why Postpartum Meal Prep Matters
After your baby is born, having nutritious, ready-to-eat meals at your fingertips makes a world of a difference. They’ll provide nourishment and energy, save your sanity, and ease the burden of unnecessary house chores. Envision warming up a bowl of hearty soup or digging into a wholesome slice of lasagna. Sound comforting? Ultimately, having meal prepped dishes will provide a sense of stability. (Just what the doctor ordered.)
What to Know About Postpartum Nutrition
As you start brainstorming postpartum meals, don’t underestimate the importance of nutrition. Certain nutrients play a critical (and game-changing!) role in healing and recovery, energy levels, breastmilk production, and emotional well-being.
Of course, adequate calories are also necessary to fuel the demands of motherhood. This means the requirements for all macronutrients—and the large majority of micronutrients—increase during postpartum. You’ll need starchy carbs for slow-digesting energy, protein for satiation and rebuilding tissue, and healthy fats for blood sugar stability. Last but not least, don’t forget digestion. Cooked veggies and probiotic-rich foods are key for a thriving postpartum gut.
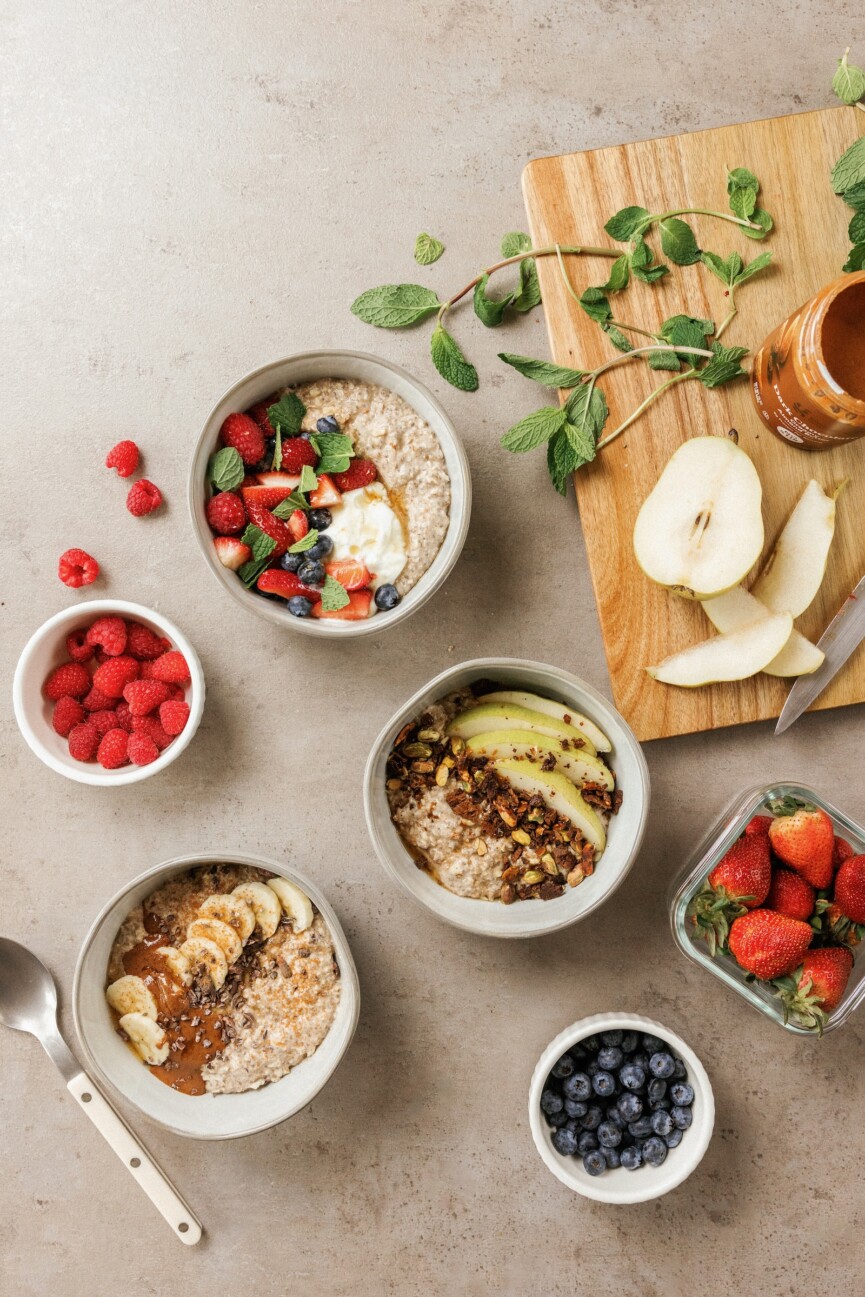
Think: hydrating, easy-to-digest, nutrient-dense meals like soup with rice, a sweet potato with soft-boiled eggs, or steel-cut oats with almond butter and stewed berries. All of the organs in your abdomen are going through a massive shift, and digestion is likely to be compromised. Stock your fridge and pantry with the following ingredients:
Eggs. Packed with choline (to support your mental health and baby’s brain development), pastured eggs are one of the most nutritious and convenient ingredients to have on hand. For plant-forward mamas, opt for non-GMO soy/tofu for a source of choline.
Greens. Asparagus, spinach, kale, and arugula are a versatile source of folate, which supports the production of new cells, aids in tissue repair, and helps prevent anemia.
Avocado. As a postpartum mom, avocados help you—and your baby—absorb fat-soluble vitamins and can benefit your baby’s developing brain. For a quick and satisfying snack, sprinkle half an avocado with nutritional yeast and flake salt. Drizzle with balsamic glaze. Eat with a spoon or seedy crackers.
Berries. Keep bags of organic berries in your freezer to top your granola, oatmeal, or add to smoothies. Their fiber and antioxidants are important for postpartum mamas.
Legumes. Another source of folate, legumes are a nutritious addition to bowls and salads. Keep canned lentils, chickpeas, and black beans in the pantry to bulk up your lunches and dinners.
Bone broth. Rich in minerals and collagen, this superfood aligns with the traditional practice of serving new mothers warm beverages (and soups) to heal her body.
Fermented ingredients. Kimchi, miso, kefir, sauerkraut, and yogurt aid in digestion, nourish breast milk, and help rebuild the microbiome.
Nut butter. Monounsaturated fats, the majority of fat found in nuts, help combat emotional fluctuations by steadying blood sugar. Snack on a handful of walnuts or add nut butter to toast, smoothies, and oatmeal.
Seeds. Chia, flax, and hemp seeds are easy (and nutrient-dense) additions to smoothies, oatmeal, and avocado toast. They’re rich in omega-3 fatty acids for hormone balance and brain health.
Coconut. Another healthy fat to incorporate, it’s known to nourish breast milk.
Sardines. These are packed with a variety of nutrients that new mothers need—DHA, calcium, and vitamin D3. They’re also one of the richest sources of choline! Available tinned, keep them in your pantry for an easy addition to savory meals.
Root veggies. These comfort foods (beets, acorn squash, butternut squash, etc.) are easy to roast and pair well with any protein. Plus, they keep well in the fridge. Pair them with a healthy fat to help keep blood sugar stable—like tahini or avocado—and increase the absorption of nutrients like beta-carotene.
Grass-fed liver. Liver is rich in vitamin A, which helps replete blood loss after birth. If eating liver makes you squeamish, you can opt for a grass-fed liver supplement (or add liver to your food processor along with ground beef to make these meatballs!).
Greek yogurt. If you tolerate lactose, organic/pasture-raised Greek yogurt is a convenient source of protein and probiotics. Cottage cheese is another dairy source worth stocking up on!
Benefits of Meal Prepping Before Your Baby Arrives
You’ll be so relieved you carved out the time! This is why:
Better Planning
Newborn care. Newborns require a lot of attention, and while their needs are simple, they’re often unpredictable. Having meals prepped means you spend less time cooking and more time attending to your baby.
Sleep deprivation. Prepped food eases the burden of having to cook when you’re exhausted.
Optimal Nutrition
Balanced diet. Prepping meals in advance is the best way to maintain a balanced diet, which is crucial for recovery post-delivery and—if breastfeeding—for milk production.
Healthy choices. Rather than reach for ultra-processed foods when you’re hangry, you’ll have healthier choices to nosh on (for better satiation and stable energy).
Stress Reduction
Ease and convenience. This goes without saying, but knowing your meals are taken care of reduces daily stress.
Lessens decision fatigue. With meals/snacks already prepped, you eliminate the need to make extra decisions.
Economic Benefits
Cost savings. If you have the fridge/freezer space, preparing meals in bulk is more economical than buying one-off ingredients or ordering frequent takeout.
Waste reduction. Preplanned meals help in minimizing food waste as you buy and use exactly what you need.
Flexibility
Adaptability. Prepped meals—particularly those that are pre-portioned— provide flexibility at meal times and reduce the pressure to cook fresh meals daily.
Quick meals. Having ready-to-eat/easy-to-prepare meals are lifesavers during unexpected busy or challenging days.
The Best Types of Postpartum Foods to Freeze
Based on your food preferences and dietary preferences, consider the following foods to make ahead and freeze!
Soups and stews
Casseroles
Curries and chili
Lentil curry. Full of spices and plant protein, this coconut curry is delicious with rice or naan.
Vegetarian chili. Beans and veggies provide fiber and protein in this vegetarian chili. (It’s a house fave!)
Baked goods
Grain Bowls
Quinoa or rice bowls. Follow this guide for making your own SweetGreen at home.
Pre-portioned smoothie ingredients. Freeze bags with fruits, veggies, and nuts/seeds for quick, nutritious smoothies.
Tips for Freezing Your Postpartum Meals
Now that you have your meals made and prepped, here are a few tips you can follow to ensure they keep well and are ready in a pinch. Work smarter, not harder.
Label and date each container before freezing. Ideally, with the name of the dish and the date it was frozen, as most need to be consumed within three months of freezing.
Pack properly. Use airtight containers or freezer bags to prevent freezer burn.
Make reheating a breeze. Freezing meals in individual or family-sized portions ensures you have exactly as much as you need, whenever you need it.
Include instructions. Write out how to reheat each meal on a label attached to each container.
What is a meal train?
A meal train is an organized initiative that brings your village together. Family, friends, colleagues, and members of your community band together to support you with meals during a joyous life event (a new baby!) or an extremely challenging loss. This thoughtful gesture is two-fold: it provides much-needed nutritional support and delivers a powerful message of love and support.
Ultimately, a meal train shows how small acts of kindness can make a significant impact during life’s most profound—and transitional—moments. As a postpartum mama, a meal train is worth gold.
How to Set Up a Meal Train
It’s easy! First, decide what process you want to use to communicate to your village. This is also how you’ll compile signups. A basic Google Sheet does the job, or you can use a platform like Meal Train or Take Them A Meal. These are helpful for providing a schedule and avoiding duplicates.
Ask one person to be the “leader”—they’ll make sure your meal train runs smoothly. Next, share the meal train link via email (or social media). In your message, thank your community for their generosity and support. Emphasize how their nourishing meals will help you focus on rest, recovery, and your newborn. Gently encourage your friends and family to participate! Last but not least (and this goes without saying), make your meal/snack preferences very clear. That way, you aren’t receiving food you don’t want.
Meal Train Tips
Beyond listing specific postpartum meal prep meals, make sure to include things like:
Allergies, intolerances, or dietary preferences (i.e., No dairy, please!)
Ideal drop-off windows and where to leave the food (i.e., Leave on the front porch, but text before you come—hopefully it’s a good time for you to meet our newest bundle!)
Restaurants you love and what you typically order (for those who feel more comfortable getting you takeout)
Your leader’s contact info
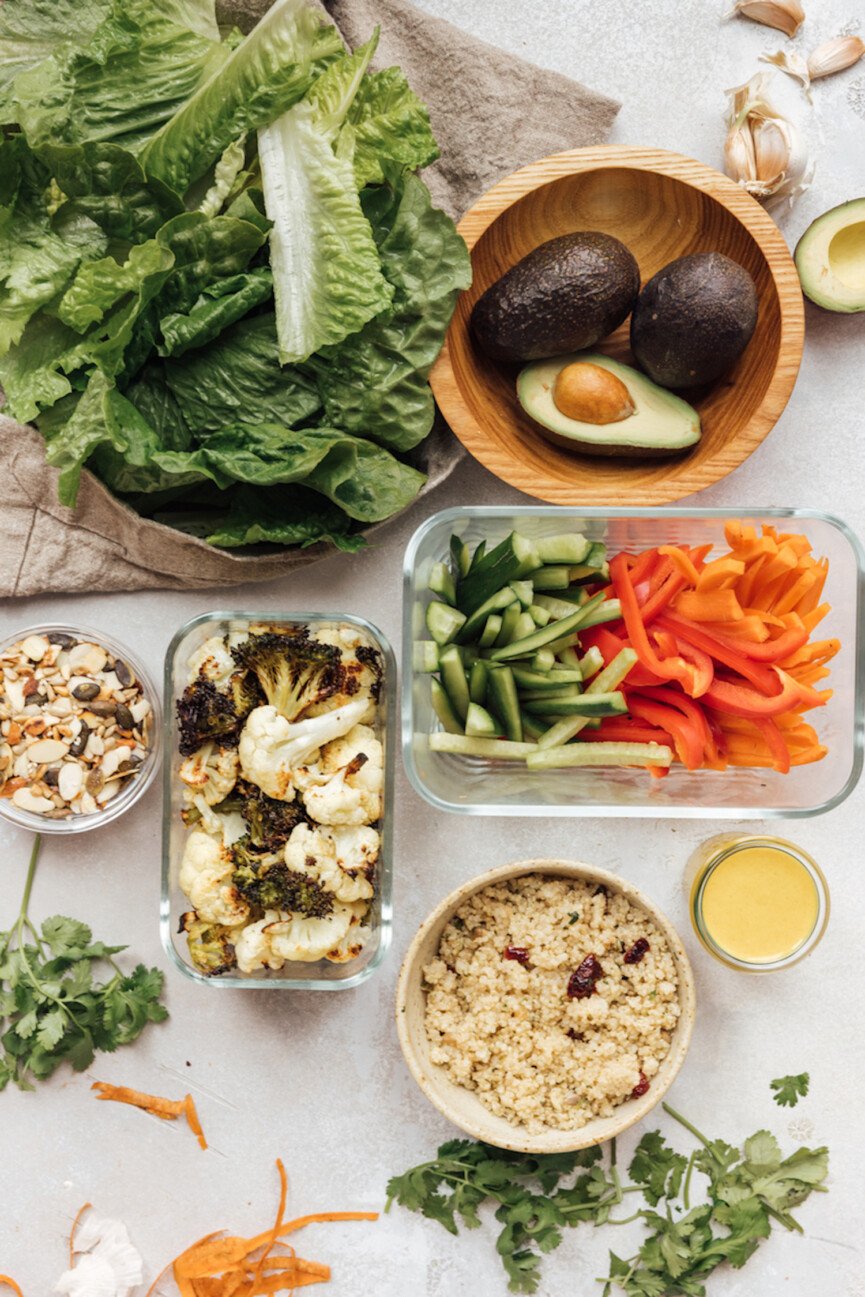
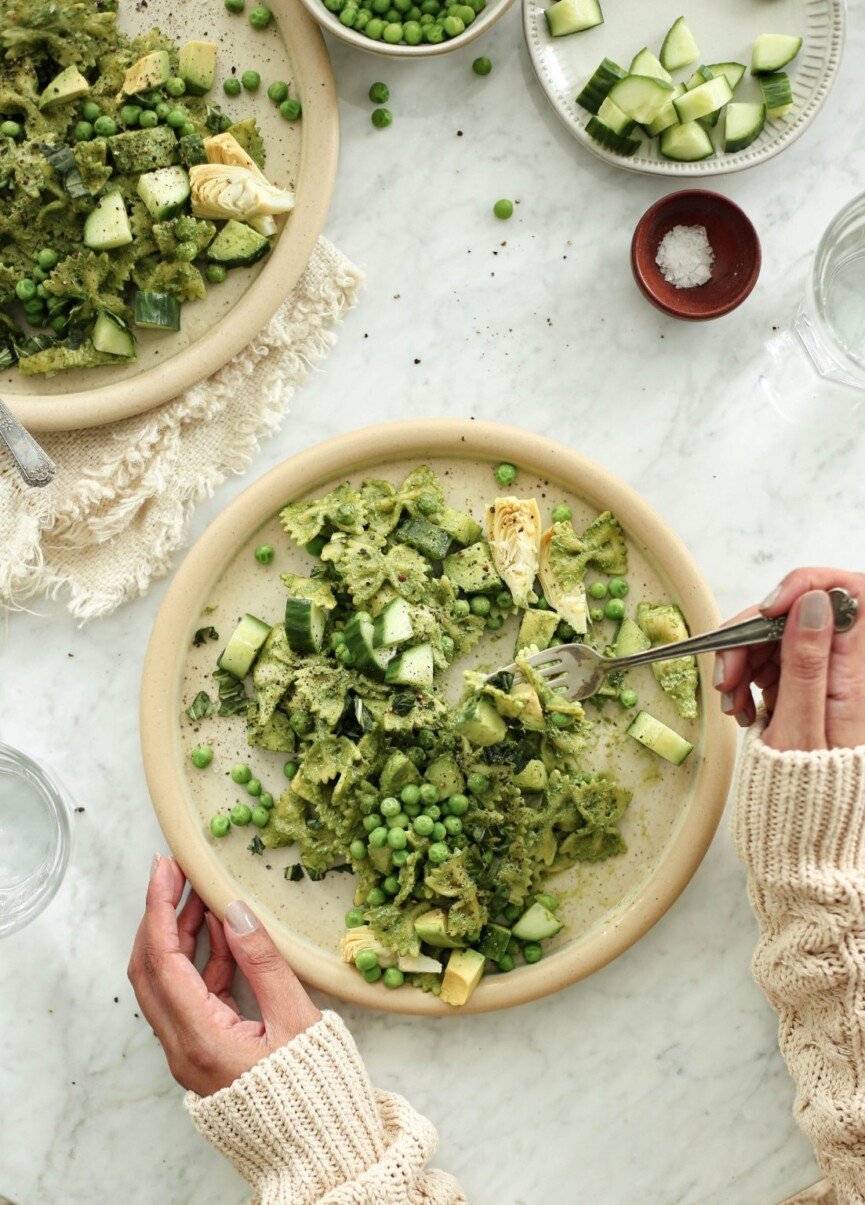
6 Postpartum Meal Prep Ideas
To bring this full circle: as a soon-to-be mama, don’t underestimate the energy and strength you’ll need during the early postpartum weeks! Ideally, extended family and friends will bring you food, but you can also prepare healthy, pre-cooked freezer meals and snacks before your little one arrives. These are some of our faves.
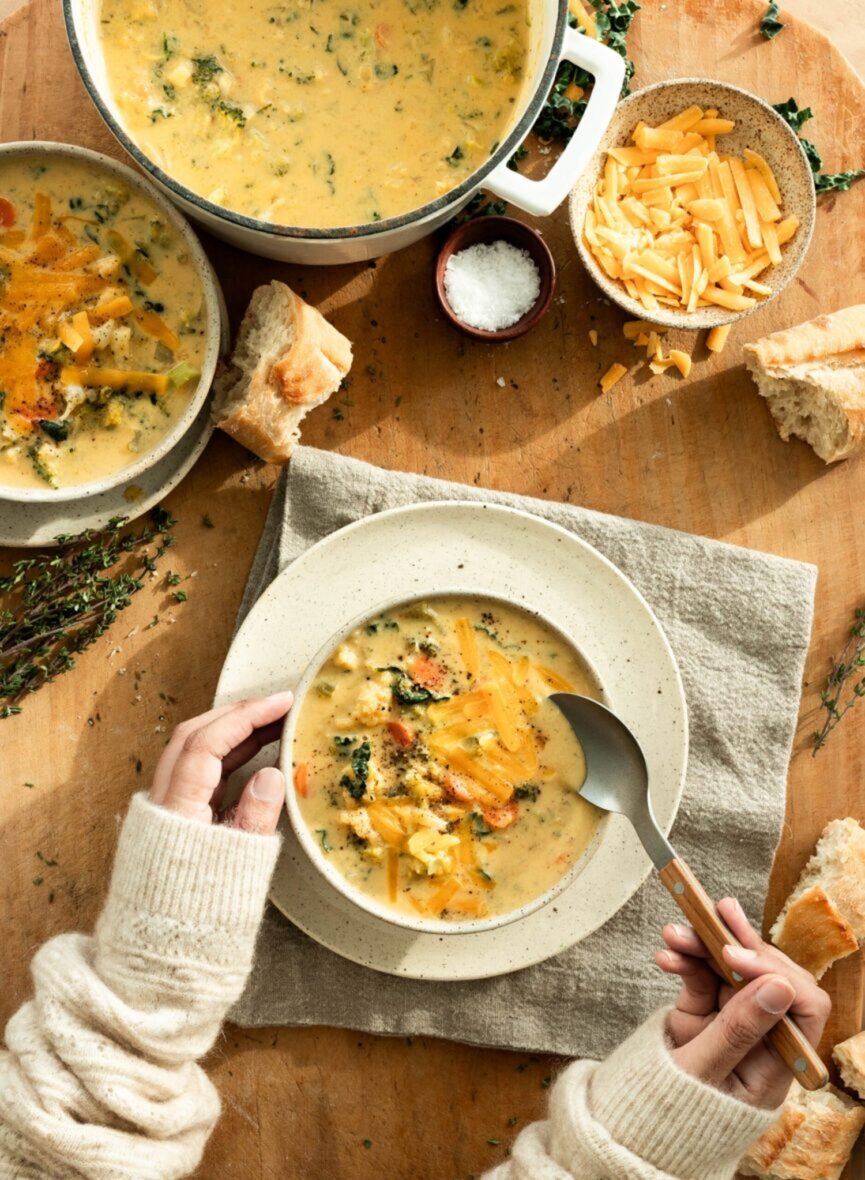
This soup is hearty, satisfying, and packed with anti-inflammatory ingredients. Make a batch of this nourishing recipe for (multiple) healing lunches or dinners.
Keep these in your freezer and pop one or two into the microwave for a wholesome yet decadent boost of energy. Pair a muffin with a cup of Greek yogurt for a satisfying breastfeeding snack.
You heard it here first: outsource this healthy chicken tikka masala recipe to a friend, and voilà, you’ll think twice about ordering takeout. Keep a bag of microwavable rice in the freezer—or better yet, naan!—and dinner is served.
Prep these meatballs in advance, pop them in the freezer, and eat them reheated on a bed of pasta, quinoa, or couscous. With cannelini beans as the base, you’re getting a substantial amount of fiber and protein in these flavorful, versatile meatballs.
This soup packs a major nutritional punch. Plus, it’s a convenient way to pack an inordinate amount of green veggies into one very wholesome meal. Have it with a slice of toasted sourdough (or a simple grilled cheese) for a plant-forward lunch.
You’ll want to eat this grain-free granola by the handful. For added staying power, enjoy over a bowl of yogurt and top your granola with berries for fiber and antioxidants. It’s a quick breakfast—or hearty snack—when breastfeeding hunger strikes.
We may receive a portion of sales if you purchase a product through a link in this article.
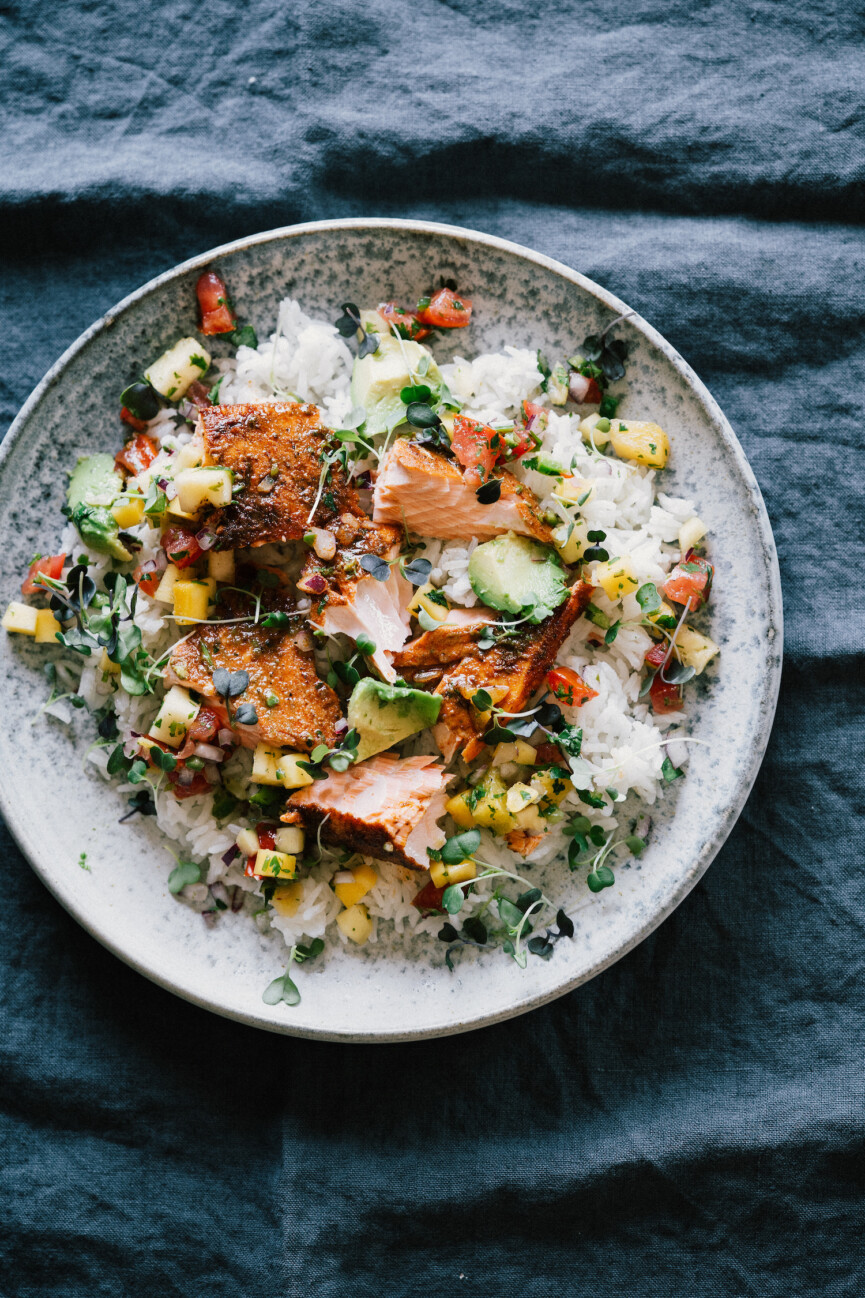
At Camille Styles, our love of delicious, nourishing food runs deep. In-person and on Slack, our conversations inevitably gravitate to what we’re currently cooking in our kitchens across the country. From our best taco recipes to soups when the cozy season calls for it to our enduring passion for sweet potatoes—food is endless fodder for conversation. And the dish that’s in constant rotation in my kitchen right now? Sara Forte’s blackened salmon recipe with tropical pico from her new cookbook, Around Our Table: Wholesome Recipes to Feed Your Family and Friends.
As the creator behind the healthy cooking site Sprouted Kitchen, Sara is an expert at making fresh, delicious dishes accessible to an ever-expanding audience. Her recipes pair creativity with honesty—acknowledging that as much as we’d wish otherwise, our time in the kitchen is limited. Sara understands food as a core tenet of the larger pursuit of wellness. And though that translates to nutrition, nourishment also takes into account what’s possible with the resources we have.
What’s more, food is also a means of connection. It’s the foundation for intimate moments spent in the company of family and friends. Sara’s latest cookbook, Around Our Table, creates space for this comprehensive understanding of food. It’s the sort of cookbook that evolves alongside of you. Instead of being steeped in shifting food trends, it serves as a guide for how food can support your life—no matter the season.
We sat down with Sara to talk about the intention behind her latest release. As she reflects, Sara’s passion for incorporating food into a full life is evident. Her recipes are on-the-fly friendly, bringing color and creativity to the table while keeping things simple and streamlined.
Blackened Salmon With Tropical Pico
“This is your salmon for a crowd,” Sara writes in her cookbook. Whereas other salmon recipes forgo flavor for simplicity, Sara leans on fresh, heavy-hitting ingredients to streamline the prep and deliver a delicious meal, every time.
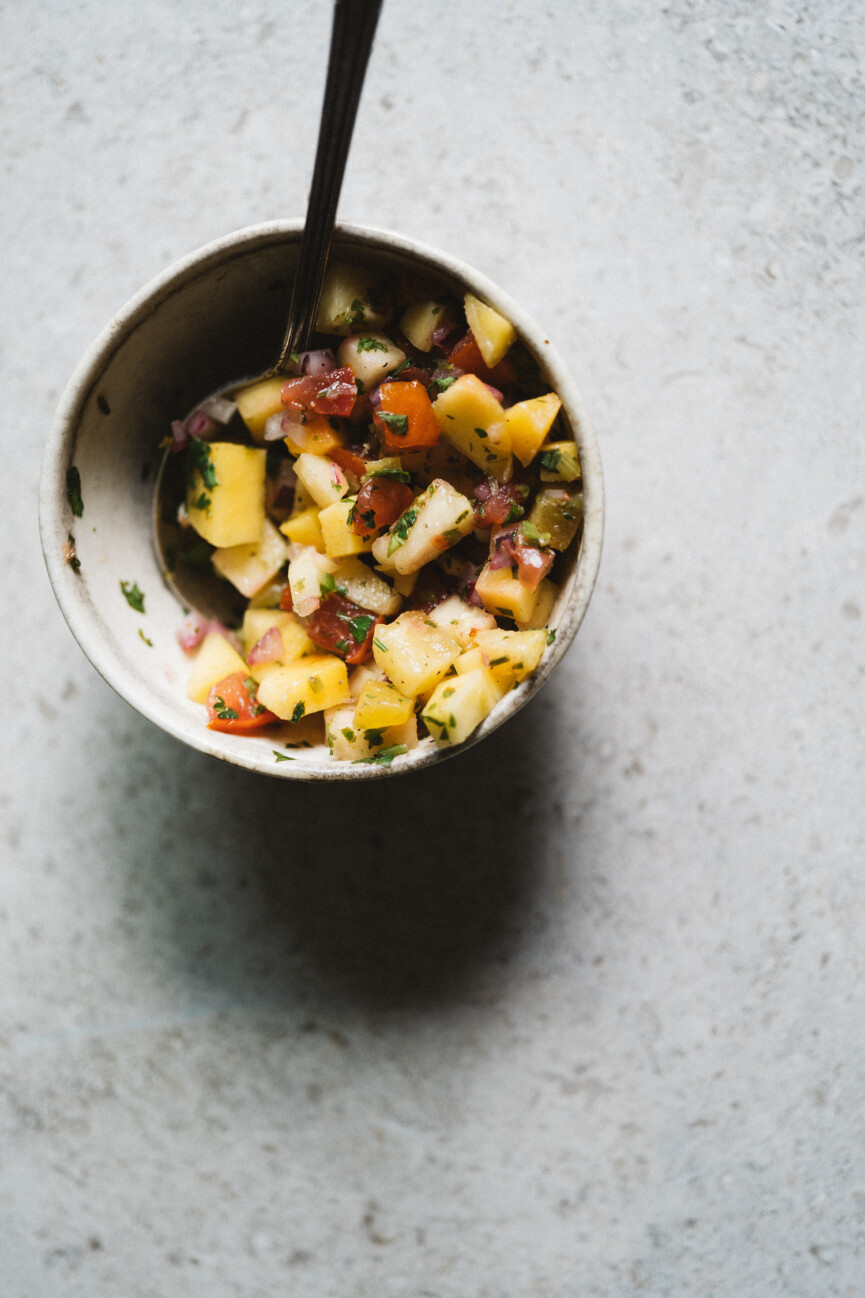
We also love that this salmon—and its accompanying pico—can be served in endless ways. Sara tops fish tacos with the pico or adds a little heft to the salsa with avocado for a standout, standalone appetizer. (With crunchy, salty chips, of course.)
Serving tips for your salmon abound. She enjoys it best “[…] generously seasoned and served with some punchy pineapple pico and avocado.” (I.e., the exact recipe you’re getting below.) “I serve it with coconut rice, but it could just as easily be wrapped into a burrito or even served over greens. This dish makes for excellent lunch leftovers, so don’t overthink the suggested serving number.”
And contrary to popular belief, salmon isn’t a year-round dish. Sara notes that you’ll find the freshest fish between May and September. And while frozen fillets work in a pinch, she advises staying away from “thin, flimsy tail-end pieces.”
With those expert tips in mind, read on for Sara’s blackened salmon recipe with tropical pico. And be sure to pick up Around Our Table for more recipes to keep in your everyday arsenal.
Excerpted with permission from Around Our Table by Sara Forte published by Hardie Grant Publishing, April 2024, RRP $40.00 Hardcover.
A crowd-pleasing dish you can make in a pinch, this Blackened Salmon With Tropical Pico is the standout recipe of the summer.
For the Tropical Pico:
2 cups / 330 g chopped fresh pineapple
1 ripe mango, diced small
1 Roma tomato, seeded and chopped
1 bundle cilantro, chopped
1/4 of a red onion, minced
1 serrano, seeded to taste and minced
1 lime, zest and juice
1/2 teaspoon sea salt
A few grinds of freshly ground pepper
Pinch of sugar
For the Salmon:
2 tablespoons olive oil + more for the pan
2pounds / 900g center-cut slab of salmon
For the Blackened Seasoning:
1 teaspoon paprika
1 teaspoon onion powder
1 teaspoon garlic powder
1/2 teaspoon dried thyme
1/2 teaspoon dried oregano
Pinch of cayenne pepper
1 teaspoon sea salt
1 tablespoon light brown sugar
1 teaspoon finely ground coffee
1/2 teaspoon freshly ground pepper
For the Coconut Rice:
1 cup / 200 g short-grain white rice, well rinsed
1cup / 240ml water
1cup / 240ml coconut milk
Pinch of sugar
Zest of 1 lime
Sea Salt
2 large avocados, cubed
Fresh cilantro and microgreens
For the Tropical Pico:
Put all the ingredients in a bowl and mix to combine. Keep covered in the fridge until ready to use.
For the Blackened Salmon:
Preheat the oven to 300°F / 150°C. Line a rimmed baking sheet with parchment paper. Spray or rub it with oil. Dry the salmon with a paper towel and place it on the oiled parchment sheet.
Mix all the blackened seasoning ingredients together. Mix in the oil and gently rub it all over the flesh of the salmon.
Start the rice. Combine the rinsed rice, water, coconut milk, sugar, lime zest, and salt together. Stir to mix. Bring the rice to a boil, then down to a simmer. Cover and cook for 18 to 20 minutes until cooked and tender. Set aside.
While the rice cooks, roast the salmon. Bake for 15 minutes, then turn the heat up to broil and cook another few minutes until the top starts to char. Timing will vary by oven, but assume somewhere in the 2-minute ballpark. The salmon should be cooked to about medium in that time; add 5 minutes to that first bake if you prefer it well done. Remove to rest.
Serve the slab of salmon over the rice on a platter, flaking it apart with a fork, with the avocado and pico over the top. Garnish with cilantro and microgreens.
We may receive a portion of sales if you purchase a product through a link in this article.
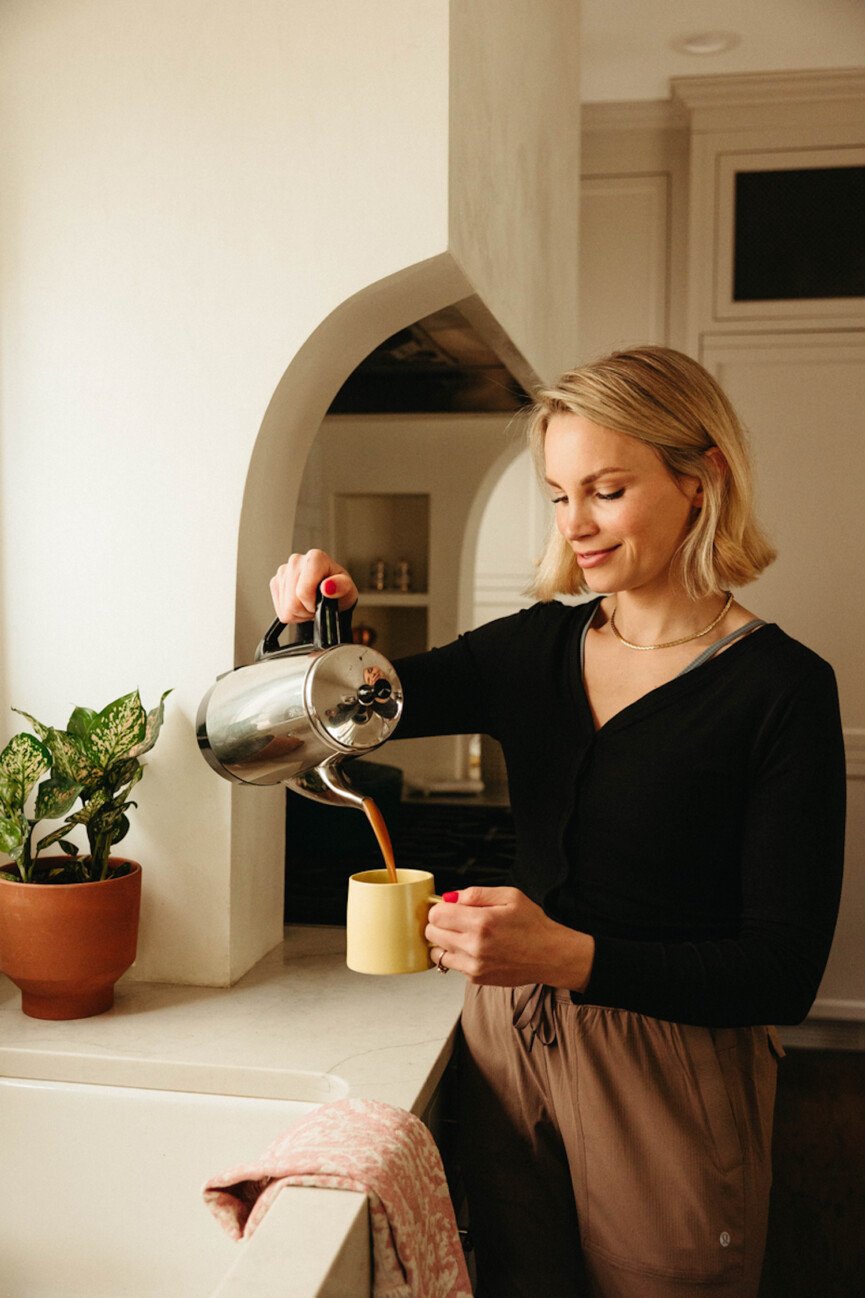
There was a time in my life when I didn’t understand the hype behind an electric kettle. Even in the colder months, Austin’s weather often has me opting for a green smoothie in lieu of a latte or tea. But in the spirit of leveling up all areas of my life and romanticizing even the most mundane moments, warm bevvies—and their inherent coziness—are now a staple in my routine. So of course, this change of heart prompted me to seek out the best of the best electric kettle. Spoiler alert: I’ve been changed for the better.
Like any kitchen appliance, there are a few factors to consider when deciding on the best electric kettle. You’ll need to evaluate what you’ll be using your kettle for, how often, and how much water you’re looking to heat up. (Do you keep to one pour-over or are you a full pot kind of person? Be honest.)
If the hunt seems a bit overwhelming—never fear. We’ve rounded up the best electric kettles for all your warm and cozy needs.
The Best Electric Kettles to Level up Your Morning Routine
This comprehensive list has an electric kettle for just about everyone. From affordable options to luxury splurges, these kettles will make brewing the perfect bev a breeze. With stunning colors, innovative elements, and easy-to-use specs, you’re sure to find your fave.
Our Top Picks:
Best Electric Kettle Overall: Fellow Corvo EKG Electric Kettle – $165 at Fellow
Best Basic Electric Kettle: Breville 57oz Soft Top Pure Stainless Steel Electric Kettle – $89.95 at Target
Best Budget Electric Kettle: Bodum 34oz Electric Bistro Gooseneck Water Kettle – $59.99 at Target
Best Gooseneck Electric Kettle: Stagg EKG Electric Kettle – $195 at Fellow
Best Aesthetic Electric Kettle: Alessi Plissé White Electric Kettle – $109 at Care & Barrel
This is THE electric kettle. Whether you opt for the classic matte black or one of the Wooden Accent models, the Corvo EKG Kettle will be a staple in your morning/evening routine. The kettle keeps heat time to a minimum while still providing exact temperature control. We also love that it isn’t excessively heavy—making pouring your water less of a hassle.
If you’re looking for a fairly simple electric kettle to add to your kitchen, this stainless steel kettle from Breville is your best bet. The soft opening lid prevents any hot water spills or splashes and helps to stagger the steam release. Its 360-degree base has concealed storage for the kettle’s cord and a removable scale filter.
Pros:
Soft top lid gently releases steam and prevents potentially hazardous hot water splashes
This slim and stunning appliance is one of the best electric kettles for those looking for a less pricey option. The temperature-controlled gooseneck kettle makes it the perfect addition for all your hot coffee and tea needs while enhancing your aesthetic space. Our Managing Editor, Isabelle has had this kettle for over two years and her love is still going strong. The sleek design is perfect for a small kitchen with limited counter space, and her only qualm is the limited temperature control options.
If you’re looking to splurge on any of these kettles, let it be this one. The Stagg kettle features a slim gooseneck spout for perfecting your pour-overs. Additionally, this kettle comes with exact temperature control and a speedy heat time.
This electric kettle is the perfect pick for the design-oriented. While it leans on the more expensive side, its aesthetic value is worth every penny. Not only is this electric kettle an appliance that you’ll use on the daily, but it’s also one that can be left on display in your kitchen for all to take in its beauty.
Pros:
Comes in black or white
Artful and aesthetic design
Quick boil time
Cordless
Cons:
Made entirely from thermoplastic resin
Lighter and less sturdy compared to models made from heavier materials
Convenience meets functionality with this electric kettle from Target’s Hearth & Hand line. For a reasonably priced kettle, this pick has plenty of power at 1500 watts and room to spare with a capacity of 1.7 liters. The 360-degree base connector acts as a cordless power base that takes up minimal room in any kitchen.
With this kettle from Zwilling, you won’t have to worry about spills when pouring your hot beverage. The outside remains cool to the touch while the double-walled body keeps your drink perfectly hot. This kettle comes in a stunning matte black or stainless steel and holds 51 ounces.
If you’re after an option that doubles as a countertop centerpiece, this pick from Fellow takes the cake. The kettle features a drip-free pour spout, a heat-resistant handle, and a 1.5-liter capacity and comes in green and black.
Sleek and streamlined, this kettle is the pick for the minimalists among us. Its pared-back exterior aligns with any style and the modern features ensure a perfect cuppa. With a smooth stainless steel body and LED features, it’s the elevated version of the traditional tea kettle we all know and love.
How to Pick an Electric Kettle
There are a couple of important elements to consider when selecting the best electric kettle. As one beverage drinker’s needs may be different than another’s, we’ve laid out the top three things you should consider before making your purchase.
Kettle Capacity
How much water are you planning on heating up? Do you drink several cups of coffee or tea? Capacity is one of the most important factors to take into consideration when choosing your perfect electric kettle. You may want to stick to a capacity of around 1.5-1.7L or more if you’re brewing for 2+ people, whereas you can most likely get by with a capacity of one liter or less if you’re aiming for 1-2 cups of your drink of choice.
Temperature Control and Boiling Speed
If you’re seeking out a kettle that can reach an exact temperature, you may need to opt for a more expensive model. But if you’re simply looking for a kettle that can keep water hot, then you may be able to find a more generic electric kettle.
Additionally, the speed at which water can heat up is a factor to consider in your selection process. If you find yourself short on time (or simply a lack of patience) when brewing your bev, look for a quick-heating electric kettle as opposed to one with a more lengthy heat time.
Selecting Your Spout
How fast or slow your water pours from the electric kettle depends on the spout size and length. If you’re looking for a slower and more precise pour, typically a long, tapered or gooseneck spout is the best option. This can also prevent spills and splashes of hot water that escape from your kettle. If you’d rather have a larger and faster pour, select a spout with a wide and short opening.
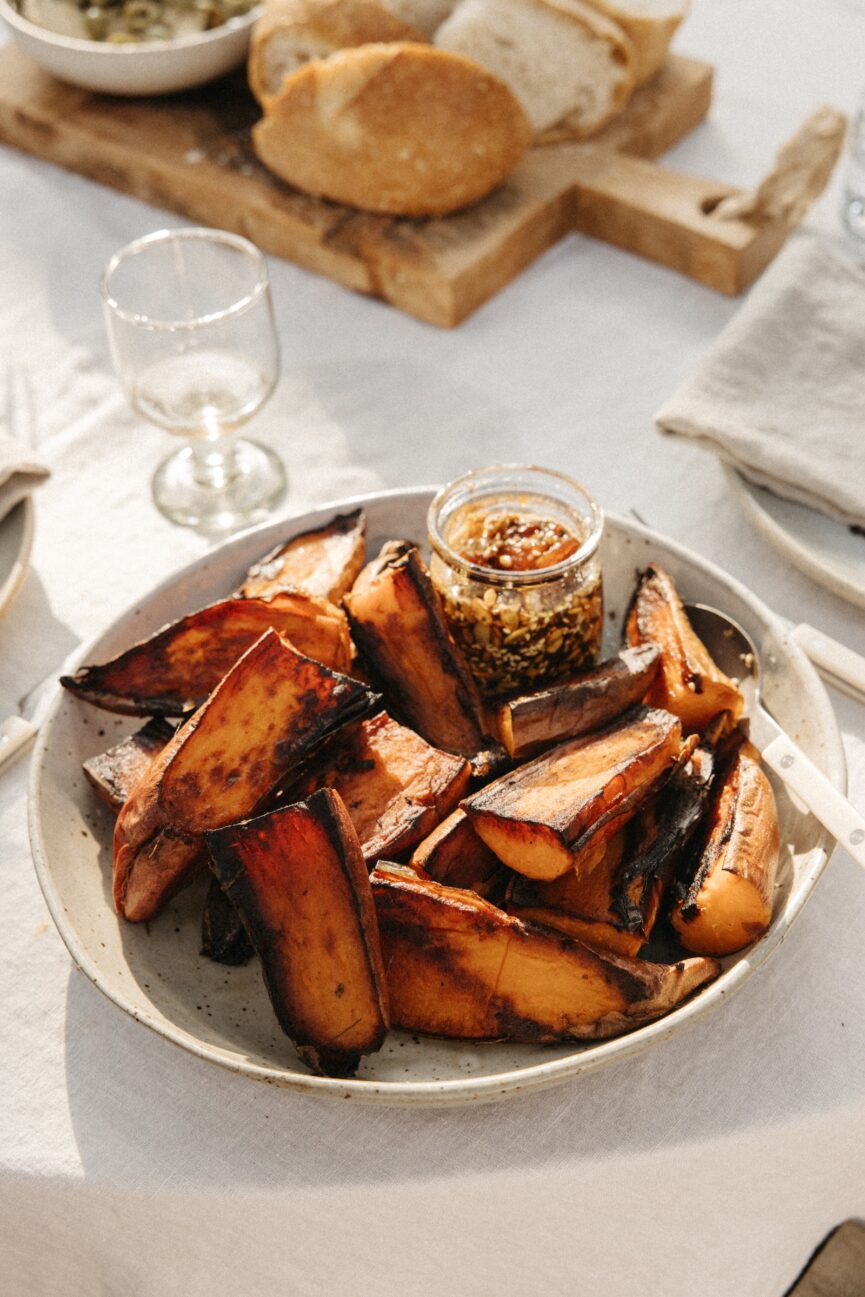
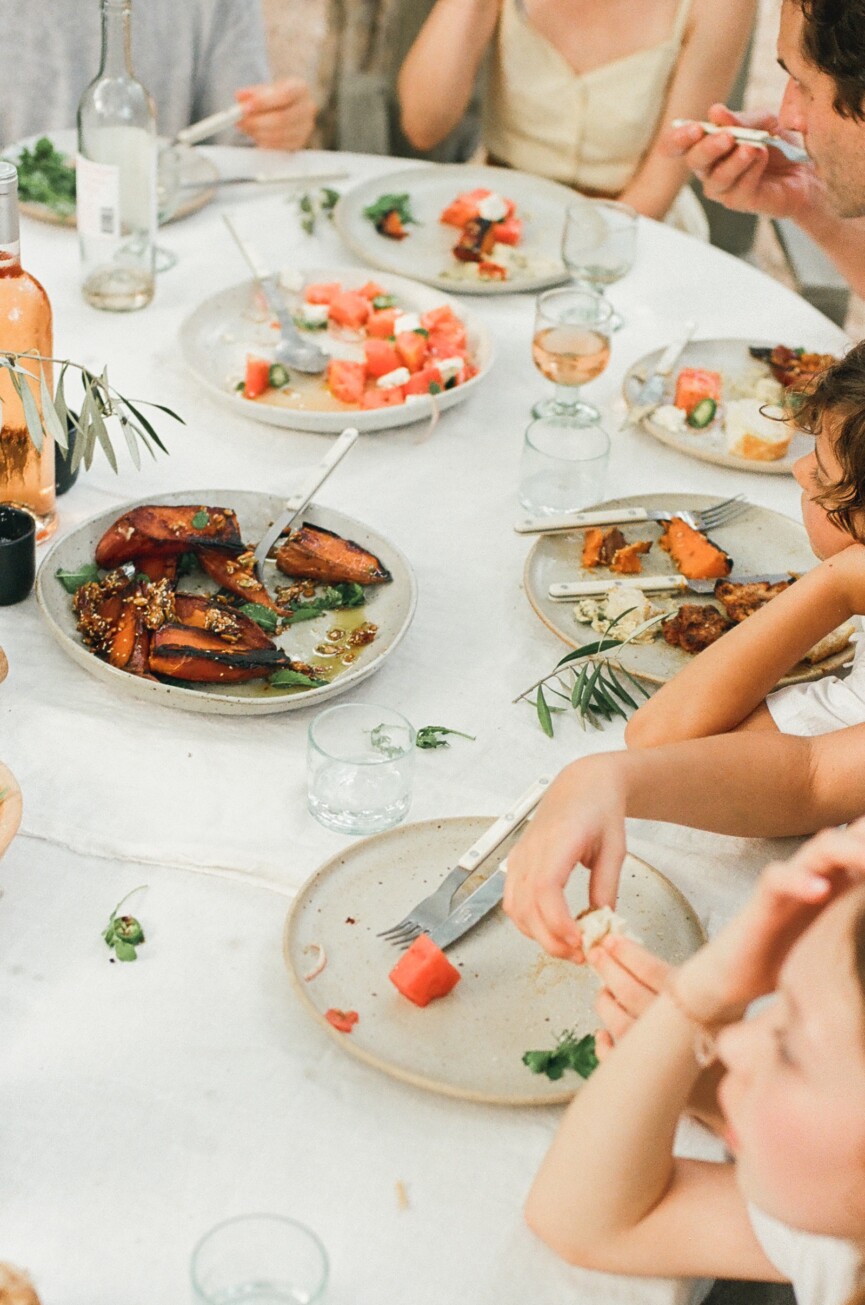
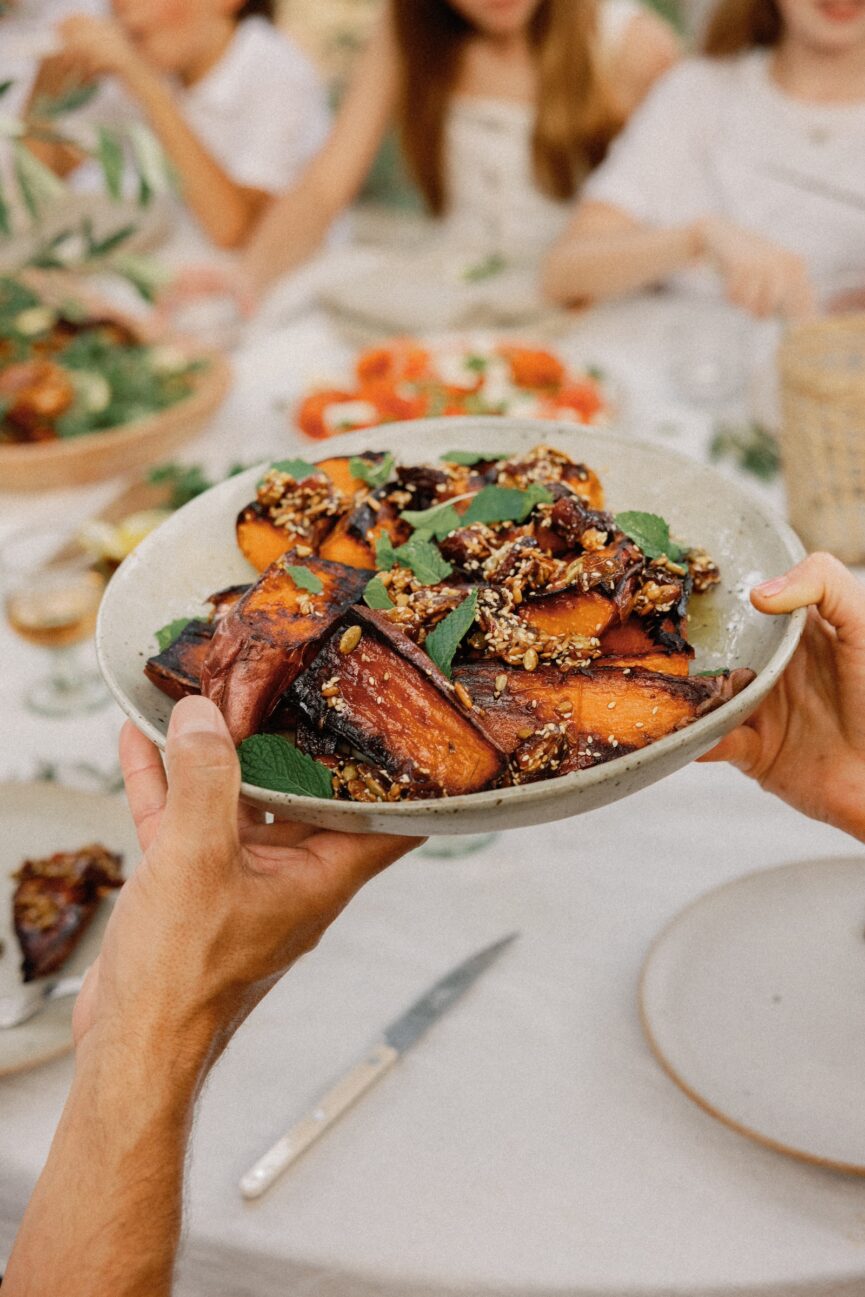
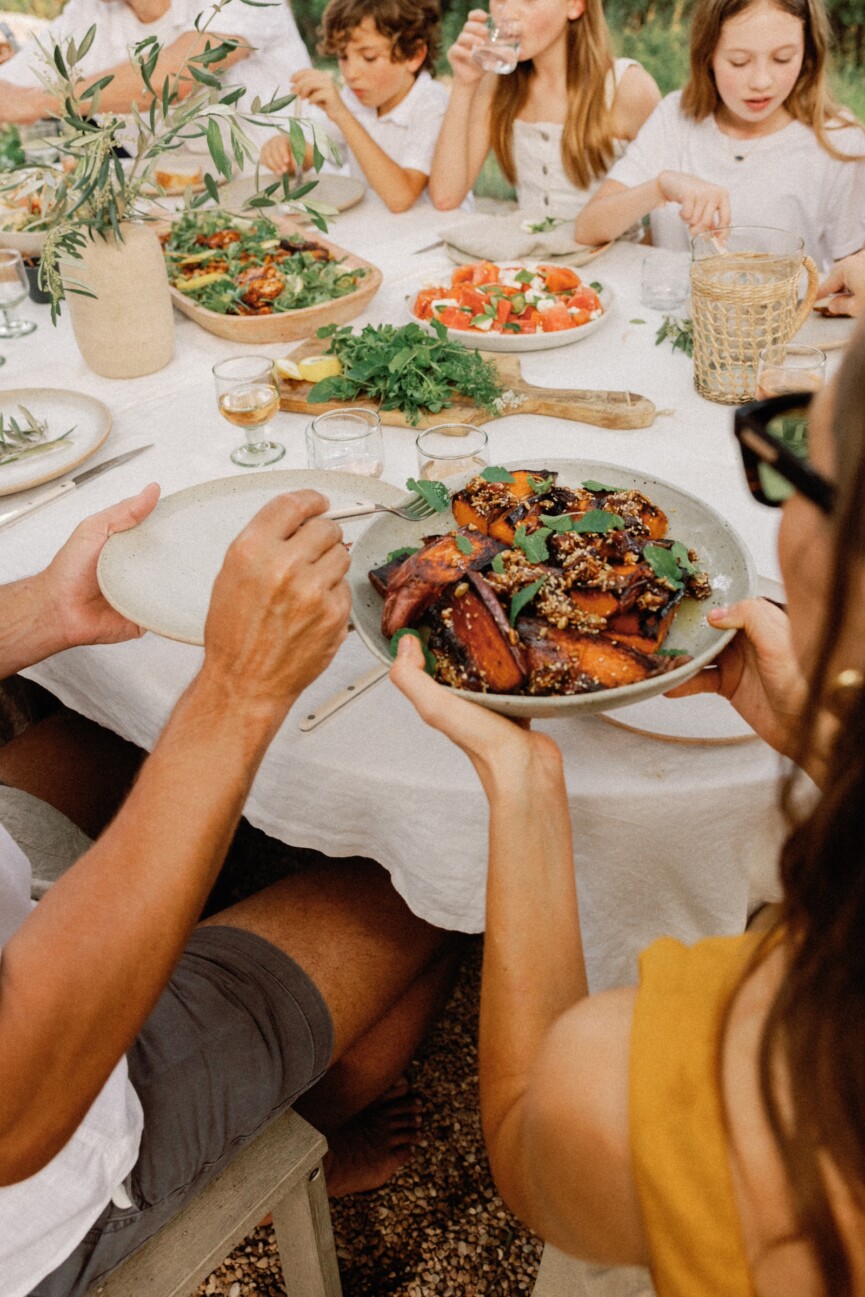
If I had to choose only one food to eat for the rest of my life, it would probably be sweet potatoes. So when I say that these charred sweet potatoes with dates are my new favorite way to eat them, you know it’s a statement I don’t take lightly.
This dish is a flavor adventure that speaks to all the senses. Sweet potatoes slowly roasted to release their natural candy-like sweetness, then quickly charred for those crispy edges. A luxurious date-studded brown butter drizzled over the top. Crunchy seeds and peppery arugula to wake it all up and make you go in for another bite. Yes, these are that good.
Read on for how these charred sweet potatoes with dates come together. Warning: you may never make sweet potatoes any other way.
The Ultimate Healthy Summer Side
This dish not only offers a satisfying mix of textures and flavors but is also packed with vitamins, minerals, and fiber—it’s a recipe that will leave you feeling so nourished and energized.
Sweet potatoes are a great source of vitamins A and C, fiber, and antioxidants. The seeds add a boost of healthy fats and protein, while dates bring a natural sweetness along with essential minerals like potassium and magnesium.
Ingredients You’ll Need
Gather a handful of simple ingredients to make this dish:
sweet potatoes
olive oil
seeds (I like a mix of sunflower, pumpkin, and sesame seeds)
butter
dates
honey
Aleppo pepper
arugula
cilantro
How to Make Charred Sweet Potatoes With Dates and Arugula
Roast the sweet potatoes. You’ll roast them on a baking sheet with a little water and sealed with foil. This helps evenly roast and lightly “steam” the potatoes to get them extra tender.
Prepare the topping. This seedy sweet brown butter is where it’s at. You’re going to melt some butter over the stove, add your seeds, and lightly brown them. Then you add your dates, olive oil, honey, salt, and Aleppo pepper. HEAVEN.
Char the sweet potatoes. This is what takes these over the top. Warm some olive oil in a cast-iron pan, then cut the potatoes open and sear them cut-side down in the skillet to get those crispy bits.
Put it together. Top your charred sweet potatoes with the seed mixture, some fresh arugula and cilantro leaves, and a sprinkle of flaky salt.
Tips for Success
The perfect potato. Opt for medium-sized sweet potatoes that will cook evenly. And feel free to experiment with any type of sweet potato! Classic orange potatoes or yams are naturally sweet and not too heavy, whereas Japanese sweet potatoes are a bit more dense and starchy (also delish). And for something that feels really elevated, opt for purple sweet potatoes. The vibrant, colorful presentation is stunning.
Ideal substitutions. If you can’t find Aleppo pepper, red pepper flakes work just as well but use a bit less to manage the heat. Feel free to sub any type of seed, or even slivered almonds, in place of the pumpkin, sunflower, and sesame seeds I used here.
How to serve. This dish pairs wonderfully with grilled or roasted meats like this yogurt-marinated chicken. It can also stand alone as a hearty vegetarian main, with a green salad served alongside.
Feel free to meal prep the roasted sweet potatoes ahead of time and refrigerate, then char them and add your toppings just before serving. Easy! Scroll on for the recipe for these sweet, savory, and extremely satisfying charred sweet potatoes with dates.
These charred sweet potatoes with dates are a sweet and savory dish that pairs beautifully with grilled meats—and is hearty enough to standalone as a vegetarian main. Prepare to be obsessed!
4 sweet potatoes
Kosher salt
Olive oil
2 tablespoons pumpkin seeds
2 tablespoons sunflower seeds
1 tablespoon sesame seeds
2 tablespoons butter
5 dates, pitted and quartered
2 tablespoons honey
2 tablespoons olive oil, plus more for sweet potatoes
Pinch kosher salt
Pinch Aleppo pepper (or sub with less red pepper flakes)
2cups arugula
1/2cup cilantro leaves
Flaky salt
Preheat the oven to 400 F.
Use a fork to prick the sweet potatoes a few times. Place on a baking sheet and pour ¼” water into the pan. Cover with foil and seal, then roast until tender, about an hour. Let cool.
In a small saucepan, heat the butter over low heat, along with the seeds, and cook just until butter and seeds begin to brown, 3 – 5 minutes. Stir in dates, olive oil, honey, salt, and Aleppo pepper. Remove from heat.
Heat a cast-iron skillet over medium heat, then add olive oil to coat the bottom of the pan.
Halve the potatoes lengthwise and then crosswise. (Each sweet potato will yield 4 pieces.) Sprinkle cut sides with a pinch of salt. Place sweet potatoes in pan, cut-side down.
Brown for 10 minutes in the pan. Transfer to a serving platter and top with seed mixture, arugula, cilantro, and flaky salt. Enjoy!
Notes
You can roast the sweet potatoes ahead of time and refrigerate, then char them and add your toppings just before serving.