How to protect against ticks – and what to do if you spot one on your child
Enjoy the great outdoors, but don’t forget about the threat of ticks. Ticks can carry diseases, including Lyme disease.
The good news is that, according to the Orange County Mosquito and Vector Control District, the county has not had a confirmed case of Lyme disease acquired from local ticks. The district also routinely tests for Lyme disease in local tick populations.
Just the same, it’s good to remain vigilant – especially when traveling to places with more risk. Here, Dr. Olga Guijon, a CHOC pediatrician, answers common questions about kids and ticks.
How can I protect against ticks?
Ticks don’t have to become a problem if you follow some basic tips.
Wardrobe and accessories matter
Wear light-colored clothing to help you see ticks more easily.
Wear closed shoes or boots, long-sleeve shirts, and pants.
Tuck pant legs into socks or shoes for extra protection.
Pull long hair back or wear a hat.
Clothes also can be treated with a specific insecticide (like permethrin) to help prevent bites.
Choose locations wisely
When hiking, stay on trails and avoid bushy areas with tall grass and leaf litter.
Take post-hike measures
Wash kids’ skin with soap and water when they come back inside. If you’ve been in an area with ticks, wash all clothes in hot water and tumble dry on high heat before they’re worn again.
Check your kids each day for ticks — look in and behind ears, in the groin area, behind the knees, in hair, in eyebrows and eyelashes, and under the arms.
Also remember to inspect pets, clothing, and camping gear, including backpacks and sleeping bags.
If you find a tick, remove it right away.
Are bug sprays with DEET safe for kids?
Insect repellents containing DEET have been tested and approved as safe for kids older than age 2 months. In addition to ticks, DEET helps protect against mosquitoes, biting flies, chiggers, and fleas.
However, while DEET is approved for babies 2 months and older, parents ought to apply sparingly in children under 2 years of age as their skin is different compared to older children.
But be sure to read all labels and take care when you use them:
Choose a repellent with a 10% to 30% concentration of DEET (look for N,N-diethyl-m-toluamide on the label). The higher the concentration, the longer it lasts.
Use lower concentrations (10%) if kids will be outside only for an hour or two.
If they’re outside longer, consider using a repellent with up to 30% DEET, which lasts around five hours.
Do not apply a repellent with DEET more than once a day.
DEET can be put on exposed skin, as well as clothing, socks and shoes. But don’t use it on your child’s face, under clothing, on cuts or irritated skin, or on the hands of young children. Here are some other tips for applying DEET:
Do not use a single product containing both sunscreen and DEET. Sunscreen needs to be reapplied often, while DEET should not be used more than once a day.
DEET concentrations higher than 30% are not more effective and the chemical (which is absorbed through the skin) in high amounts can be toxic. Follow the directions on the label.
Do not apply repellent to kids’ hands because they could swallow it if they put their hands in their mouth. It also can irritate the eyes if they touch them.
Don’t spray the repellent anywhere near the mouth.
Apply the repellent in an open area so that you and your child don’t breathe it in.
Wash kids’ skin with soap and water when they come back inside, and wash all clothes before they’re worn again.
Other bug repellents don’t contain DEET. The US Environmental Protection Agency has a list of approved repellents. Their tool can help you choose the right one for your family.
What to do if you find a tick on your child
First, don’t panic. It’s true that Lyme disease is the most common tick-borne disease in the United States. But your child’s risk of developing Lyme disease after being bitten by a tick is very low.
To be safe, though, you’ll want to remove the tick as soon as possible. The risk of infection rises 24 to 48 hours after the tick attaches to the skin.
Tick removal steps
Step 1: Use tweezers to grasp the tick firmly at its head or mouth, next to the skin. Use a magnifying glass, if you have one, to see the tick clearly.
Step 2: Pull firmly and steadily until the tick lets go of the skin. Do not twist the tick or rock it from side to side. Be careful not to compress the ticks body. If part of the tick stays in the skin, don’t worry. It will eventually come out on its own.
Step 3: Release the tick into a jar or zip-locked bag.
Step 4: Wash your hands and the site of the bite with soap and water.
Never use petroleum jelly or a hot match to kill and remove a tick. These methods don’t get the tick off the skin, and can make it burrow deeper and release more saliva, which makes it more likely to pass a disease.
What are the signs of tick-related diseases?
Most tick bites are harmless and don’t need medical treatment – especially in Orange County, CA. But some ticks (like the deer tick, wood tick and others) can carry harmful germs that cause diseases like Rocky Mountain spotted fever and Lyme disease.
Here are some things to look for:
a red bump ringed by an expanding red rash, which looks like a bull’s-eye (Lyme disease);
red dots on the ankles and wrists (Rocky Mountain spotted fever); or
flu-like symptoms such as fever, headache, tiredness, vomiting and muscle and joint aches.
When should I call the doctor about tick bites?
Call your doctor if:
Your child has had a tick bite, especially if the tick might have been on the skin for more than 24 hours. Sometimes, doctors prescribe a preventive dose of antibiotics for kids at high risk for Lyme disease.
Part of the tick remains in the skin.
A rash of any kind develops (especially a red-ringed bull’s-eye rash or red dots on wrists and ankles).
The bite area looks infected (increasing warmth, swelling, pain, or oozing pus).
Your child gets symptoms like a fever, headache, tiredness, stiff neck or back, joint swelling, or muscle or joint aches.
Your child has facial paralysis (can’t move areas of the face).
What do doctors do if you have Lyme disease?
A pediatrician may be able to diagnose Lyme disease based on a child’s bull’s-eye rash, or they might order a blood test.
If Lyme disease is confirmed, the doctor will prescribe an antibiotic, a medicine that kills the spirochetes, the bacteria carried by some ticks.
Instant Pot black beans are perfectly tender and flavorful, seasoned to perfection and cooked effortlessly in under an hour.
Are Black Beans Better in the Instant Pot?
The short answer is yes! Using an Instant Pot for black beans is a time-saving, convenient, and reliable method that gives your black beans the best flavor and retains the most nutrition.
Speed and Convenience: The Instant Pot significantly reduces cooking time compared to traditional stovetop methods. Black beans that usually take hours to cook can be ready in under an hour.
No Need for Soaking: Soaking beans overnight can help reduce cooking time and improve digestibility, but when you cook beans in a pressure cooker, soaking isn’t necessary and they turn out perfect every time.
Consistent Results: The controlled environment of the Instant Pot ensures that the beans cook evenly and consistently. This helps avoid the common issue of some beans being undercooked while others are overcooked.
Flavor Infusion: Pressure cooking helps to infuse the beans with the flavors of any spices, herbs, or other ingredients you cook them with.
Nutrient Retention: Cooking beans in a pressure cooker can help retain more of their nutrients compared to boiling them on the stove. The shorter cooking time and sealed environment minimize nutrient loss, ensuring you get the most health benefits from your beans.
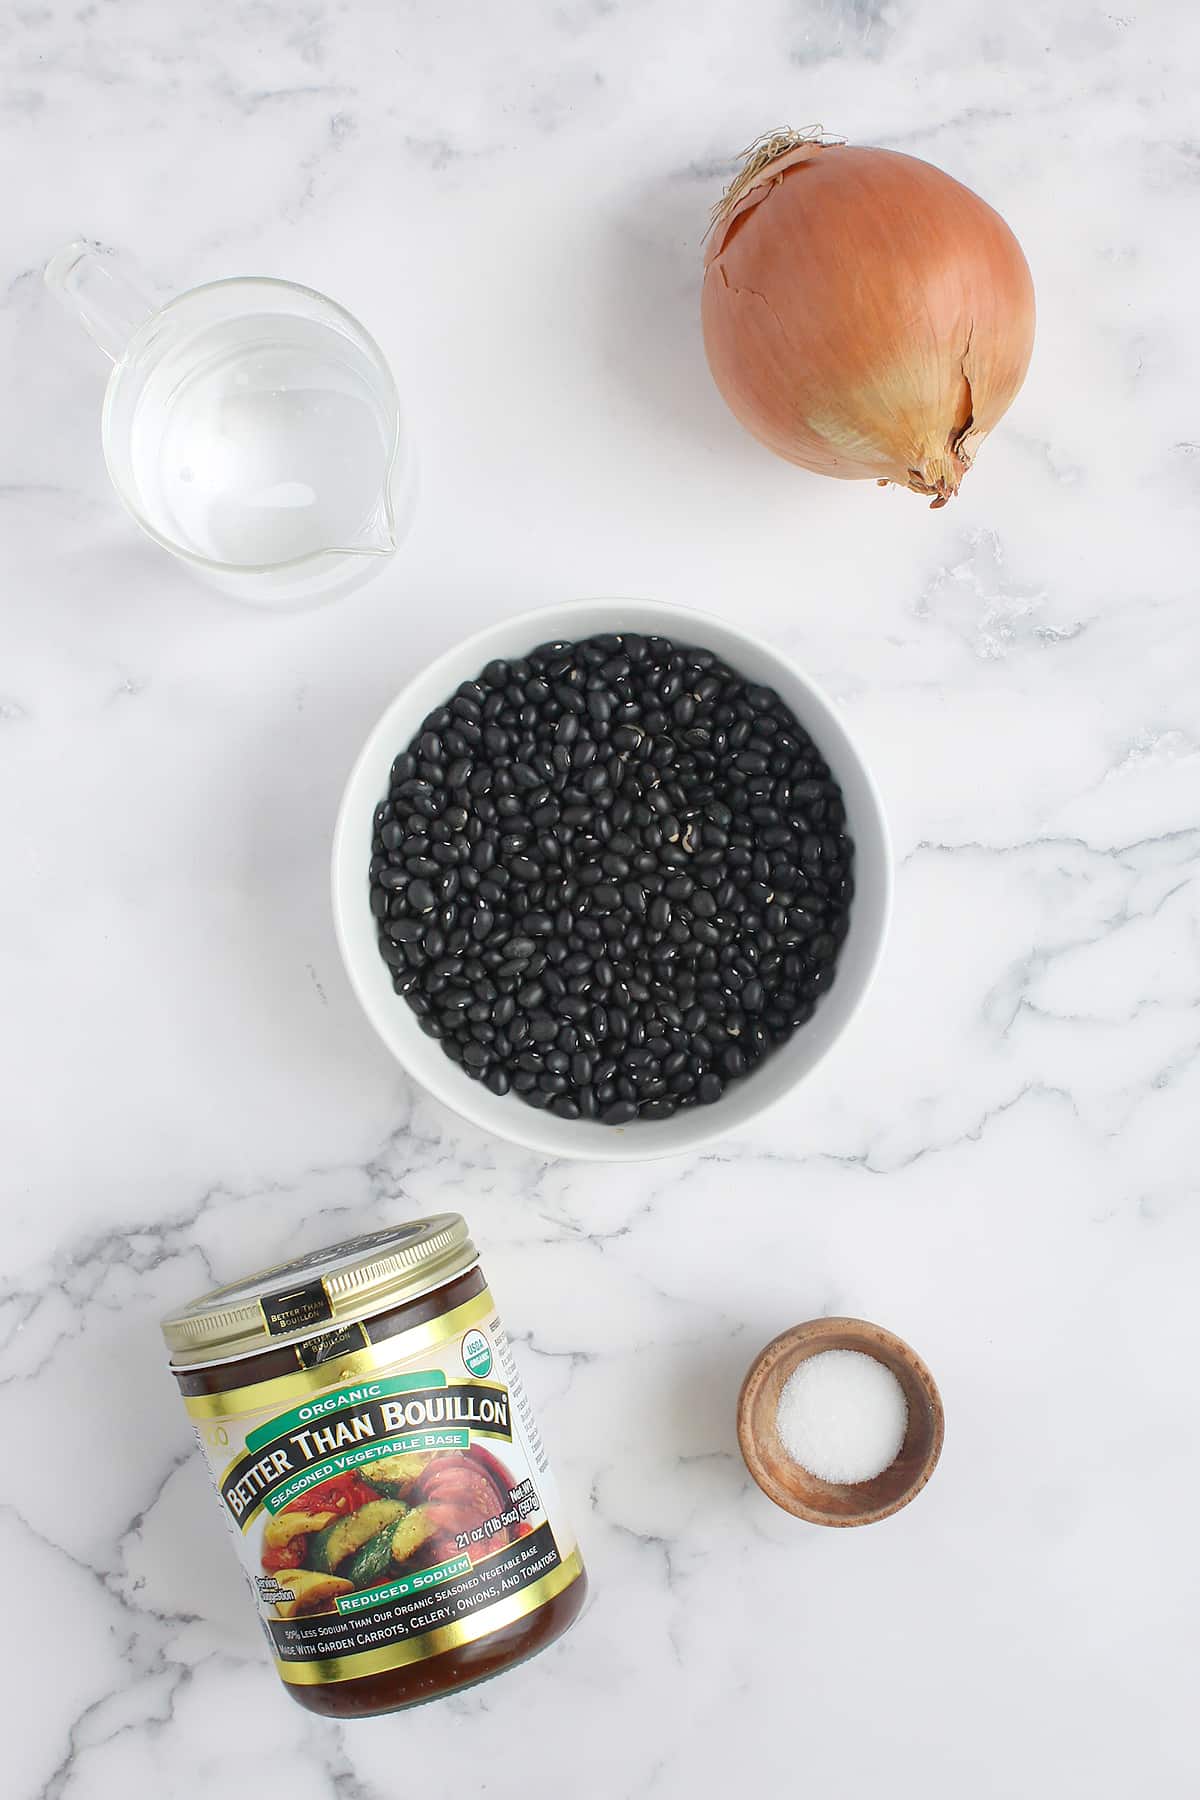
Ingredients for Pressure Cooker Black Beans
Water/Broth: The ratio of beans to water in a pressure cooker is typically 1:3. This means for every cup of dried black beans, you should use about three cups of water. This ratio ensures that the beans have enough liquid to cook evenly and absorb without drying out or burning.
You can definitely use water, but I like to use vegetable or chicken broth to add flavor.
Onion: Onions are an aromatic that give a deep, savory flavor to the beans. As they cook, they release their natural sugars and essential oils, which meld with the beans, creating a richer and more complex taste.
Cutting the onion into wedges makes them easy to remove if you have onion haters 😉
Beans: When you are buying dry beans, here are a few things to consider:
Check the Packaging Date: Fresher beans cook more evenly and have better flavor. Look for beans with a recent packaging date.
Uniform Size and Color: Choose beans that are uniform in size and color to ensure even cooking.
Avoid Wrinkled or Discolored Beans: These could be signs of old or improperly stored beans.
Add-Ins: If you want to add more flavor, before cooking you can add:
garlic cloves
cumin
bay leaves
bell pepper
jalapeno
How to Cook Beans in a Pressure Cooker (Instant Pot)
Cooking beans in your pressure cooker is SO easy!
Prep Beans: Rinse and sort beans to remove any debris.
Add to Pressure Cooker: Place beans, water, and optional flavorings in the pressure cooker.
Cook: Seal the lid and set to high pressure. Cook for 30 minutes.
Release Pressure: Allow for a natural pressure release (about 15-20 minutes) before opening the lid.
Season and Serve: Season to taste and enjoy!
Tips:
No Soaking Needed: The pressure cooker can handle unsoaked beans, saving you prep time.
Flavor Infusion: Adding aromatics like onion and garlic enhances flavor.
Check for Doneness: If beans are not tender, you can cook for an additional 5-10 minutes.
Questions and Troubleshooting
Can you overcook beans in Instant Pot?
Yes – leaving them too long under high pressure can cause them to become mushy or fall apart. If you follow the recommended cooking time, you shouldn’t have a problem.
Why are my beans still hard in an instant pot?
-Old Beans: Older beans take longer to cook and may never soften completely. -Hard Water: Water high in calcium or magnesium can inhibit the softening of beans. -Acidic Ingredients: Adding acidic ingredients (like tomatoes, vinegar, or lemon juice) before the beans are fully cooked can prevent them from softening. -Not Enough Water: Beans need enough water to cook properly. Ensure you use the correct bean-to-water ratio
Is it healthier to pressure cook beans than other methods? YES!
-Pressure cooking retains more vitamins and minerals compared to boiling or slow cooking. -The high pressure and temperature can help preserve and even improve the quality of the proteins in beans -Pressure cooking can reduce antinutrients such as phytic acid and lectins, which can interfere with the absorption of essential minerals.
Recipes to Use Black Beans
Instant Pot Black Beans
Instant Pot black beans are perfectly tender and flavorful, seasoned to perfection and cooked effortlessly in under an hour.
Prep Time10 minutesmins
Cook Time25 minutesmins
Natural Release20 minutesmins
Total Time55 minutesmins
Course: Side Dish
Cuisine: Mexican
Servings: 12(1/2 cup servings)
Calories: 133kcal
Rinse beans in a colander and remove any cracked beans. Add to the pot of your Instant Pot along with the water, vegetable broth, onion and salt.
Place the lid on the Instant Pot, and switch the vent to seal. Cook on high pressure for 30 minutes. When the time is done, allow the steam to release naturally for 20 minutes.
Open the lid carefully and remove onion and strain off any excess cooking liquid.
Serve with a squeeze of lime, an chopped cilantro. You can store extra beans in the fridge for 5 days. To freeze the beans, let them cool and then portion into freezer safe ziploc bags. Remove air and lay flat to freeze. Enjoy!
I’m a registered dietitian, mom of 4, avid lover of food and strong promoter of healthy habits. Here you will find lots of delicious recipes full of fruits and veggies, tips for getting your kids to eat better and become intuitive eaters and lots of resources for feeding your family.
One warm morning, as my husband and I sat on our front porch, we heard an odd, loud, piercing cry. Soon, a medium-sized hawk flew to the top of the house across the street. It was hard to look away, but I decided I had to try to get my camera to capture the moment.
Of course, as soon as I went inside, the hawk flew away. Despite having watched for a good minute or two, I don’t think I could confidently picture or identify the hawk. What could I have done differently to better remember the details of the moment? What tools would have been great to have at my fingertips?
John Muir Laws
John Muir Laws—an award-winning author, artist, naturalist, environmental educator, and principal innovator of the global nature journaling movement—would have been prepared for the hawk (though both Johns share a passion for nature, Laws is not named after or related to John Muir, environmental advocate and founder of the Sierra Club).
John, who goes by the name “Jack,” would have had his nature satchel nearby filled with his nature journal and the necessary tools to remember this experience. Instead of going inside for his camera, he would have known what to do to “capture” the moment forever.
Jack has spent his career looking for the best tools to connect people to nature and help them fall in love with the world around them. He has dedicated his life to the art of nature journaling and to offering step-by-step guidance to help students and adults feel confident getting started.
In 2022, Jack co-founded the Wild Wonder Foundation, where you can find numerous free resources to help you and your students start nature journaling today!
Not Just for Nature-Loving Teachers!
In the following article, you will learn some of his basics of nature journaling, some techniques and tools to help you get started (or improve your experience) with students, and more about what has inspired Jack to do this work.
We will also explore why this is important to do with students, even if a nature expedition isn’t normally your thing. But don’t be surprised if, after the lesson, you find yourself inspired to do more nature journaling on your own!
Journaling is the single most powerful tool to supercharge your observation, memory, and connection with nature. It is the critical foundational habit of being a naturalist and scientist.
John Muir Laws
Laws argues that the observation notebook is a “fundamental thinking tool” that helps students observe more carefully and remember more effectively. He says, “Keeping a journal of your [nature] observations, questions, and reflections will enrich your experiences and develop gratitude, reverence, and the skills of a naturalist. The goal of nature journaling is not to create a portfolio of pretty pictures but to develop a tool to help you see, wonder, and remember your experiences.”
He believes everyone can develop these observation skills and that you do not have to be an artist or a naturalist to do this. He continues:
I believe that the process of attention is what makes you fall in love with the world. It is through attention that we create memories, but those memories will change over time so keeping a notebook and documenting what you’re seeing is a very powerful way to help you preserve the integrity of those memories as a scientist… the notes are data, a record of what I see.
John Muir Laws
During my interview with Jack, it became clear that his passion would benefit FOSS users by helping teachers better support students with their science notebooks and enriching many of the outdoor experiences built into our program. As you read on, consider how these observation skills could be used outdoors to help you dig deeper into the schoolyard activities from your Investigation Guides.
What is Nature Journaling?
Observation notebooks, nature journals, science notebooks—Jack calls them nature journals, but all terms are relevant—are all about getting students outside to record what they see. Students are encouraged to look very carefully at unique and mundane things they find and to slow down and connect with the natural world. Observations lead to deeper understanding and more lasting connections.
The goal of nature journaling is not to create a portfolio of pretty pictures but to develop a tool to help you see, wonder, and remember your experiences.
John Muir Laws
Jack believes the step-by-step strategies used to enhance observations are tools that provide a road map to making stronger, longer-lasting memories. They help people connect more deeply with nature. He says, “Looking hard isn’t enough. Observation isn’t something in the eyes; it engages your brain in a dynamic way to remember what you observe—intentionally engage your curiosity. Curiosity is a skill you can enhance and develop if you’re deliberate about it.”
How to Get Started with Nature Journaling
It’s probably best to start observing things that will not fly, hop, or run away. Start with acorns, seeds, leaves, or flowers. When you want to capture an animal, they tend not to stay still for you or your students, so Jack recommends speaking out loud about what you see.
As an example, the following is what I could have said about my hawk (I will write an X where I cannot remember specific details):
The hawk is about 28 cm high, brown with only a few white feathers on the back, the white feathers look like stripes, its beak is X color, with a sharp point, the beak is about the size of X, the eyes are X color and located on the X of its head. Its tail feathers are X long. Its head swivels to the left and right about 180 degrees. It is resting on the peak of Sean and Carol’s house with a small bird in its talons. What is it using to balance itself if the bird is in its talons? I wonder how long it will take to eat the bird? What parts of the bird will it eat? Will it use the feathers for something else?
Saying these things out loud is a “powerful brain trick” and would have helped me form a picture in my head and, in turn, remember the details longer. Jack recommends thinking about patterns, shapes, sizes, and other basic details. When the bird flew away, I would better remember these things as I pulled out my notebook from my satchel to start my nature journal.
With a class of students, everyone would simultaneously whisper their observations to themselves. This can be practiced indoors and may seem silly initially, but it works.
The nature journal entry will be a conversation between a natural phenomenon and your brain. This process creates a time to slow down and process things. Jack recommends that teachers emphasize three languages in nature journaling: words, pictures, and numbers. Of course, these would look very different with younger kids than older students, but you will judge what your kids can handle.
Words: Record short thoughts and ideas (no need for full sentences or correct spelling). Write what you see, hear, feel, and wonder about, as well as any questions you may have. Include the location, weather, and time of day.
Pictures: Include drawings, diagrams, maps, and sketches (color is not necessary, but useful). For drawings, start with the general shape and proportions of what you see and add details from there.
Numbers: Use the language of numbers. Count, estimate (especially when the numbers are too great to count), measure, and note the temperature. Record the time and date.
Jack believes that the tools you include will influence how students observe and will affect the things students see. Students need easy access to simple tools when on a nature walk, in the schoolyard, or on a field trip to a natural place.
First, you don’t want to have to go inside to get something you forget (because the hawk will fly away!). You also don’t want everything in a backpack or your teacher’s bag because it takes too long to take it off or dig it out. Students need immediate access to their tools.
Cloth shoulder satchels are ideal (Jack and his team designed and tested this Custom Nature Journaling Bag). But if you’re like most teachers and don’t have a budget for something like this, consider making satchels for students using zip bags, as FOSS describes in the Taking FOSS Outdoors chapter. Students should try to include a small ruler, a magnifying lens, pencils, and a notebook. The tools you have will change the way you observe as they affect the things you see.
Jack cautions that the first time you introduce a new tool or procedure, it will be a novelty for students and may be a distraction. Students will want to investigate that new tool and overuse it. It may take time until students begin using the tool without being distracted, but the only way to overcome that is to use or do it regularly. Anticipating that this will be an issue for students will best prepare the teacher to expect certain behaviors.
The first time you do some nature journaling with students, the experience itself will be a novelty and a distraction. Likewise, taking students outside for an outdoor activity for the first time will be a novel experience. The Taking FOSS Outdoors chapter highlights many teaching strategies to improve the outdoor experience.
People should do this because the world is infinitely fascinating and beautiful. You see so much more when observing through the journal. The ability to hold things in our head is really limited. Journaling gets us past the limits of our brain’s capacity of how much information it can store and hold and manipulate at one time. The journal frees up our brain, once you’ve got all of this down on paper, your brain is freed up to operate at more sophisticated levels.
John Muir Laws
Nature journaling is a great way to reach out to children. Jack explains, “I was shut down academically and had come to believe, because I’m dyslexic and had trouble spelling and writing sequences of numbers, that I was ‘stupid.’” But a high school biology teacher saw past this by engaging Jack, believing in him, and introducing him “to the joy and fun of scientific exploration.”
The FOSS staff works with science educators from across the country, and we know that many of you are meeting the young “Jacks” of the world and believing in them. You help them see the wonders of classroom science, the schoolyard, and the greater world around them.
We believe that finding time to use nature journals with your students will make them more productive thinkers, better observers, and more peaceful, nature-loving young people.
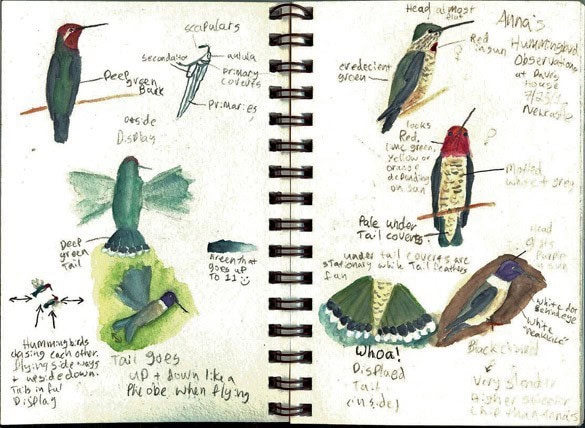
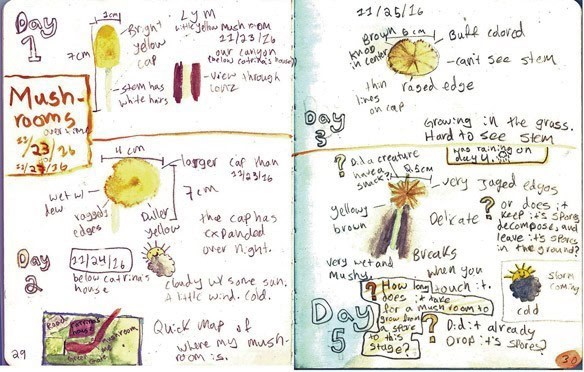
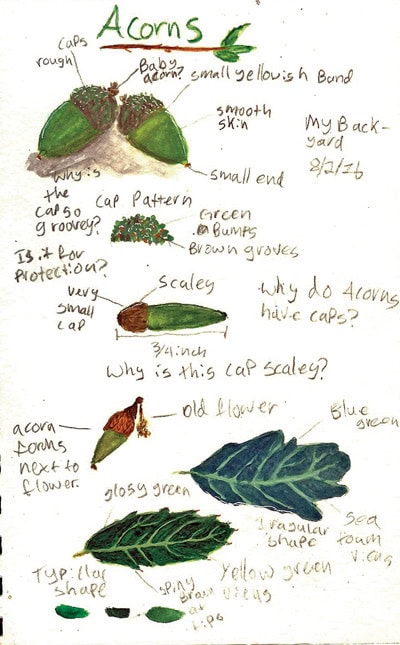
Young Nature Journaler Over the Years
The nature journal pages you’ve seen in this article were from a journal by Fiona Gillogly. At that time, she was a 13-year-old seventh-grader in Applegate, California. She had been doing this for only five months when she shared with us this magical experience she had in nature with her journal:
In August, I was back in Sierra Valley with my new best friend and nature journaling buddy, John Muir Laws, also known as Jack. We worked in our journals and sketched the birds we saw, including American bittern, sandhill crane, and great egret.
As we walked up to the steel bridge, it was dusk, and my mom called out “Barn owl! Barn owl!” and Jack and I saw it flying along the edge of the bridge. We were mesmerized. Then Jack said, “I just saw that barn owl fly under the end of the steel bridge.” We gave each other one look, and since we are crazy nature people, we went running to the end of the bridge where he saw it go.
Jack climbed down over the edge of the bridge and peered in under the large rock piles around the base of the bridge. It was almost dark by then, so Jack pointed a flashlight into a crevice in the rock pile. He looked up at me, and whispered excitedly “FIONA! You NEED to come down here RIGHT NOW!” So my mom and I climbed down and peeked in, and there, not two feet back in the hole, looking right at us, sat the spectacular barn owl. Of course, we both went straight to our journals to draw and write about it. This evening was a truly miraculous occurrence that I will never forget.
Fiona Clare Gillogly, Birder, Artist, Nature Journaler, and Advocate for Nature
Fiona met Jack on her 13th birthday, and Jack immediately saw the fire and curiosity Fiona had for nature. Fiona is now 21 and has continued her passion for nature journaling. You can see some of her recent pages, read her essays, and see her talks on nature journaling at fionasongbird.com.
To learn more about taking science instruction outside and helping your students engage with nature, check out the FOSS Next Generation modules for grades K-8!
This month on the It’s Time for Science podcast, we had both John Muir Laws and Erica Beck Spencer come in and tell us more about nature journaling and outdoor science. Listen below!
Erica Beck Spencer
Erica is a curriculum specialist with the Full Option Science System Project (FOSS K-8) and spearheaded the major Taking FOSS Outdoors initiative. In addition to developing the program, over the course of her career with FOSS, she has worked with over 50 districts and tens of thousands of educators on implementing the FOSS program. She has taught a wide variety of educators, ranging from kindergarten paraprofessionals to train-the-trainer sessions in diverse settings, including major urban adoptions, rural schools, and even international trainings in Egypt and Italy. She has served on the board of directors for the Maine Environmental Education Association, Rippleffect, and will be the board president for the Maine Math and Science Alliance. She holds a Master of Education degree from Lesley University. Prior to working for FOSS, she taught in urban schools in Cambridge, Boston, and Portland, Maine.
John Muir Laws
A principal innovator in the global nature journaling movement, John Muir Laws is an award-winning naturalist, artist, scientist, educator, and the author and illustrator of several books, including The Laws Guide to Nature Drawing and Journaling, The Laws Guide to Drawing Birds, and The Laws Guide to the Sierra Nevada. He is also the co-author of How to Teach Nature Journaling. He is co-founder and president of the Wild Wonder Foundation, a nonprofit dedicated to encouraging nature connection and conservation through attention, curiosity, art, science, and community.