Health
20 Glute Exercises to Get Your Best Butt

Being consistent with leg workouts and building arguably our most important muscles–the glutes–helps to stave off muscle dysfunction and tightness that can lead to injury.
Whether you’re hammering out some time in the gym, or you opt for some at-home leg workouts, skipping glute day is not an option. Here are 20 of the best moves to build you butt the right way.
How to Warm Up Your Glutes
For a proper lower-body warmup, you want to release and mobilize muscles, as well as wake them up. Your glutes can become inactive if you sit most of the day. These are among the best glute exercises to do before a butt workout to activate glutes, as well as increase range of motion for heavier weighted lifts like sumo squats. Some require a mobility ball, resistance band, and light dumbbells.
Best At-Home Glute Exercises
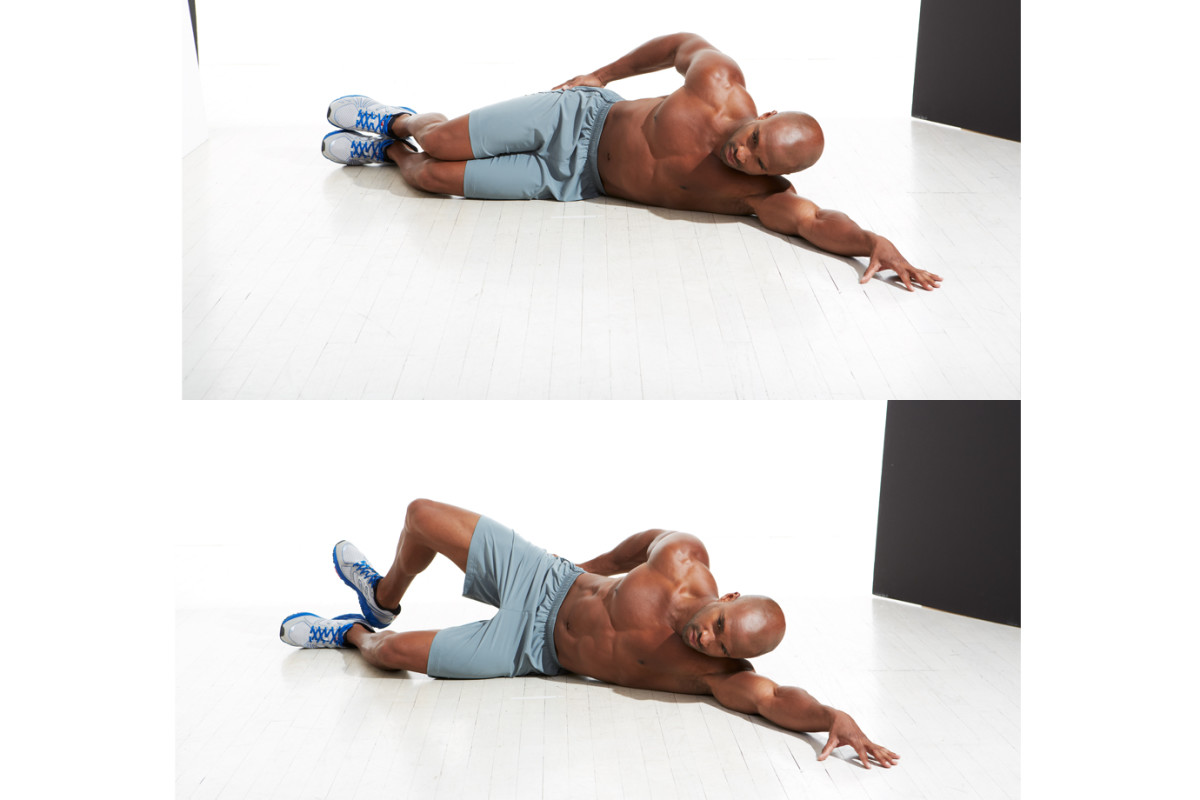
1. Side-Lying Clamshell
How to do it:
- Lie on your side on the floor and bend your knees 90 degrees.
- Your knees and feet should be stacked.
- Place one hand on your glutes and push through your heel as you rotate your hip open, raising your knee until it points to the ceiling. The movement should look like a clamshell opening.
- Reverse the motion to return to the start. That’s one rep.
Pro tip:
Hold at the top of the raise for 1-2 seconds while squeezing your glutes.
Variation:
This move can be done while using a resistance band around the knees to increase the challenge.
2. Single-Leg Suspension Trainer Glute Bridge
Beth Bischoff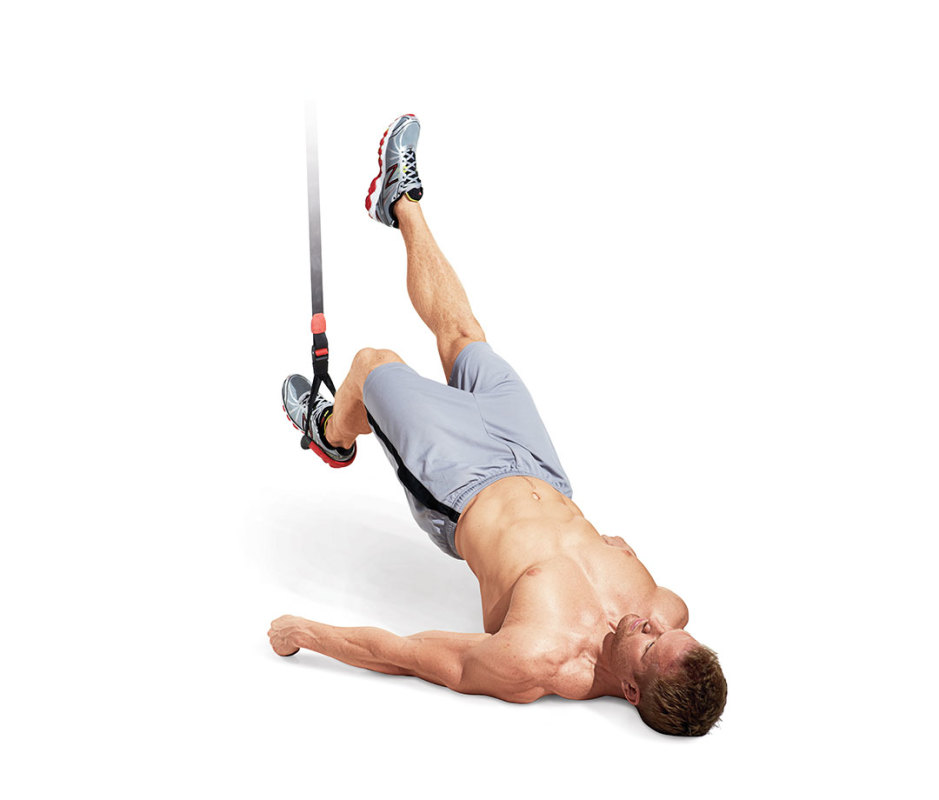
How to do it:
- Attach the suspension trainer to a sturdy overhead object and lengthen one handle so it’s at about knee height.
- Lie on your back on the floor and place the heel of your left foot in the foot cradle.
- Bend your left knee 90 degrees and extend your right leg on the floor.
- Brace your abs and contract your glutes to bridge your hips off the floor while simultaneously lifting your right leg in the air until it’s in line with your left thigh. That’s one rep.
Pro tip:
Let your hinge stop at your upper-back with each bridge and not your neck.
Variation:
There is a floor version of this move where you keep the foot of your bent leg on the floor instead of suspended.
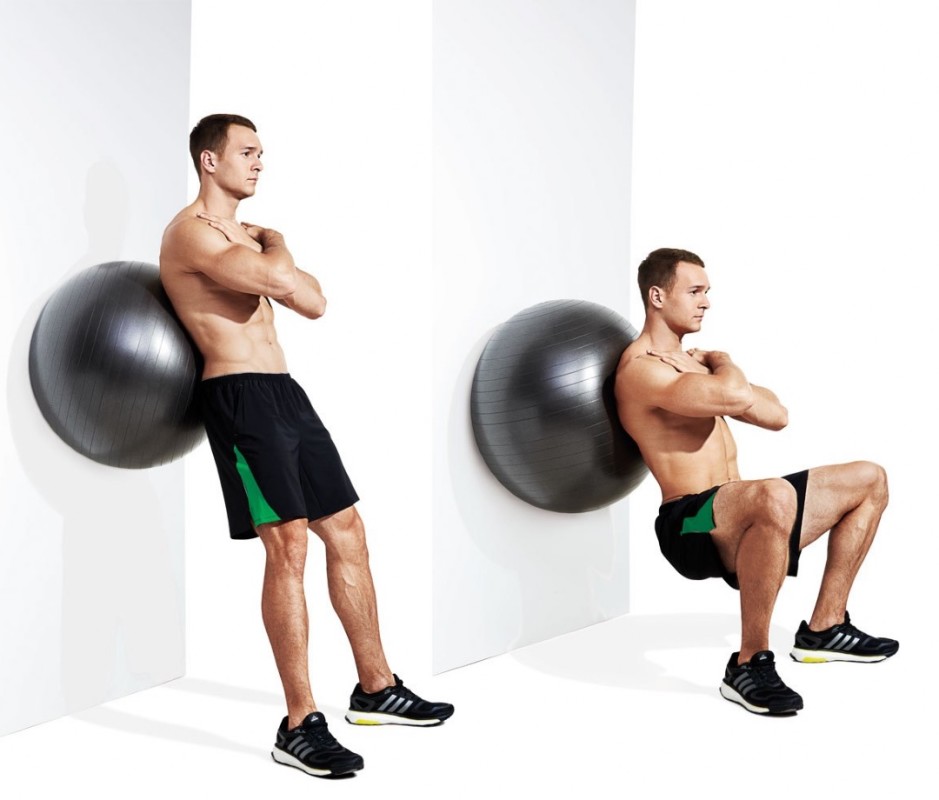
3. Swiss Ball Wall Squat
How to do it:
- Place the ball against a wall and stand with your back against it, holding it in place.
- Place your feet shoulder width and turn your toes out about 15 degrees.
- Squat down as low as you can, rolling the ball down the wall as you descend.
- Push through your heels to stand. That’s one rep.
Pro tip:
Press your back against the ball so that it’s stable, but not so hard that you’re feeling undo pressure on your back.
Variation:
You can perform this move while holding dumbbells for an extra challenge.
4. Single-Leg Glute Bridge
James Michelfelder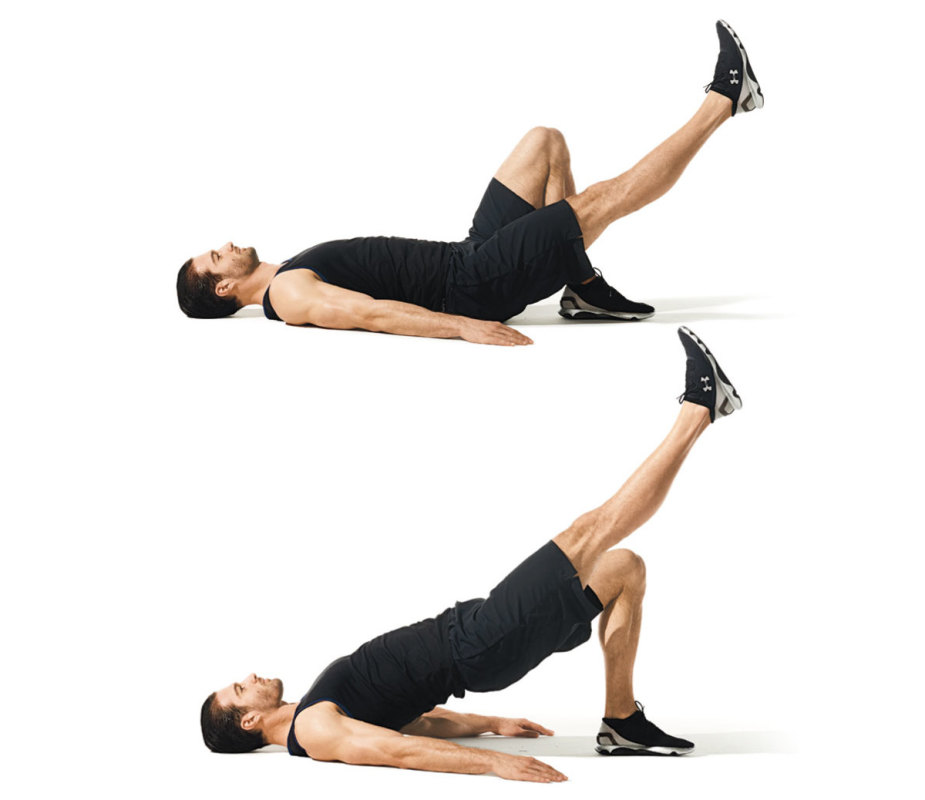
How to do it:
- Lie faceup on the floor and place your right heel on the floor and extend the left leg.
- Brace your abs and contract your glutes to bridge your hips off the floor while simultaneously raising your left leg in the air until it’s in line with your right thigh.
- Lower until your glutes are hovering above the ground. That’s one rep.
Pro tip:
Let your hinge end at your shoulders and not the neck to avoid strain.
Variation:
This is a variation of the suspended single-leg glue bridge move, where your bent leg is in a suspension harness.
5. Single-Leg Romanian Deadlift
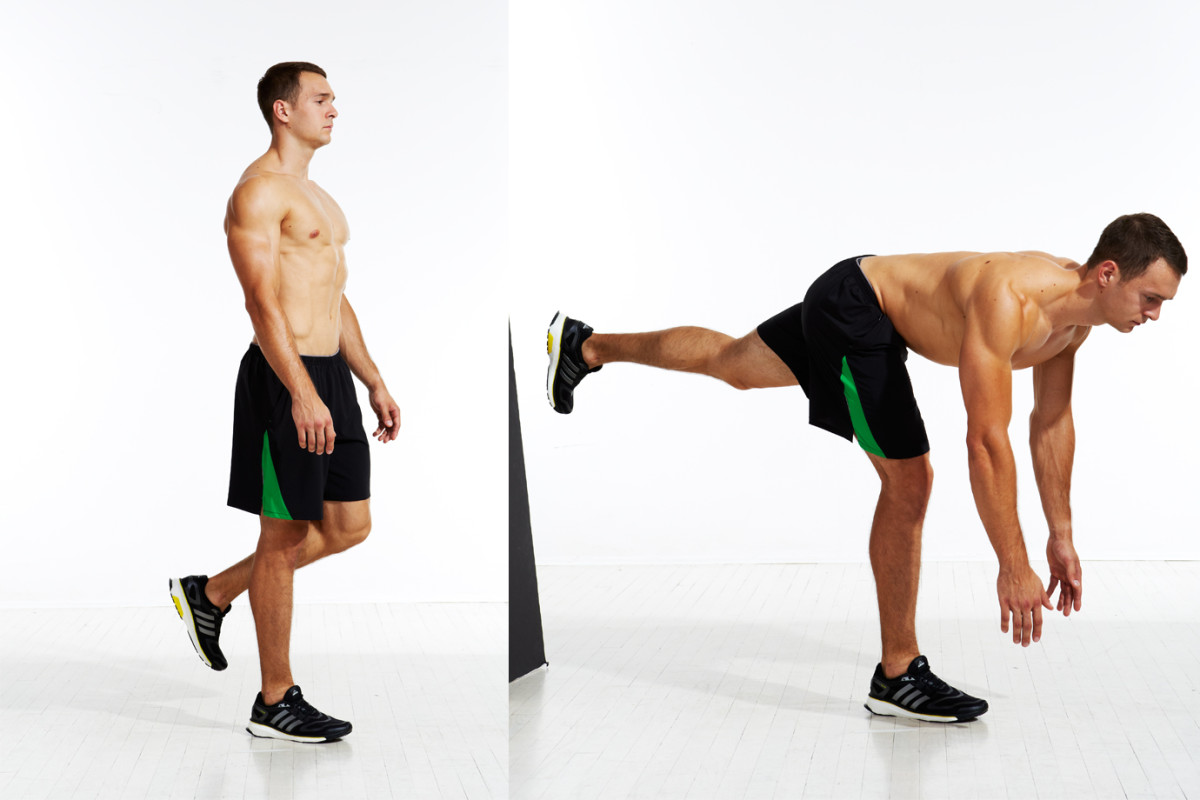
How to do it:
- Stand on your right leg and push your hips back as far as you can while reaching in front of you with both hands.
- Keeping your lower back arched, let your knee bend as needed while you allow your torso to move toward the floor.
- Go as low as you can and hold for one second.
- Squeeze your glutes to come back up. That’s one rep.
Pro tip:
Keep your head aligned with your shoulders as you lower your torso. This will help to maintain form in your back.
Variation:
This move can be done with weights–dumbbells or a kettlebell–or without weights.
6. Reverse Table-Up

How to do it:
- Sit on the floor and place your hands on the floor under your shoulders, fingers pointing in front of you.
- Place your feet shoulder width and squeeze your glutes.
- Push through your heels as you bridge your hips up.
- Your body should form a table, with your torso and hips parallel to the floor.
- Hold for two seconds, then lower back down. That’s one rep.
Pro tip:
If you’re feeling strain in your wrists or shoulders, turn your fingers outward for better support.
Variation:
There is another version of this move where you let your head fall back behind the shoulders at the top of the move, instead of keeping a neutral neck.
7. Jump Squat
Justin Steele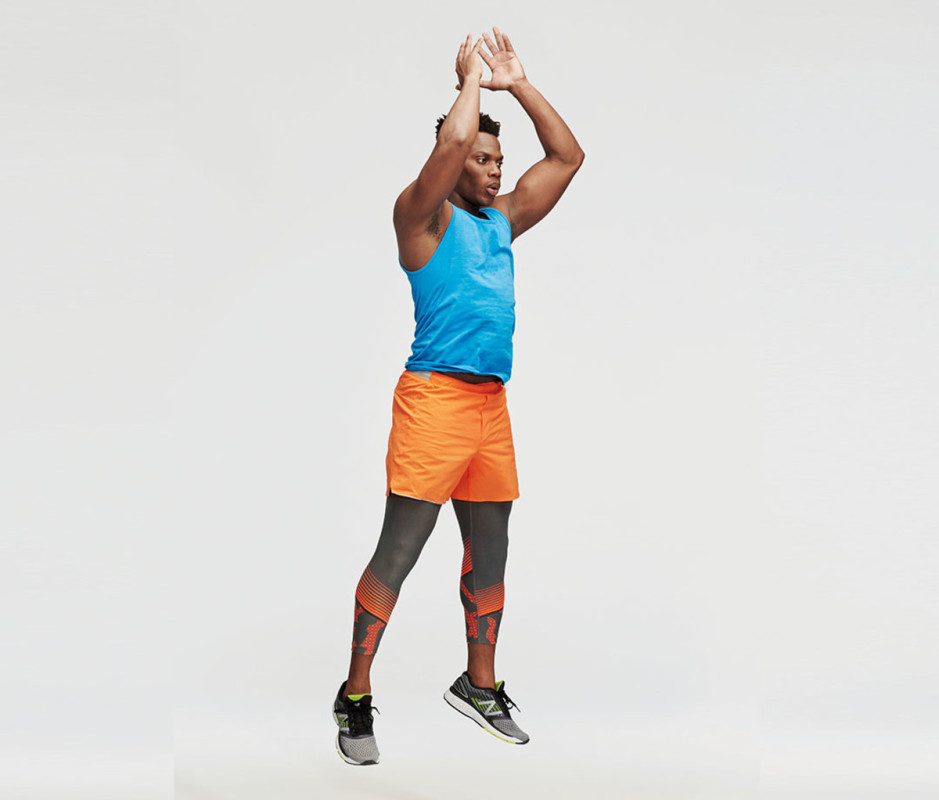
How to do it:
- Stand with feet shoulder-width apart. Bend at knees and hinge at hips to descend into a squat, bringing hands in front of you.
- Once thighs are parallel to floor, pause, then engage quads, glutes, and hamstrings to explode upward.
- Land with soft knees. That’s one rep.
Pro tip:
Engage your arms for full explosion and balance on landing.
Variation:
There is a 180-degree version of this move where you add a turn to the jump and land facing the opposite direction.
8. Swiss Ball Leg Curl
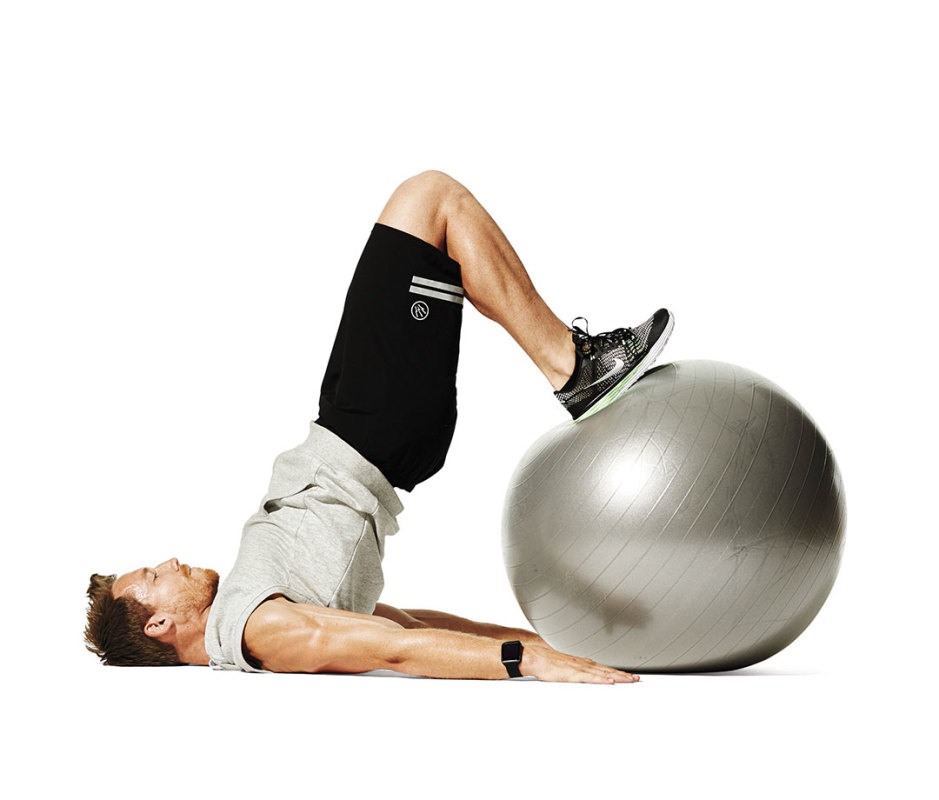
How to do it:
- Lie on the floor with legs straight and heels on top of a Swiss ball.
- Lift your hips until your body is in a straight line.
- Keeping your toes pulled toward your shins, pull the ball toward your butt with your heels.
- Then, extend your legs to push the ball away. That’s one rep.
Pro tip:
Keep your core engaged throughout this move so that your hips don’t dip. Also, be sure to perform this move on a surface that allows the stability ball to move easily but not slip.
Variation:
This move targets similar muscles as the standard glute bridge and banded glute bridge exercises.
Best Gym Glute Exercises
1. Barbell Glute Bridge
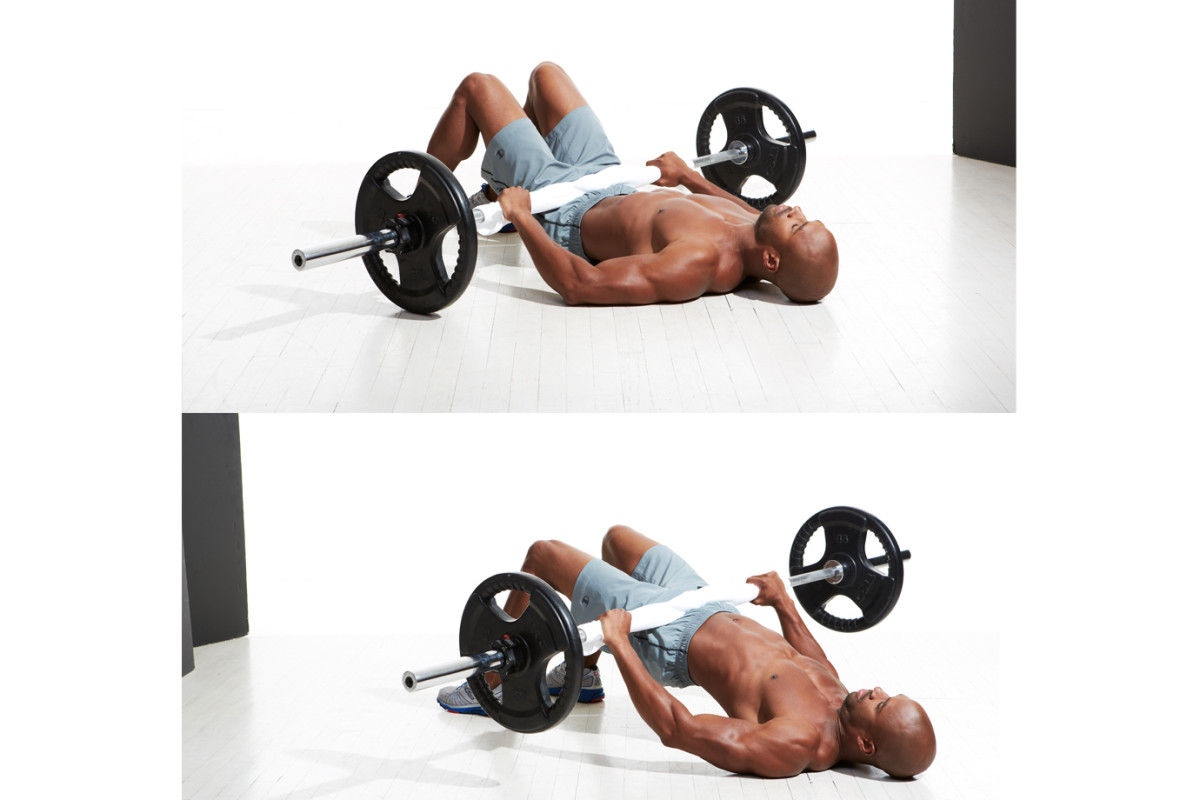
How to do it:
- Lie on your back on the floor with legs extended.
- Roll the bar up your thighs until the bar sits on your lap (you may want to place a towel on your hips or attach a pad to the bar for comfort).
- Brace your abs and drive your heels into the floor to extend your hips, raising them until they’re in line with your torso.
- Simply slide your body under the bar after you’ve rested, and begin the glute bridges.
Pro tip
Resist going up onto the balls of your feet as you raise your hips.
Variation:
You can also do a one-leg variation. If you find it difficult to use a barbell, use your bodyweight or free weights (weight plate or dumbbells).
To make a one-leg variation harder, inch yourself close to a wall or bench so your trunk is about a foot away. Bring your planted leg flat onto the surface. From here, raise your “non-working leg” up into the air, keeping your knee bent. As you raise up into the glute bridge, drive your heel against the surface, raising your hips.
2. Dumbbell Deficit Reverse Lunge
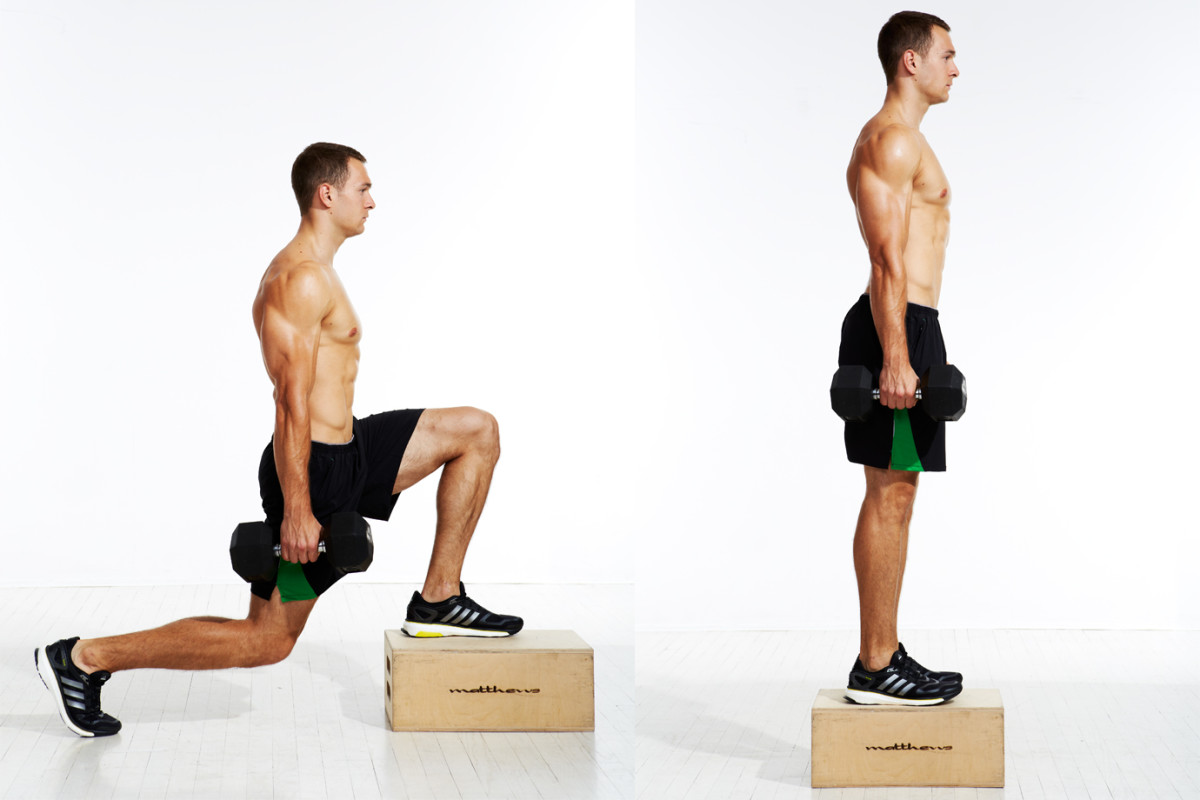
How to do it:
- Grasp a dumbbell in your right hand and stand on a step or block that raises you a few inches above the floor.
- Step back with your right foot and lower your body until your left thigh is parallel to the floor and your rear knee nearly touches the floor.
- Keep your torso upright. Step forward to return to the starting position. That’s one rep.
Pro tip:
Your step back should cause you to feel the stretch in your calf and hamstring, but it shouldn’t be so wide that it pulls your hips backward.
Variation:
This move can be done without using a step or block as your starting point.
3. Single-Leg Romanian Deadlift
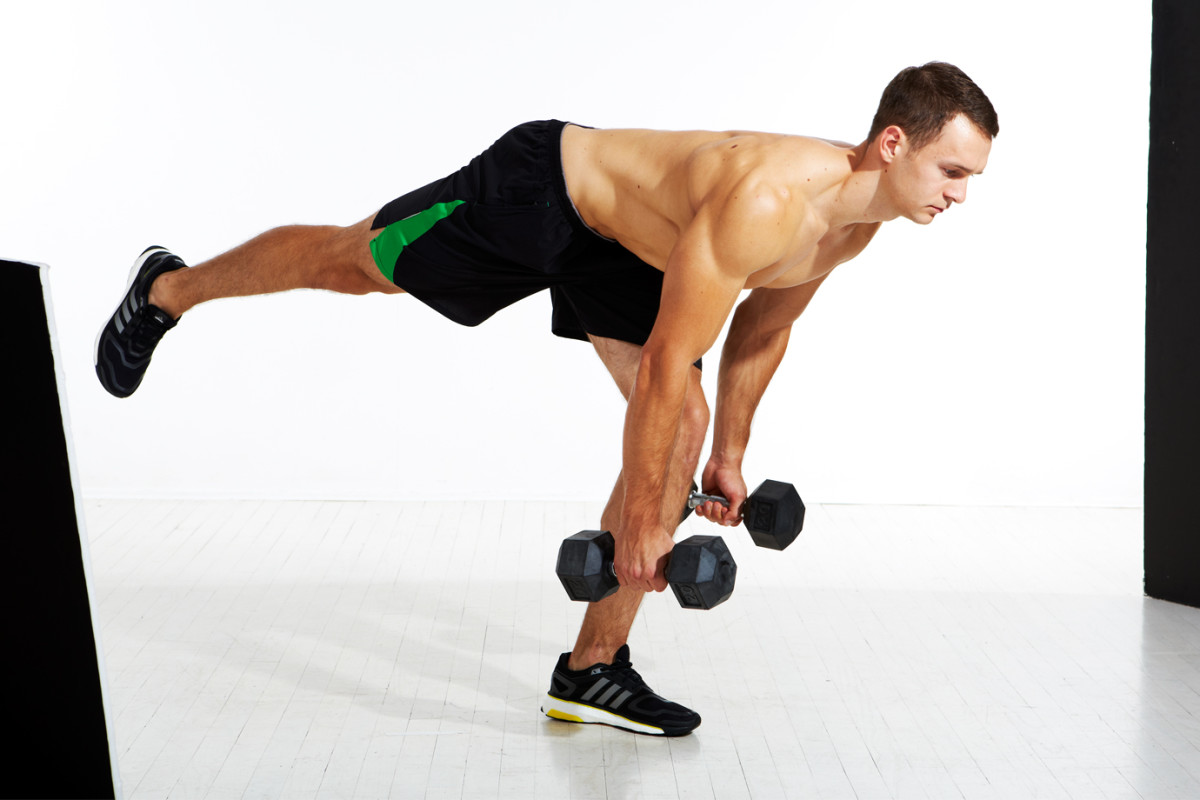
How to do it:
- Stand tall with a dumbbell in each hand, arms to your sides. Put some slack in your knees so they’re in a neutral position, slightly bent.
- Step one leg back; this non-weight-bearing leg should extend straight back until it’s parallel to the floor, while your planted leg remains engaged and planted firmly to the floor.
- As you draw your elevated leg back, bend at the hips as far as you can without losing the arch in your lower back. Your weight-bearing knee should be neutral to just slightly bent to avoid hyperextension.
- Sink your arms toward the floor. Use your glutes to pull yourself back to the upright position. That’s one rep.
Pro tip:
Contract your glutes as you return to starting position. This should keep the strain off of your lower back.
Variation:
There is the traditional Romanian deadlift involving a barbell. You hold a barbell with a shoulder-width grip and stand with feet hip-width apart. Then bend your knees slightly as you lower the bar along your shins until you feel a stretch in your hamstrings.
4. Bulgarian Split Squat
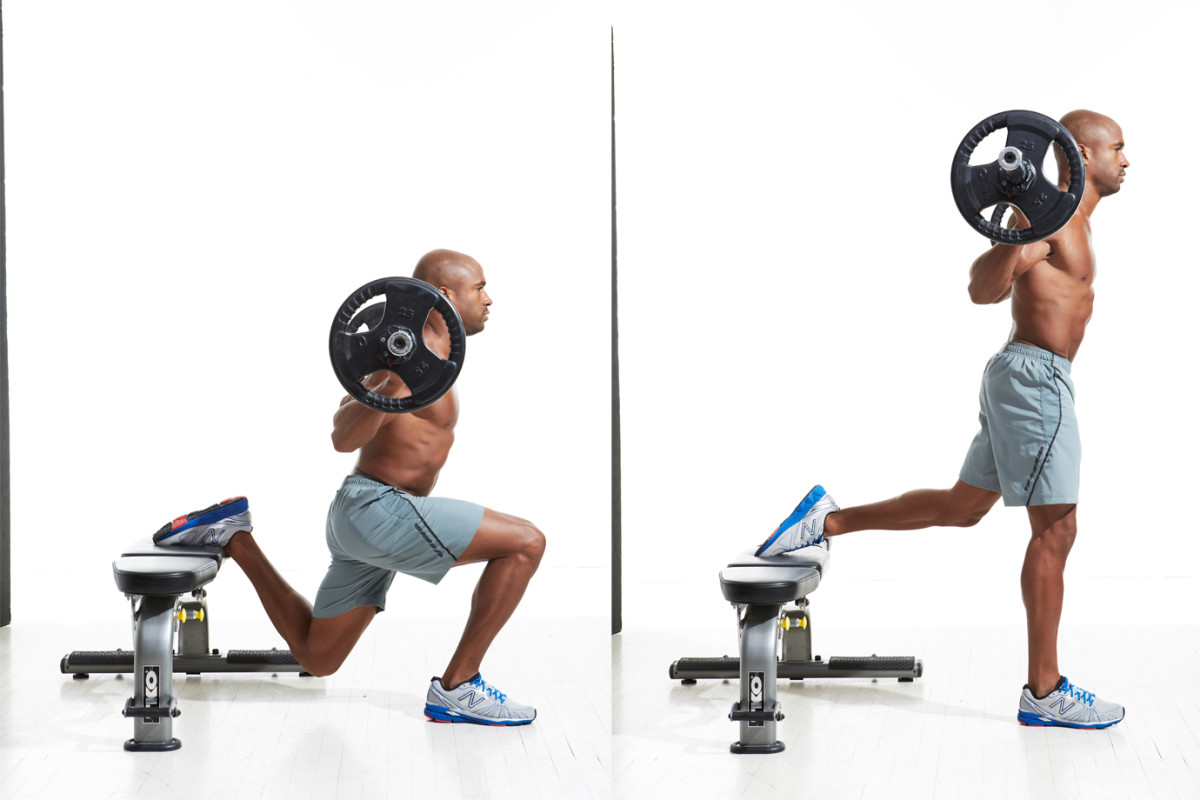
How to do it:
- Hold a bar on the backs of your shoulders as if to squat.
- Rest the top of your one foot on a bench or box behind you so that your back knee is bent 90 degrees.
- Bend your hips and right knee to lower your body until your rear knee nearly touches the floor. Drive through your planted leg to rise. That’s one rep.
- Keep your torso upright. If you don’t want to use a barbell, you can hold dumbbells at your sides.
Pro Tip
Keep your upper body posture strong and aligned throughout the movement. Keep your dip shallow for more emphasis on the quads, and deepen it for more emphasis on working the glutes.
Variation:
This move can be done with or without weights. For beginners, try starting by interlocking your fingers behind your head. Then transition to holding a medicine ball before moving to dumbbells or kettlebells.
5. Sumo Romanian Deadlift
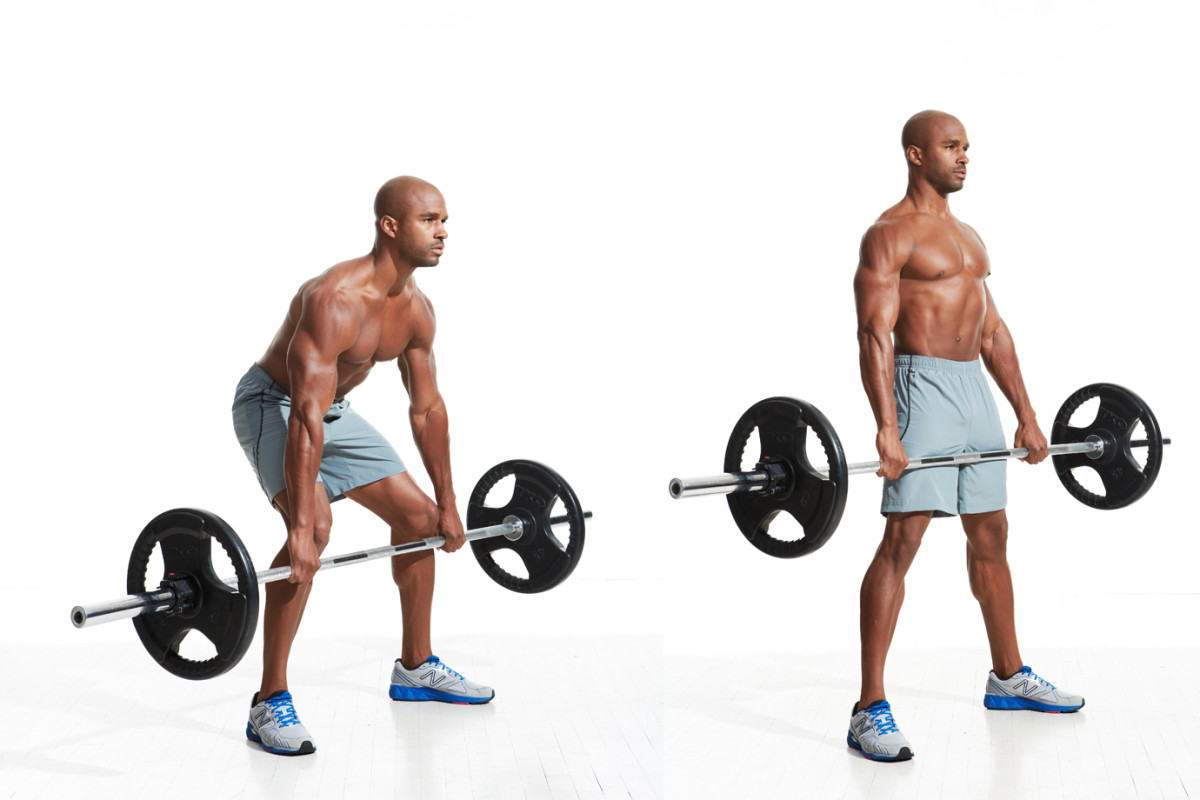
How to do it:
- Stand with your feet outside shoulder-width and toes turned out about 15 degrees.
- Bend your hips back and let your knees bend as needed until you can grasp the bar at shoulder-width.
- Keeping your lower back in its natural arch, push your hips forward to raise the bar to lockout. That’s one rep.
- To begin each subsequent rep, push your hips back and lower the bar to mid-shin level.
Pro tip:
Do not bend your knees more and make it a deadlift—the movement must come almost entirely from your hips.
Variation:
There’s also a dumbbell single-leg variation of this move, where you hold a dumbbell in each hand at your sides and lean forward while lifting one leg straight behind you. As your chest comes forward, the dumbbells should shift from your sides to directly over your planted foot.
Return to starting position by lowering your back leg as you come up and returning the dumbbells to your sides.
6. Barbell Squat
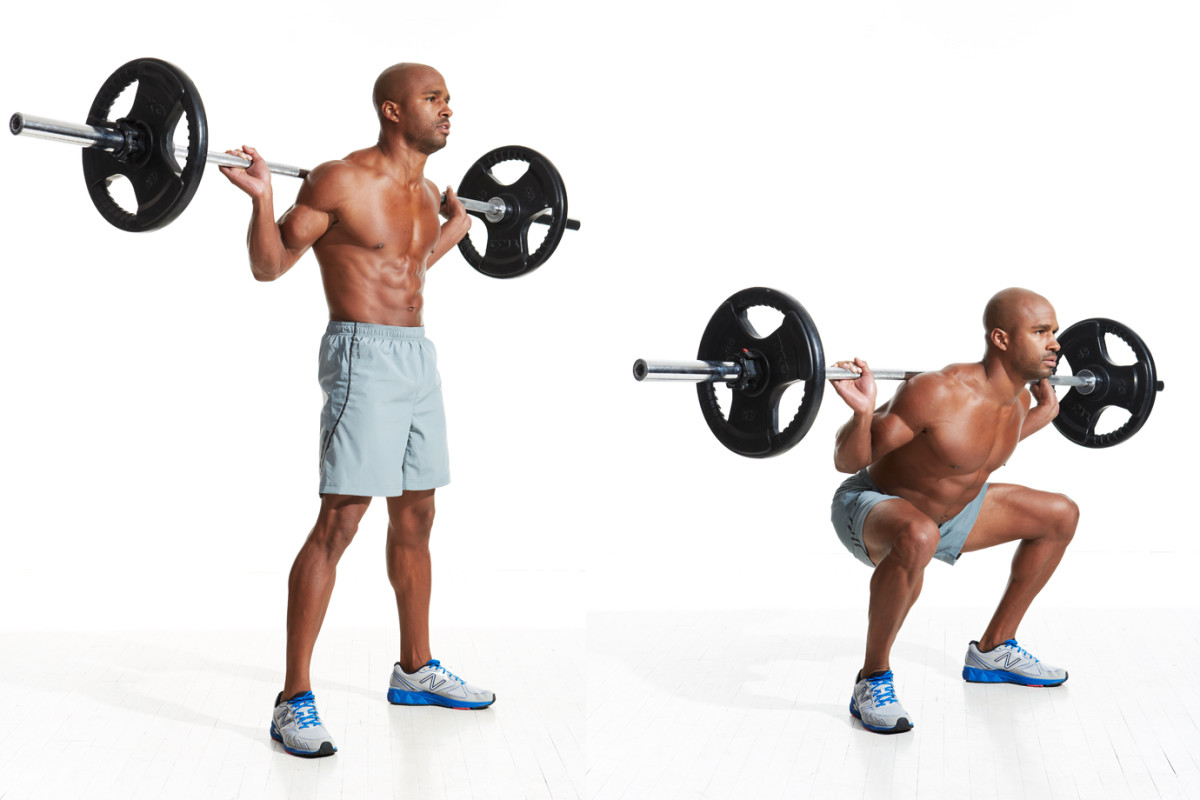
How to do it:
- Set up in a squat rack or cage and grasp the bar as far apart as is comfortable and step under it.
- Squeeze your shoulder blades together and nudge the bar out of the rack.
- Step back and stand with your feet shoulder-width and your toes turned slightly outward.
- Take a deep breath and bend your hips, then knees to lower your body as far as you can without losing the arch in your lower back.
- Push your knees outward as you descend.
- Extend your hips to come back up, continuing to push your knees outward. That’s one rep.
Pro Tip:
“Optimum form and range of motion for the squat is very dependent on your physicality, structure, joint integrity, limb length, strength, flexibility, and current condition,” Reames says. Your range of motion is 90 degrees max at the knee. Some people are able to go lower than this, but not everyone will squat to parallel, he says. And that’s totally okay. “Stick to form and the appropriate resistance levels for you; the squat is still one of the best and simplest moves for overall strength, building lower-body muscle, core strength, and athletic performance.
Variation:
There are numerous variations to this move. Two of them are the overhead squat–where you perform the move while holding the bar over your head, and goblet squat–where you hold the weight in front of you.
7. Trap Bar Deadlift
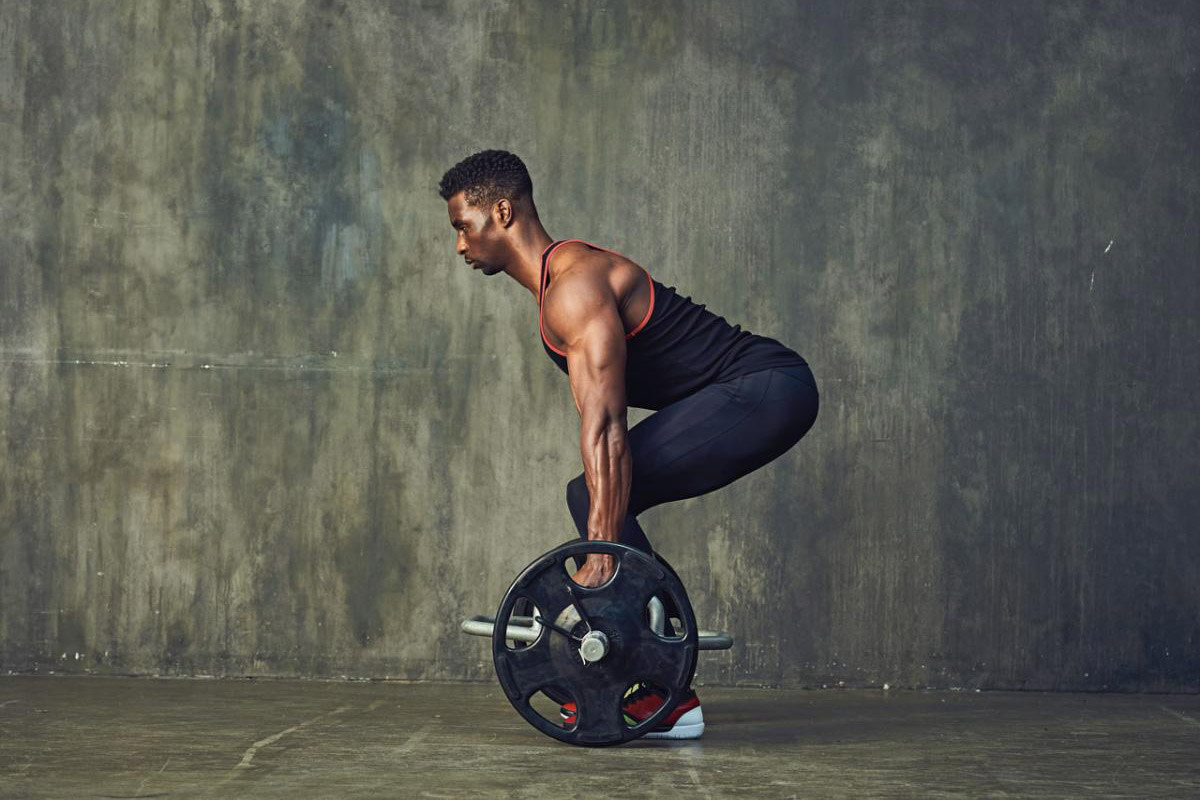
How to do it:
- Stand with feet hip-width apart.
- Hinge at your hips, bend your knees, and lower your hands to grip the bar’s handles in the middle.
- Inhale and brace your abs as you retract your neck so you feel like you’re making a double chin, looking at the floor several feet in front of you.
- Keep a flat back as you drive your heels into the floor and lift the bar up, pushing your knees out so they don’t collapse in.
- Stand upright, squeezing your glutes as you lock out your hips (without leaning back). Bend your hips back and lower the bar. That’s one rep.
Pro tip:
The big knuckle of your middle finger should line up with the center of the bar.
Variation:
There are numerous variations to the deadlift with different weight. This move can also be done using resistance bands.
8. Dumbbell Stepup
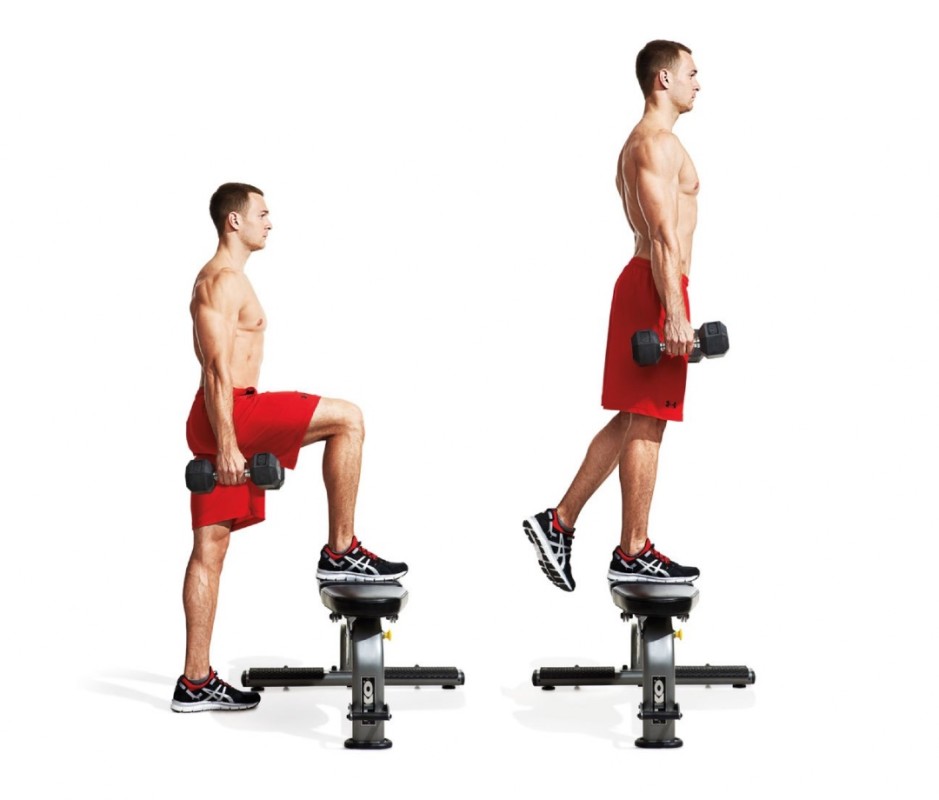
How to do it:
- Stand perpendicular to a bench or other elevated surface that’ll put your thigh parallel to the floor when you step on it.
- Hold a dumbbell in each hand and step up onto the bench, leaving your trailing leg hanging of.
- Drive through your front heel to stand.
- Pause briefly, then slowly lower to starting position. That’s one rep.
- You can also stand parallel to the bench and perform lateral dumbbell stepups, and even add a jump to either variation driving through your planted foot and landing softly on the trail leg.
Pro Tip
“You can work one side first then the other, and/or alternate legs,” Reames says. Keep your upper body leaned forward to incorporate as much weight bearing on each repetition, he adds.
Variation:
This move could include a reverse lunge, where you drive your trailing knee up toward your chest as you step up, and then step back into a reverse lunge once your back on the floor.
9. Goblet Squat
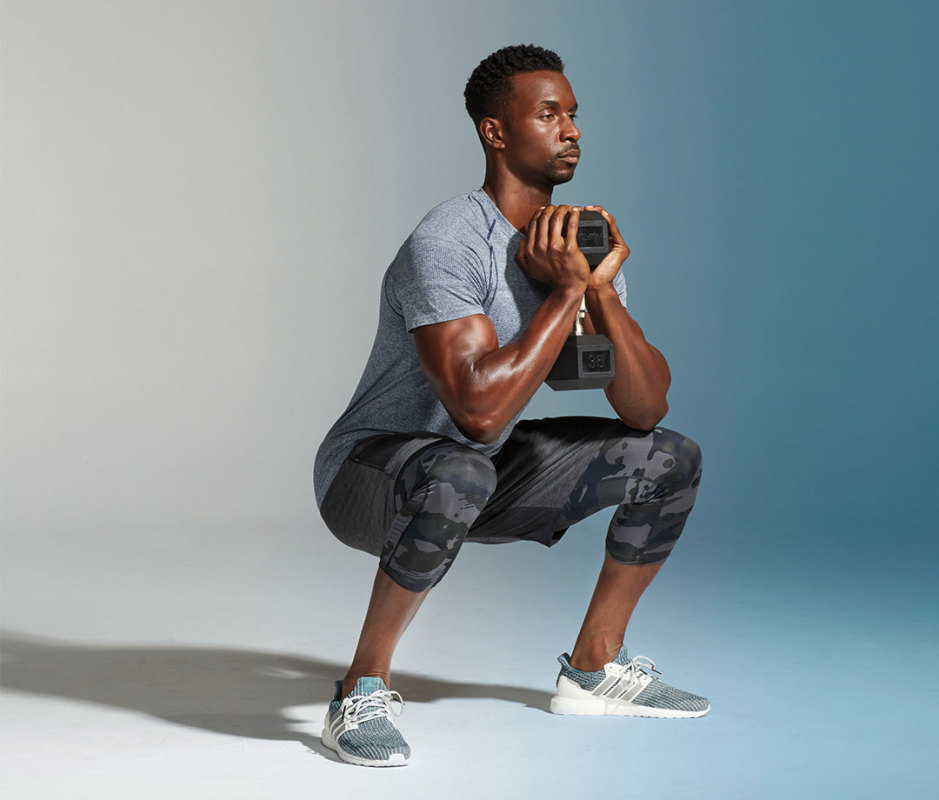
How to do it:
- Hold a dumbbell or kettlebell with two hands.
- Squat by sitting the hips back and down, keeping your weight in the heels of the feet, without lifting toes.
- Your elbows should touch your knees at the bottom of the squat. Rise and extend powerfully through hips to rise. That’s one rep.
Pro tip:
Hold for a beat at the bottom of the move to ensure you don’t bounce or rock your hips.
Variation:
For a fuller range of motion, let your elbows drop slightly below your knees, but not so much that the weight dips below your chest.
10. Landmine Squat
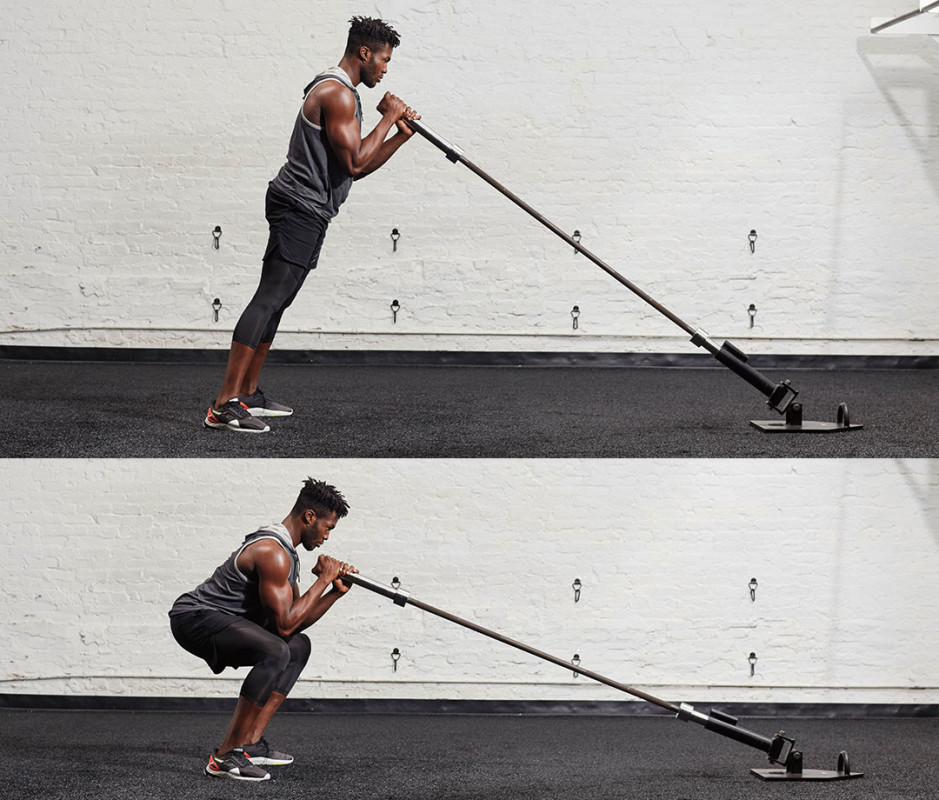
How to do it:
- Stand facing landmine, holding barbell fist-over-fist so thumbs are on top. Step back so body leans forward, placing some bodyweight into barbell, to start.
- Drop down into a squat so barbell is just under chin, then reverse. That’s one rep.
Pro tip:
Widen your stance to deepen your squat and engage more muscle groups.
Variation:
There are numerous variations to this move, including the sidekick squat, the pistol squat, and the prisoner squat.
11. Thrusters
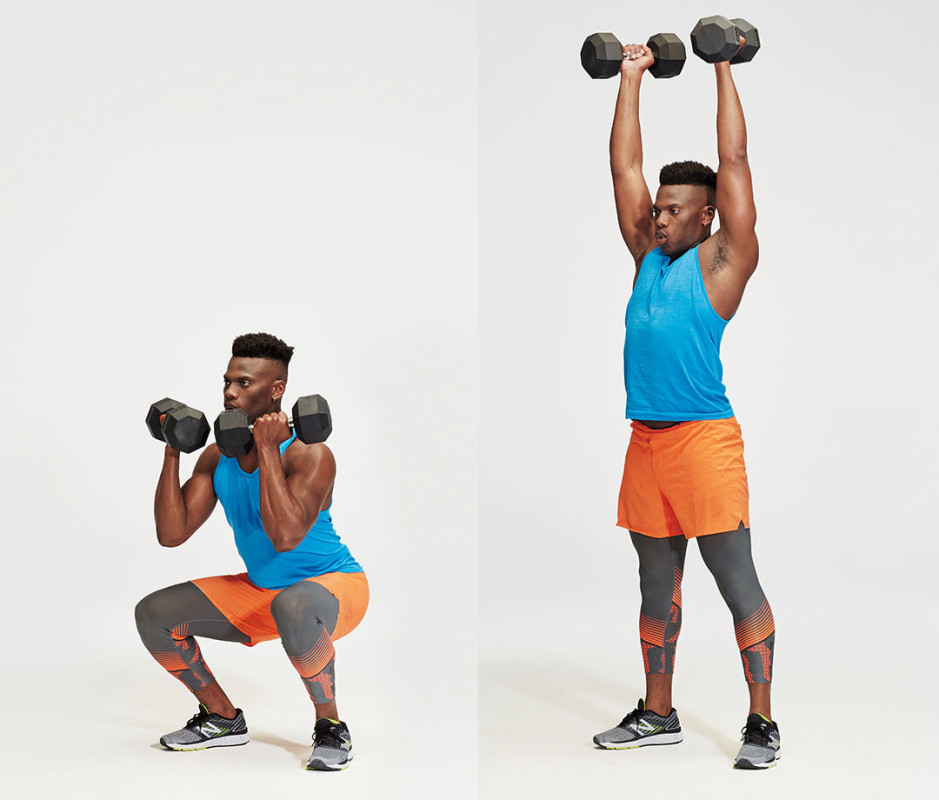
How to do it:
- Stand with feet shoulder-width apart with dumbbells in the front-rack position, to start.
- Keeping weights near shoulders, lower into a squat, then explosively stand to rise, activating glutes, pressing hips forward, and locking out knees; use the momentum to help drive the weights overhead, palms facing each other. That’s one rep.
- Immediately reverse the motion, lowering weights to front-rack position and transitioning into a squat.
Pro tip:
Foot position is key for this move. You want to place your feet slightly wider that shoulder-width with toes slightly pointed outward.
Variation:
This move can be considered a variation of a jump squat or a kettlebell press-out with a squat.
12. Alternating Lateral Lunge
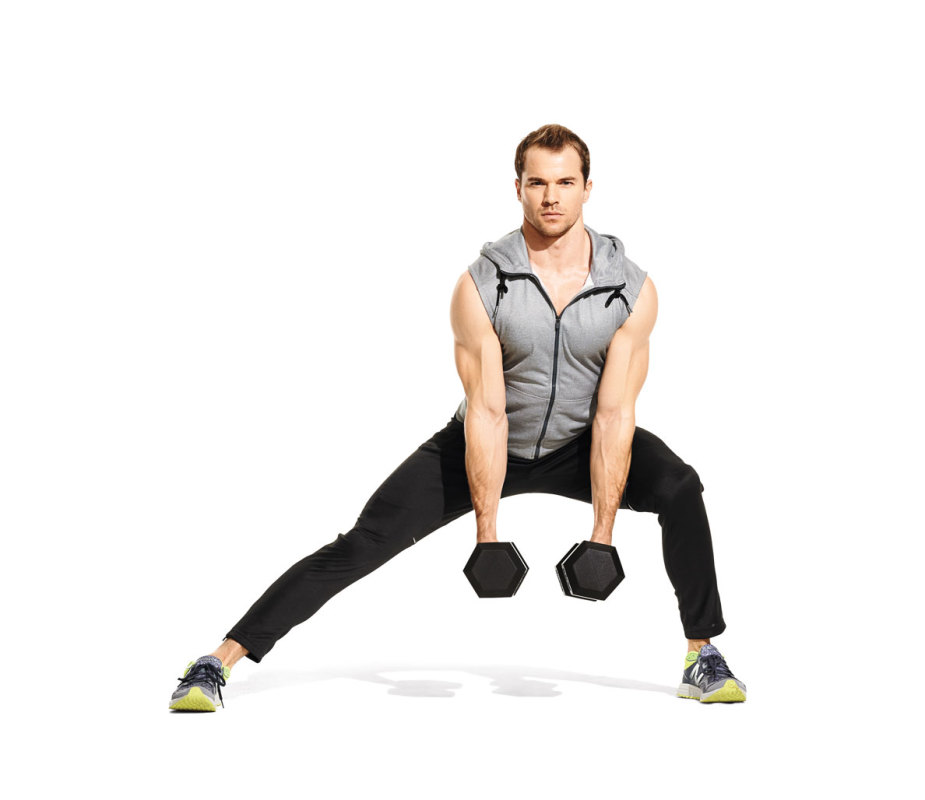
How to do it:
- Stand holding dumbbells in each hand at your sides (you can also do this with just your bodyweight).
- Step to one side and lower your hips to the ground by squatting with the stepping leg, keeping the other leg straight.
- The arms should remain still with one dumbbell on the outside of the squatting leg, the other between your legs—or put both arms between legs.
- Push up with your bent leg to return to the starting position. Repeat on the other side. That’s one rep.
Pro tip:
Keep your shoulders square throughout the move.
Variation:
There is an unweighted version of this move where you bring your left arm across your body to touch right toes, while keeping your back straight and shoulders square. Reverse the movement and return to standing.
Why it’s Important to Train Glutes
Combined with the hamstrings, calves, and back, the glutes are the most powerful muscles in the human body.
This muscle group—collectively called the “posterior chain”—generates more force than any other human movement, whether that means power cleans, deadlifts, box jumps, or simply lifting a heavy suitcase off the floor and into the overhead compartment.
Will glute exercises make your butt bigger? Yes, and that’s a good thing. You want the glutes to be firmer and more muscular, though, as with any transition from flab to muscle, the result is a bit of an optical illusion since you’ll be leaner and perhaps lighter.
How to Program Glute Workouts
Don’t expect to head to the gym and do every single glute exercise we’ve highlighted below in one-off glute workouts. The glutes may be strong, but they’re not invincible.
Instead, break up this list of moves into four or five different groups of exercises to hit your gluteus minimus, gluteus medius, and gluteus maximus (this is the biggest muscle in the body). Piece together a few moves that require the same piece of equipment—like, say, the suspension trainer, Swiss ball, or barbell. Workout equipment needed for glute exercises can run the gamut from machines to free weights to no equipment at all (think sprints, bodyweight squats, and lunges)
You can combine them as a circuit: Do as many reps as possible of each exercise in 45 seconds, rest for 15 seconds, then move on to the next exercise; rest for 2 minutes after each round.
Alternatively, do these glute exercises in traditional straight sets—say, 2 to 5 sets of 8-15 reps, with 60 seconds of rest in between. Vary your rest, sets, reps, and exercise selection to ensure you make the most of these glutes exercises.
How Can You Get the Most Out of Your Glute Workouts?
The glutes, perhaps more than any other body part, benefit from bodyweight training, though dumbbells, barbells, and cables can play a role, too. Since most of us spend little time thinking about glute activation, be conscious of firing (squeezing) those glutes during butt workouts. Go slow, maximizing time under tension during the eccentric part of the lift, holding, then finishing with a fast concentric movement.
By varying the workload, training your muscles from multiple angles, and incorporating instability into your workout routines, you can strengthen your glutes (and sculpt your butt while you’re at it).
In addition to your effort in the gym, think of life as one daily glute workout. For instance, simply squeeze each cheek one at a time. This can be done while sitting in a meeting, on a conference call, or while stuck in traffic. Look for opportunities throughout your day to train your glutes, whether taking the stairs instead of the elevator or squatting to pick something up rather than bending over at the waist.
Health
The Hazards and Blessings of Being Male: Embracing the Seven Challenges For a Successful Life

Although there have been infinite varieties of life forms that have evolved on Earth in the last 4 billion years, two life forms that are our male and female ancestors evolved a billion years ago. Here’s how this first sexual experience occurred according to cosmologist Dr. Brian Swimme and historian Dr. Thomas Berry in their book, The Universe Story.
The first male organism—they call him Tristan—and the first female organism—they call her Iseult—began life in the ancient oceans. Swimme and Berry describe their chance encounter this way:
“They were cast into the marine adventure, with its traumas of starvation and of predation. Able to nourish themselves but no longer capable of dividing into daughter cells, such primal living beings made their way through life until an almost certain death ended their 3-billion-year lineage.
A slight, an ever so slight, chance existed that a Tristan cell would come upon a corresponding Iseult cell.They would brush against each other, a contact similar to so many trillions of other encounters in their oceanic adventure. But with this one, something new would awaken. Something unsuspected and powerful and intelligent, as if they had drunk a magical elixir, would enter the flow of electricity through each organism.
Suddenly the very chemistry of their cell membranes would begin to change. Interactions evoked by newly functioning segments of her DNA would restructure the molecular web of Iseult’s skin, so that an act she had never experienced or planned for would begin to take place—Tristan entering her cell wholly.”
Of course no humans were there to record this original encounter, but we all have origin stories and this one resonates with me. Dates are never exact and change as more information is gathered. Here are some additional dates I found important in The Universe Story timeline:
- 12 billion years ago, the universe begins.
- 4 billion years ago life first emerges.
- 1 billion years ago sexual reproduction evolves.
- 216 million years ago the first mammals appear.
- 30 million years ago the first apes inhabit the earth.
- 2.6 million years ago the first humans appeared.
- 200,000 years ago Archaic Homo sapiens evolved.
- 10,600 years ago first settlements in the Middle East emerged and wheat and barley were cultivated.
Needless to say, we have a long evolutionary history to embrace. In their book, Solving Modern Problems with a Stone-Age Brain, Douglas T. Kenrick, PhD and David E. Lundberg-Kenrick describe seven evolutionary challenges we must all face and embrace. They offer a visual summary as a revision of Maslow’s original Hierarchy of Human Needs which they call The New Pyramid of Human Motives:

The Seven Challenges for a Successful Life
During the billion years of life, all organisms must embrace these challenges and they are particularly relevant beginning with our mammalian history. In their book, the Kenricks ask, “What are the fundamental problems of human existence?” They go on to share the results of their research.
“Together with a large team of researchers at more than 30 universities on five continents, we have been investigating the universal motivations faced by human beings around the globe.”
Here is a summary of their findings:
We must meet our basic physiological needs for shelter from the elements,
water, and food.
- Protect yourself from attackers and plunderers.
Given the scarcity of resources and the ever-present possibility of starvation, there has always been competition among different groups (most often the male members) for precious real estate and resources (including access to females).
As the Kenricks remind us. “Our ancestors were not rugged individualists.
They need to band together not only to protect themselves from bands of
marauding bad guys but also to accomplish most of the tasks of everyday life.”
Some people have always been more resourceful and clever than others and
some were more willing to bravely defend their groups against armed marauders.
Those resourceful and courageous individuals won higher status and gained
greater respect.
“From the perspective of evolution by natural selection,” say the Kenricks, “this
step is essential. Every one of our ancestors managed to attract at least one
person who wanted to make with them. Not everybody in the ancient world got
to reproduce, though, and a reasonable percentage of men went unmated.” This
fact, is of major importance when understanding male desires, fears, and
behavior.
From an evolutionary perspective, we not only have to find a mate who will have
sex with us, but we need to hold on to our mate long enough to have a child and
raise the child to maturity, so they can find a mate and continue the process.
- Care for your family members.
Unlike other animals, human males are much more involved with raising children, since human children require long-term care before they reach reproductive age.
Males and Females Are Alike and Also Different
Males and females are alike in that they must both successfully meet the seven challenges noted above. However, there are also significant evolutionary differences. These differences first came home to me when I first met psychologist David M. Buss and read his book, The Evolution of Desire: Strategies of Human Mating.
“If mating desires and other features of human psychology are products of our evolutionary history,” says Dr. Buss, “they should be found universally, not just in the United States.”
To test his theories, he conducted a five-year study working with collaborators from thirty-seven cultures located on six continents and five islands. All major racial groups, religious groups, and ethnic groups were represented. In all, his research team surveyed 10,047 persons world-wide.
Dr. Buss concluded that there are actually two human natures, one male, the other female. What do women really want? Buss found that the top three qualities that women look for in men are exactly the same as those things that men look for in women: Intelligence, kindness, and love. Then, what women want diverges from what men want.
“Women then look at a man’s ability to protect her and her children, his capacity to provide, and his willingness to make commitment to a relationship,” says Buss.
What do men really want?
“A man is drawn to youth and beauty,”
says Buss.
“This interest is not just a modern desire driven by advertising and male desire to control women [though advertisers take advantage of our evolutionary-driven desires]. It is a universal desire based on evolutionary pressures for reproductive success. Men who mated with women who were incapable of bearing children left no ancestors. Every man alive today is descended from men who did not make that mistake. Worldwide, men are drawn to younger women.”
Note: Just because we have these evolutionary-based desires does not mean we must act on them, that they are good for us, or will make us, or the partners we desire, happy. It also does not mean they are hard-wired into our biological makeup and can’t be changed. It does mean that we must take seriously our evolutionary-based desires and listen to the ancient “whisperings within” that pull us in certain directions.
The Hazards and Blessings of Gender-Specific Health
The ancient Roman philosopher, Virgil offers a simple truth to consider.
“The greatest wealth is health.”
A modern American medical doctor, Marianne J. Legato, M.D., world-renowned cardiologist and founder of The Foundation For Gender-Specific Medicine, says,
“The premature death of men is the most important—and neglected—health issue of our time.”
Although human males, as a group, occupy more positions of power in government and business than women, it has come at a price. This was first brought home to me by psychologist Herb Goldberg, in his book 1976, The Hazards of Being Male.
“The male has paid a heavy price for his masculine ‘privilege’ and power. He is out of touch with his emotions and his body. He is playing by the rules of the male game plan and with lemming-like purpose he is destroying himself—emotionally, psychologically and physically.”
In recent years we have learned a lot more about the realities of being male.
“If it’s true that men rule the world, it comes at a heavy cost,”
says Dr. Legato.
“From conception until death, men are inherently more fragile and vulnerable than women. In virtually every society today, men die first.”
Dr. Legato offers the following facts of life:
- The male fetus is less likely to survive the womb than the female.
- Boys are six weeks behind in developmental maturity at birth compared to girls.
- Men have four times the developmental disabilities of females.
- Men suffer more severely than women from seven of the ten most common infections that human experience [Including Covid-19].
- Men are likely to experience the first ravages of coronary artery disease in their mid-thirties, a full 15 or 20 years before women.
- Twice as many men die of heart disease, the leading cause of all deaths, than do women.
- Men die by suicide 4 times more than women.
- Murder and homicide are among the top four killers of men from the time they are born until heart disease and cancers begin to claim those who survive into middle age.
Accepting the realities of our own inherent weakness and vulnerabilities instead of trying to pretend we are masters of the universe is the first step we just take to begin our own healing and recovery.
I have been writing a series of articles on the Future of Men’s Mental Health. In Part 3, “Gender-Specific Healing and Man Therapy,” I explore my own healing journey and issues that address the unique problems faced by men and how the emerging field of Gender-Specific Healing and Men’s Health is a key to the future of health care. If you’d like more information about upcoming trainings, drop me an email to Jed@MenAlive.com and put “Gender-Specific Health Training” in the subject line.

This post may contain affiliate links. As an Amazon Associate, I earn from qualifying purchases. Please read my disclosure.
My no-bake, healthy peanut butter bliss balls are loaded with creamy peanut butter and chocolate flavor, making them a hit with both kids and adults alike. Enjoy these as an on-the-go breakfast, wholesome snack, or healthy dessert alternative! They’re also dairy-free, vegan, gluten-free, and low in sugar, making them ideal for a variety of dietary preferences.

Indulge in my delicious no-bake peanut butter bliss balls, affectionately called “cookie dough bites” by my daughter. They taste like dessert, but are totally guilt-free and nutrient-rich! I love bliss ball recipes like this one because they come together quickly, and always satisfy my sweet tooth!
With only five simple ingredients and just ten minutes of prep time, bliss balls are a perfect option for busy days. I especially love making a huge batch at the beginning of the week, and enjoying them all week long for ultimate convenience. I find that they taste even better the next day, once they’ve had time to chill in the fridge for a while longer!
These protein balls with peanut butter are such a fun treat for any time of day! I really love how versatile they are – I’ll often use them as part of a quick breakfast, for packing in my kids’ lunches, or as a mid-afternoon snack.
Made with natural peanut butter, hearty oats, and a touch of pure maple syrup, I’ve crafted these bliss balls to be as healthy as possible. You won’t find any refined sugar here, even with these healthy swaps they still taste just like cookie dough. And each ball has only 90 calories and 3 grams of sugar!
I’ve also made sure that these wholesome ingredients can come together with minimal equipment required. No need to deal with your bulky food processor and spend all that extra time cleaning!
And my all time favorite thing about this recipe is that it’s a great way to involve kids in the kitchen. My kids have so much fun helping me out and adding in their own special twists.
Your family can also customize them in so many different ways, changing things up based on your preferences! I’ll share my favorite variations later in this post (like my peanut butter bliss balls with protein powder)!
Latest Recipe Video!
🥘 Ingredients
My easy peanut butter bliss balls recipe calls for just 5 nutritious ingredients, all easily found in your pantry or local grocery store. Here’s what you need:

Oats: I’ve found that rolled oats work best for these kid-friendly bliss balls. I don’t recommend using oat flour or quick oats as it won’t have the same texture as whole oats, and won’t hold up as well.
Natural Peanut Butter: I use creamy peanut butter to bind all the ingredients together and add a boost of protein to these energy bites. If you don’t have peanut butter, try almond butter as a 1:1 substitute. Other nut butters (like cashew butter or a mixed nut butter) should also work in place of peanut butter, but the bites might have a slightly different consistency since some nuts create a thinner or runnier butter than others!
Dark Chocolate Chips: I prefer using dark chocolate chips for a healthier choice. These can be regular or mini chocolate chips. To keep this recipe vegan-friendly, I’ll use dairy-free chocolate chips. If you don’t need these to be vegan, then semisweet, white chocolate, or milk chocolate chips are all yummy options.
Maple Syrup: The only added sugar is natural maple syrup which gives the bliss balls a slightly sweet taste. If you don’t have maple syrup on hand, agave, raw honey, or vegan honey work.
Vanilla Extract: Pure vanilla extract brings out the richness of the chocolate. Sometimes I also add a pinch of salt to really enhance the sweetness. For a nutty flavor, try using almond extract.
🔪 How To Make Peanut Butter Bliss Balls
My vegan no bake peanut butter balls are so easy to make – they’re ready in just 3 simple steps. Let me show you how to make these healthy dessert balls:
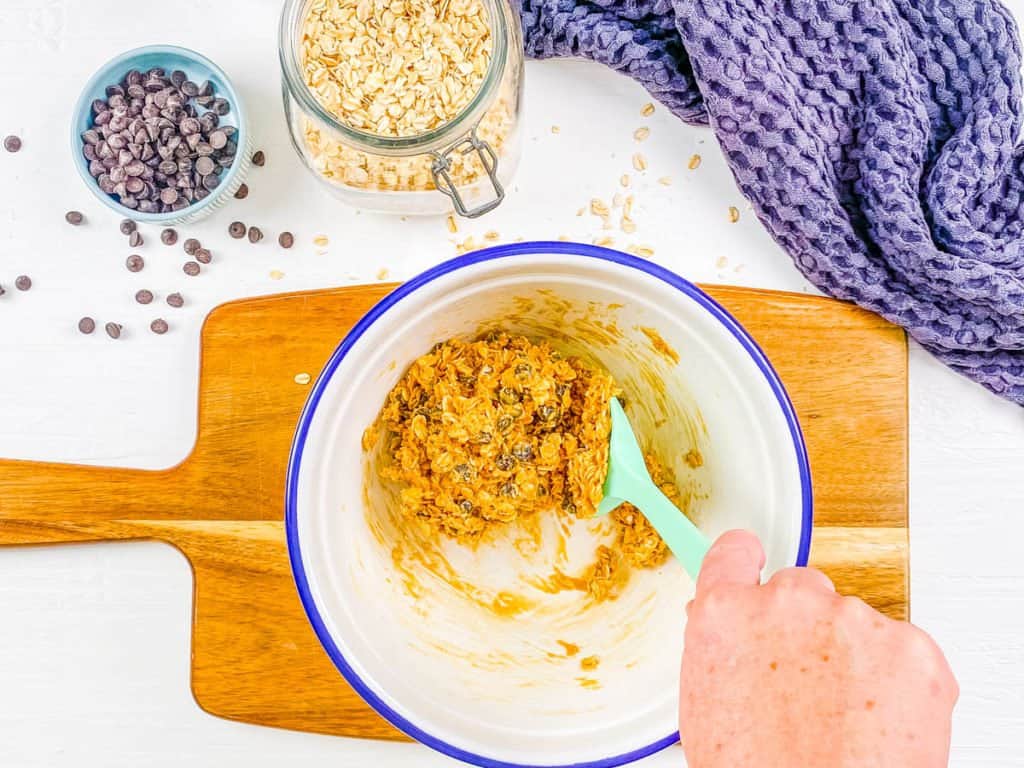
Combine Ingredients: In a large bowl, using a wooden spoon, I start by stirring together the oats, peanut butter, chocolate chips, maple syrup, vanilla, and salt until combined.
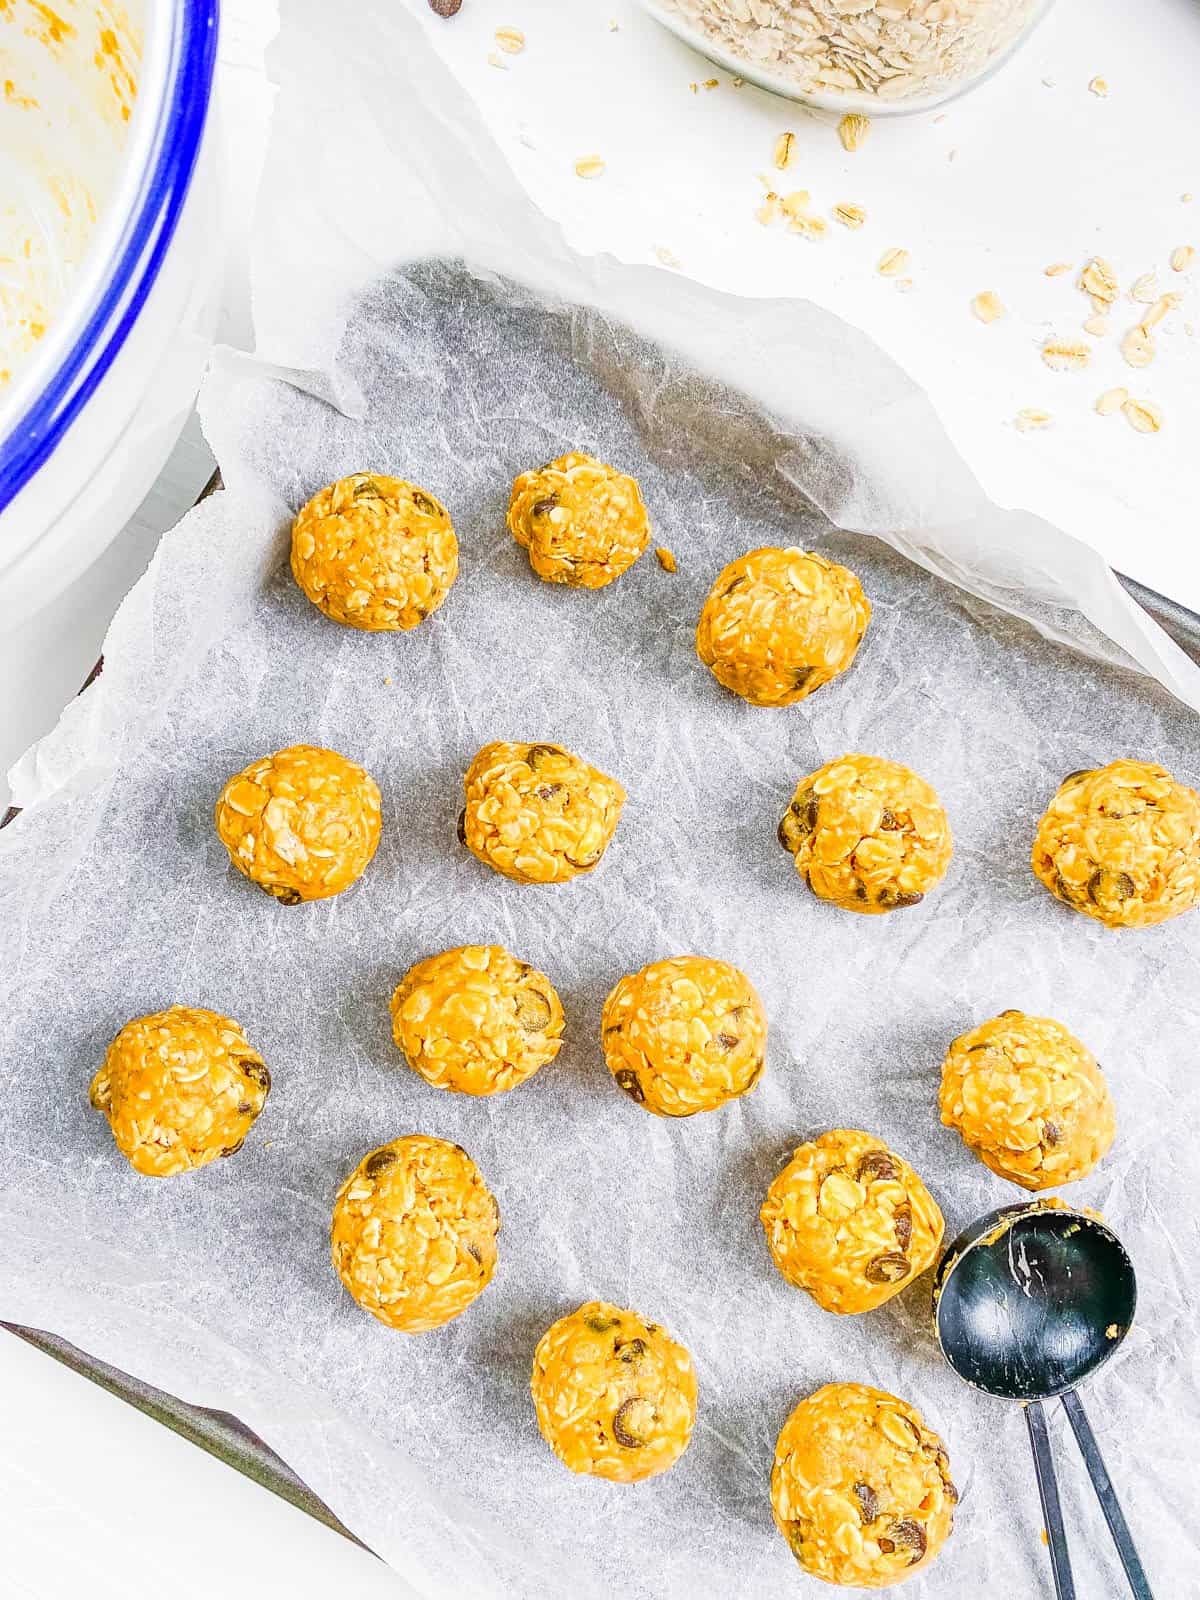
Form The Bliss Balls: Next, I line a baking sheet with parchment paper. Taking small handfuls of the mixture, I roll them into small balls 1-2 inches in size – about the size of a golf ball or ping pong ball. I prefer to use a cookie scoop to make this step extra easy. Place each ball onto the baking sheet.

Let The Balls Set: Once rolled, I refrigerate these peanut butter snack balls for 30 minutes or until solid.
My #1 Secret Tip for this recipe is to make sure you measure ingredients precisely, with the right ratio of wet to dry ingredients.
While there is a little wiggle room with these bliss balls due to them being a no-bake recipe, I recommend being precise with all measurements to ensure ensures that the mixture has the right consistency to hold together without being too sticky or crumbly.
The creamy peanut butter is critical as the binding ingredient for these bliss balls, and I find it to be especially important to measure correctly. Too much or too little will throw the whole recipe off, leading to a mixture that is either too wet and sticky or too dry and crumbly.
After trial and error, I have found that achieving this balance is important for forming perfect bliss balls that stay intact and have a great texture.
Other Tips To Keep In Mind:
- Use The Right Tools: I like to use a cookie scoop to get all of these no-bake bliss balls the same size and to help my hands stay mess free!
- Check The Oats: If you or someone in your family is gluten intolerant, be sure to check the packaging on your oats for gluten-free certification. Some oats can be at risk for contamination with gluten substances.
- Involve The Kiddos: My kids love to help out in the kitchen, and this no-bake recipe is perfect for kids of all ages! They can learn how to measure out ingredients, combine ingredients, and roll the mixture into perfect ball shapes!
- Adjust For Moisture: If the dough seems too wet to mold into balls, consider adding a tablespoon or two of oat flour or almond flour. This will help to firm the mixture up so that it holds its shape and doesn’t stick to your hands.
- Bliss Balls For Kids: If you want to make these as toddler peanut butter balls I recommend reducing or omitting the sugar! You might also want to cut them into smaller bites when serving.
📖 Variations
I’ve perfected a few easy swaps and add-ins for when I’m looking to switch up the taste or texture a bit with these healthy kid-friendly bliss balls. There is something for any occasion! Here are my favorite variations:
Peanut Butter Protein Balls: If you want to turn these peanut butter protein bliss balls, consider adding a scoop of vegan vanilla protein powder to the batter before mixing it. You can use up to 2 scoops of protein powder, depending on the flavor of the protein powder you use. Sometimes I also add 1 tablespoon of ground chia seeds, flax seed, or hemp seeds for an extra boost of protein and healthy fats.
Chocolate Bliss Balls With Peanut Butter: For a double serving of chocolate, add a tablespoon of cacao or cocoa powder to the batter before mixing. I love the rich and indulgent flavor that this gives this recipe! I serve this as a healthy kids dessert often!
Peanut Butter Date Bliss Balls: For a sweeter flavor, I like to add a ¼ cup of Medjool dates, soaked and drained. I use a food processor when adding dates so that they are completely incorporated with the peanut butter and oats.
Sugar-Free Bliss Balls: If you want to make these no-bake peanut butter balls truly sugar-free, you can omit the maple syrup and use sugar-free chocolate. I think they still taste pretty good thanks to the natural sweetness from the vanilla and chocolate chips! If you are making these peanut butter balls for toddlers, this is a good option.
Mix-Ins: Add your favorite mix-ins to give these peanut butter energy balls some texture. I find that crushed walnuts, pecans, peanuts, sunflower seeds, and cacao nibs work really well in this recipe. My other favorites are dried fruit like cranberries, raisins, dried apricots, and shredded coconut. I also love adding spices like a pinch of sea salt, cinnamon powder, nutmeg, or pumpkin pie spice into the mixture. When making these as toddler protein balls, be mindful of the size of the nuts and dried fruit.
🍽 Serving Suggestions
While I love these healthy bliss balls with peanut butter on their own for an easy grab-and-go snack or healthy dessert, it can be so fun to get creative with other ways to serve these! Try some of these ideas:
Toppings: For a decadent dessert I love to drizzle chocolate sauce or caramel sauce (like the one on this no-bake salted caramel cheesecake) over these no bake snacks!
Ice Cream: My kids love to mix these no bake peanut butter dessert balls into tofu ice cream for a delicious treat.
Drinks: Energy balls can be found at a lot of coffee shops nowadays, so it only feels right to create those coffee shop vibes at home! I have been loving these balls with my oatmilk honey latte or iced ube latte! You can also do a creamy mixed berry smoothie alongside these protein balls for kids as an afternoon snack.
With Other Energy Bites: Make a spread of energy bites and serve these alongside my vegan protein balls, peanut butter date balls, and these homemade lara bars! I love this idea for parties and special occasions!
🫙 Storage Instructions
Room Temperature: I store these dairy free peanut butter balls in an airtight container at room temperature for up to 3 days.
To Refrigerate: After placing in an airtight container or resealable plastic bag, I’ll store these in the fridge for maximum freshness. They’ll be good for about one week!
Freezer: I don’t recommend storing these vegan energy balls in the freezer as they won’t taste as good when defrosted.
❓Recipe FAQs
The best type of peanut butter to use is natural peanut butter with no added sugars, oils, or preservatives. I recommend looking for a brand that has just one ingredient listed: peanuts. You can also use a brand that has peanuts and salt listed as the only two ingredients.
There are two ways I’d recommend adjusting this recipe if your mixture is too dry: 1) Add more peanut butter – it’ll help bind the ingredients and add moisture. 2) Add a little bit of coconut oil, maple syrup, or even a touch of applesauce – these ingredients will add moisture and flavor to your peanut butter oat balls!

Want to Save This Recipe?
Enter your email & I’ll send it to your inbox. Plus, get great new recipes from me every week!
By submitting this form, you consent to receive emails from The Picky Eater.

Love this plant based dessert recipe? Please leave a 5-star rating 🌟 in the recipe below and/or a review in the comments section further down the page!
You can also FOLLOW ME on FACEBOOK, INSTAGRAM, and PINTEREST to see more delicious, healthy, family-friendly food, and if you have any questions, I’m here to help!
📋 Recipe Card
Healthy No-Bake Peanut Butter Bliss Balls
My healthy, easy no bake peanut butter bliss balls are loaded with creamy peanut butter and chocolate flavor, making them a hit with both kids and adults alike. Enjoy these as an on-the-go breakfast, wholesome snack, or healthy dessert alternative! They’re also dairy-free, vegan, gluten-free, and low in sugar, making them ideal for a variety of dietary preferences.
Servings: 16 balls
Calories: 93kcal
-
In a large bowl, using a wooden spoon, stir together the oats, peanut butter, chocolate chips, maple syrup, vanilla, salt (and protein powder, if using) until combined.
-
Line a baking sheet with parchment paper.
-
Taking small handfuls of the mixture, roll them into small balls 1-2 inches in size. Or you can use a cookie scoop. Place them onto the baking sheet.
-
Refrigerate the bites for 30 minutes or until solid. Store in an air-tight container in the fridge (they will last at least 1 week, and likely 2!)
- Use The Right Tools: Use a cookie scoop to get all of the balls the same size.
- Check The Oats: If you or someone in your family is gluten intolerant, be sure to use gluten-free oats.
- Involve The Kiddos: This is such a great no bake recipe for kids to make – get them in the kitchen!
- Adjust For Moisture: If the dough seems too wet to mold into balls, consider adding a tablespoon or two of almond flour.
- Sugar Free: If you want to make these truly sugar-free, you can omit the maple syrup, and they will still taste pretty good.
- Peanut-Free: Use your favorite alternative nut butter or seed-based butter.
- Nutritional information includes protein powder. Note: for even more protein, use 1 scoop of vegan vanilla protein powder and 1 scoop of peanut butter protein powder.
Serving: 1ball | Calories: 93kcal | Carbohydrates: 8g | Protein: 4g | Fat: 5g | Saturated Fat: 2g | Polyunsaturated Fat: 1g | Monounsaturated Fat: 2g | Cholesterol: 4mg | Sodium: 43mg | Potassium: 92mg | Fiber: 1g | Sugar: 3g

May 16, 2024 – Multiple U.S. agencies are working to contain the recent bird flu outbreak among cattle to prevent further spread to humans (beyond one case reported in early April) and use what we learned before, during, and after the COVID-19 pandemic to keep farm workers and the general public safe.
Fingers crossed, the bird flu will be contained and peter out. Or the outbreak could continue to spread among dairy cattle and other animals, threatening the health and livelihoods of farmers and others who work with livestock.
Or the virus could change in a way that makes it easier to infect and spread among people. If this happens, the worst-case scenario could be a new influenza pandemic.
With so many unknowns, WebMD brought together experts from four federal agencies to talk prevention, monitoring, and what the “what ifs” of bird flu might look like.
Communication with the public “about what we know, what we don’t know, and ways you and your family can stay safe is a priority for us at CDC,” said Nirav D. Shah, MD, JD, the CDC’s principal deputy director. “We at the federal level are responding, and we want the public to be following along.”
People should consult the websites for the CDC, FDA, U.S. Department of Agriculture (USDA), and the Administration for Strategic Preparedness and Response (ASPR) for updates.
It is essential to not only stay informed, but to seek trusted sources of information, Shah said during “Bird Flu 2024 – What You Need to Know,” an online briefing jointly sponsored by the CDC and WebMD.
An ‘Experimental Hamburger’
If one take-home message emerged from the event, it was that the threat to the general public remains low.
The retail milk supply is safe, although consuming raw or unpasteurized milk is not recommended. “While commercial milk supply is safe, we strongly advise against drinking raw milk,” said Donald A. Prater, DVM, acting director for the FDA’s Center for Food Safety and Applied Nutrition.
As for other foods, thoroughly cooked eggs are less risky than raw eggs, and the nation’s beef supply remains free of the virus as well.
For years, federal inspectors have purchased and tested meat at retail stores, said Eric Deeble, DVM, USDA deputy assistant secretary for the Office of Congressional Relations. So far, H5N1, the virus behind bird flu, has not been detected in beef.
The USDA took testing a step further and recently cooked ground beef from dairy cows in their lab. Using what Deeble described as an “experimental hamburger,” the agency showed cooking beef to 165 F or higher kills the virus if it ever becomes necessary.
The federal government now requires all cattle be tested and be free of bird flu virus before crossing any state lines. The government is also reimbursing farmers for veterinary care and loss of business related to the outbreak, and supply personal protective equipment (PPE) like gloves, masks, and face shields to workers.
Vaccination Not Recommended Now
Federal scientists know enough about H5N1 virus to create vaccines against it quickly if the need arises. It’s more about planning ahead at this point. “Vaccines are not part of our response right now,” said David Boucher, PhD, director of infectious diseases preparedness and response at the Administration for Strategic Preparedness and Response.
If the virus changes and becomes a bigger threat to people, “we have the building blocks to produce a vaccine,” Boucher added.
An event attendee asked if the seasonal flu shot offers any protection. “Unfortunately, the flu shot you got last year does not provide great protection from the avian flu,” Shah responded. “It might do a little bit … but that is the vaccine for seasonal flu. This is something more novel.”
Treatments Stockpiled and Ready
Antiviral medications, which if given early in the course of bird flu infection could shorten the severity or duration of illness, are available now, Shah said. The dairy farmer who was infected with bird flu earlier this year responded to oseltamivir (Tamiflu) treatment, for example.
When it comes to bird flu symptoms, the fact that the only infected person reported so far this year developed pink eye, also known as conjunctivitis, is interesting, Shah said. Officials would have expected to see more typical seasonal flu symptoms, he added.
“Influenza is not a new virus,” Boucher said. “With this strain of influenza, we are not seeing any genetic markers associated with resistance to antivirals. That means the antivirals we take for seasonal influenza would also be available if needed to treat H5N1.”
ASPR has stockpiled Tamiflu and three other antivirals. “We do have tens of millions of courses that can be distributed around the country if we need them,” he added.
“Influenza is an enemy we know well,” Boucher said. That is why “we have antivirals ready to go now and many types of PPE.”
Science in Action
The feds intend to stay on the case. They will continue to monitor emergency department visits, lab test orders, and wastewater samples for any changes suggesting a human pandemic risk is growing.
“While we’ve learned a great deal, there are still many things we do not know,” Deeble said.
Shah added, “As in any outbreak, this is an evolving situation and things can change. What you are seeing now is science in action.”
For the latest updates on bird flu in the United States, visit the CDC’s H5N1 Bird Flu: Current Situation Summary website.


Nelly Korda: World number one wins Americas Open for sixth win in seven tournaments

China’s EV makers are having more trouble paying their bills and now take 2 to 3 times longer than Tesla does

Bethany Shriever: British Olympic BMX champion fractures collarbone

Russian strikes on Ukraine’s Kharkiv region kill at least 11

Texas crime victims liaison pleads guilty to human smuggling with county vehicle

It Ends With Us Author Colleen Hoover Recalls First Reaction to Seeing Blake Lively as Lily

At Chaotic Rally in Brooklyn, Police Violently Confront Protesters

Challenge Cup: Huddersfield Giants 10-46 Warrington Wolves
32 Amazon Baby Shower Gifts That New Parents Will Go Goo-Goo Gaga Over

Virgin Trains targets West Coast in return to rail

Black History Facts I had to Learn on My Own pt.6 📜

A Closer Look: Afro-Mexicans 🇲🇽

PROOF AFRICAN AMERICANS AIN'T FROM AFRICA DOCUMENTED EVIDENCE

How Did Normal Medieval People Survive Winter? | Tudor Monastery Farm | Chronicle
A Closer Look: Afro-Mexicans 🇲🇽

What happened to the many African Kingdoms? History of Africa 1500-1800 Documentary 1/6

The Entire History of Africa in Under 10 Minutes – Documentary

AFRO MEXICO: Black History In Mexico!

Why do we call them the “Dark Ages”? – Medieval DOCUMENTARY

A Black African King in Medieval European Art

Evidence of African Nobility all over Medieval Europe.

african presence in mexico part 1

Did Africans Discover America Before Christopher Columbus?

The Black Presence in Renaissance Europe in 4K- Historical Paintings of Africans Brought To Life

Africans Visited the Americas Long Before Columbus | African History

Dr. Ivan Van Sertima – African Presence in Early Asia

African Presence in Early Europe – Dr Ivan Sertima – PART 1

History of Cameroon

Black History (It’s Yours) | Black History Month Rap Anthem | Animated Music Video

History of Africa from the 16th to the 20th Century
-
 African History4 months ago
Black History Facts I had to Learn on My Own pt.6 📜
-
 African History4 years ago
A Closer Look: Afro-Mexicans 🇲🇽
-
 African History1 year ago
PROOF AFRICAN AMERICANS AIN'T FROM AFRICA DOCUMENTED EVIDENCE
-
 African History2 years ago
How Did Normal Medieval People Survive Winter? | Tudor Monastery Farm | Chronicle
-
African History4 years ago
A Closer Look: Afro-Mexicans 🇲🇽
-
 African History3 years ago
What happened to the many African Kingdoms? History of Africa 1500-1800 Documentary 1/6
-
 African History3 years ago
The Entire History of Africa in Under 10 Minutes – Documentary
-
 African History2 years ago
AFRO MEXICO: Black History In Mexico!