Sci-Tech
Xencelabs Pen Display 16 review: Specs, performance, cost

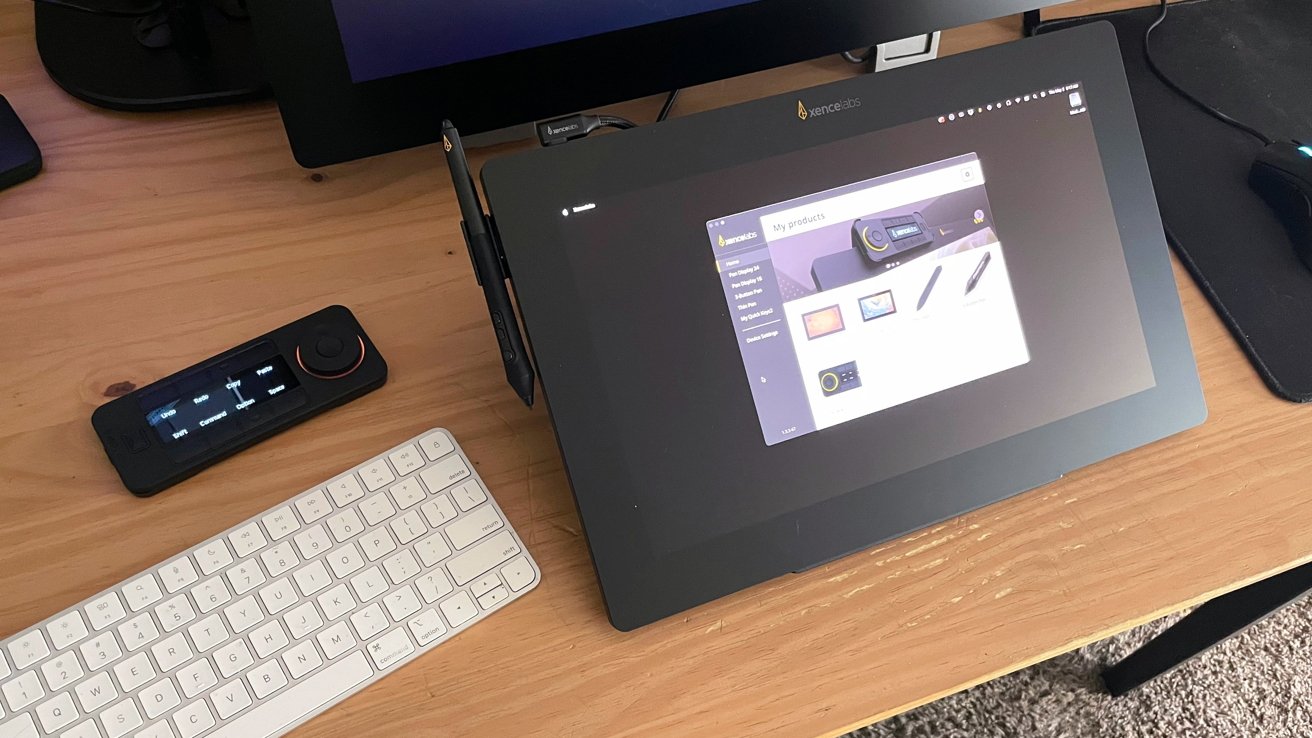
The Xencelabs Pen Display 16 in use
The Xencelabs Pen Display 16 is a great alternative to Wacom for digital artists who want to level up artistry on the Mac.
Artists in 2024 are working in more spaces and ways than ever before. From home offices to schools, shared workspaces, libraries, and coffee shops, the need presented to the pen display industry is simple: Mobility.
In recent years, companies like Apple and Wacom have worked to address this need, via offerings such as the Apple Pencil and the Wacom Cintiq Pro 16.
As with every industry, there will be newcomers who approach things from a new direction. Using the clarity of listening to their audience first, rather than leaning on gimmicks or shortcuts.
Xencelabs is a company making big moves with its incredible Pen Display 24. Its new Pen Display 16 as a viable option for artists on the move, or who want a dedicated pen display that is less expensive than a dedicated desktop display.
Xencelabs Pen Display 16 review — Two options
As of this writing, I use a 2022 Mac Studio with an Apple M1 Max chip, 32GB unified memory, with a 512GB SSD. This Mac Studio is my everyday machine and handles all my projects with zero issues.
That’s not to say that you need Mac Studio power for the Xencelabs Pen Display 16. I just retired an Intel Mac mini, and it performed well on that too.

The Xencelabs Pen Display 16 box
With the release of the Pen Display 16, Xencelabs is offering up two purchasing options for customers — The Pen Display 16 Bundle and Pen Display 16 Essentials.
The Pen Display 16 Bundle offers a lot, including the Pen Display 16 and many accessories. This includes a mobile easel, two pens, multiple cable options, hub driver, the Xencelabs Quick Keys dongle, a carrying case, pen case, extra nibs, and a drawing glove.
The bundle is everything associated with the Pen Display 16. It’s aimed toward customers who are either mobile or require HDMI and alternate data connection options with their workspace.
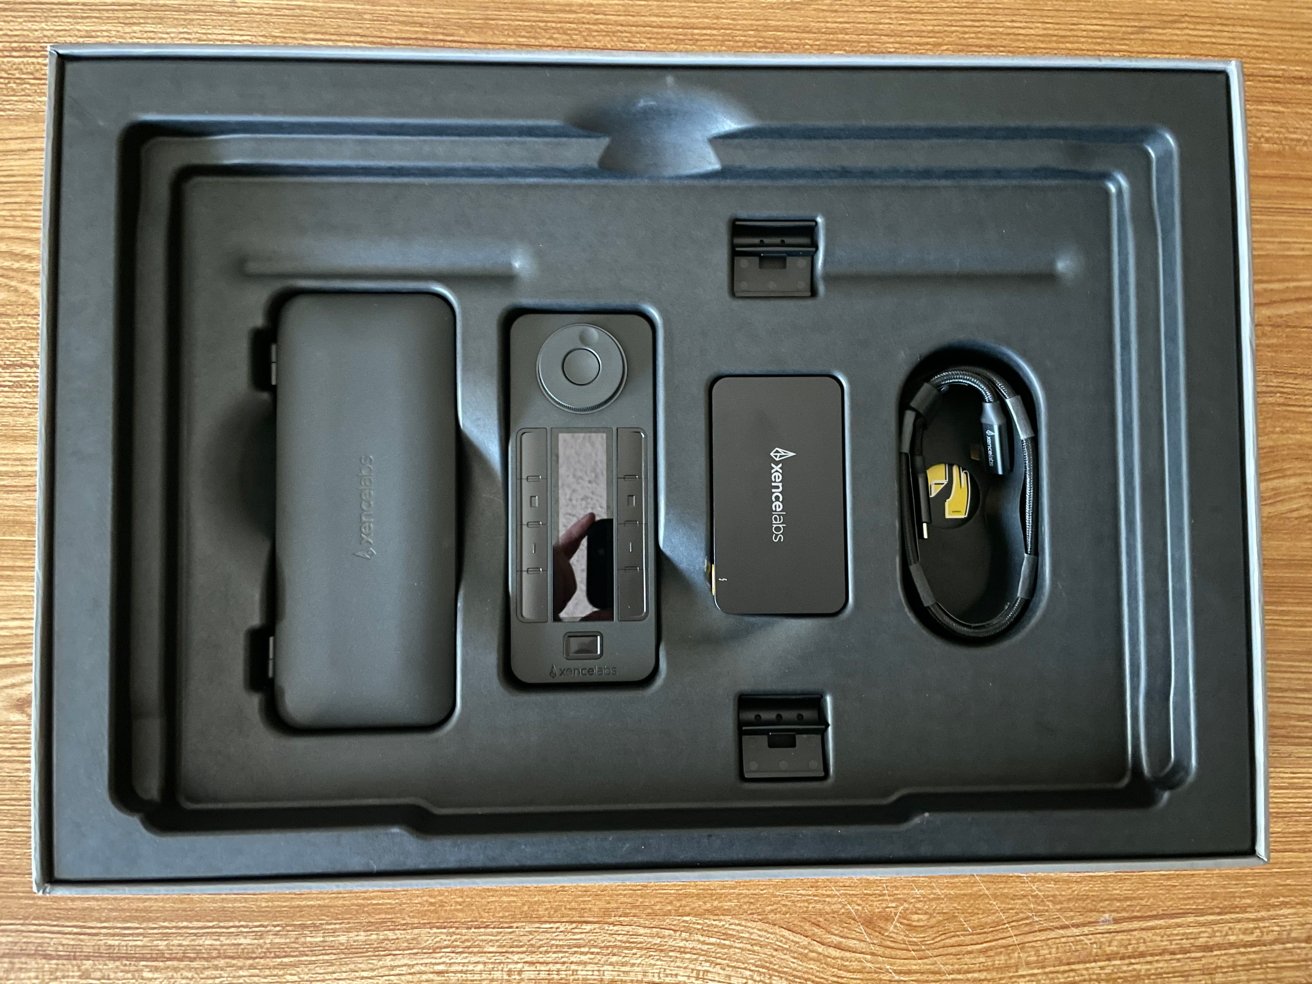
Some of the Xencelabs Pen Display 16 accessories in the box
The Pen Display 16 Essentials streamlines down the overall package. It contains the Pen Display 16, two pens, pen case, a single USB-C to USB-C cable, carrying case and a drawing glove.
This option is lower in price and is aimed at customers who do not foresee moving around often with the Pen Display 16. The missing items in this option compared to the Pen Display 16 Bundle can all be purchased a la carte from the Xencelabs eStore.
Xencelabs Pen Display 16 review — Specifications
- Dimensions (W x H x D): 16.25 x 10.25 x .47 in
- Active area size: 13.5 x 7.75 in
- Display resolution: 4k OLED
- Weight: 2.67lbs.
- Displayable colors (Maximum): 1.07 billion colors
- Color gamut coverage ratio: Five factory-calibrated color spaces: Adobe RGB (98%), P3-DCS (98%), sRGB (99%), Rec 2020 and Rec 709.
- Pens: 3-Button Pen v2 + Eraser / Thin Pen v2 + Eraser
- Pen technology: EMR
- Pen pressure levels: 8192 levels (Finely Tuned Pressure Curve)
- Pen tilt angle: 60 degrees
- Pen resolution: 5080 lpi
- Pen type: Pressure-sensitive, cordless, battery-free
- Quick Keys dimensions (W x H x D): 6.2 x 2.46 x 0.47 in
- Quick Keys weight: 142 g
- Quick Keys display: 3.12-inch OLED display; clearly displays key functions
- Quick Keys directions: 4 directions (0 degrees / 90 degrees / 180 degrees / 360 degrees); text symbols can be read horizontally or vertically
- Quick Keys battery life: 25-53 hours (1.5 hours charging time)
- Quick Keys controls: Custom buttons: 8 per set. There can be 5 sets giving a total of 40 short-cut keys. Four-mode dial
For ports, the Pen Display 16 offers a single USB-C port at the top of the tablet. To utilize HDMI or external power and data options, you will also need the Xencelabs Hub Driver to route your cables and options to meet your specific needs.
Xencelabs Pen Display 16 review — Build quality
In the unboxing of the Pen Display 16, I was absolutely stunned at how light the unit is. I don’t know what I expected, exactly, but the display is lightweight and feels durable.
If you read the review of the Xencelabs Pen Display 24, you’ll know that I sang the praises for how the Xencelabs hardware does not feel cheap or second-rate. The same can be said for the Pen Display 16.
The edge-to-edge glass is lovely and the unit is thin. It also feels like it could be quite durable.
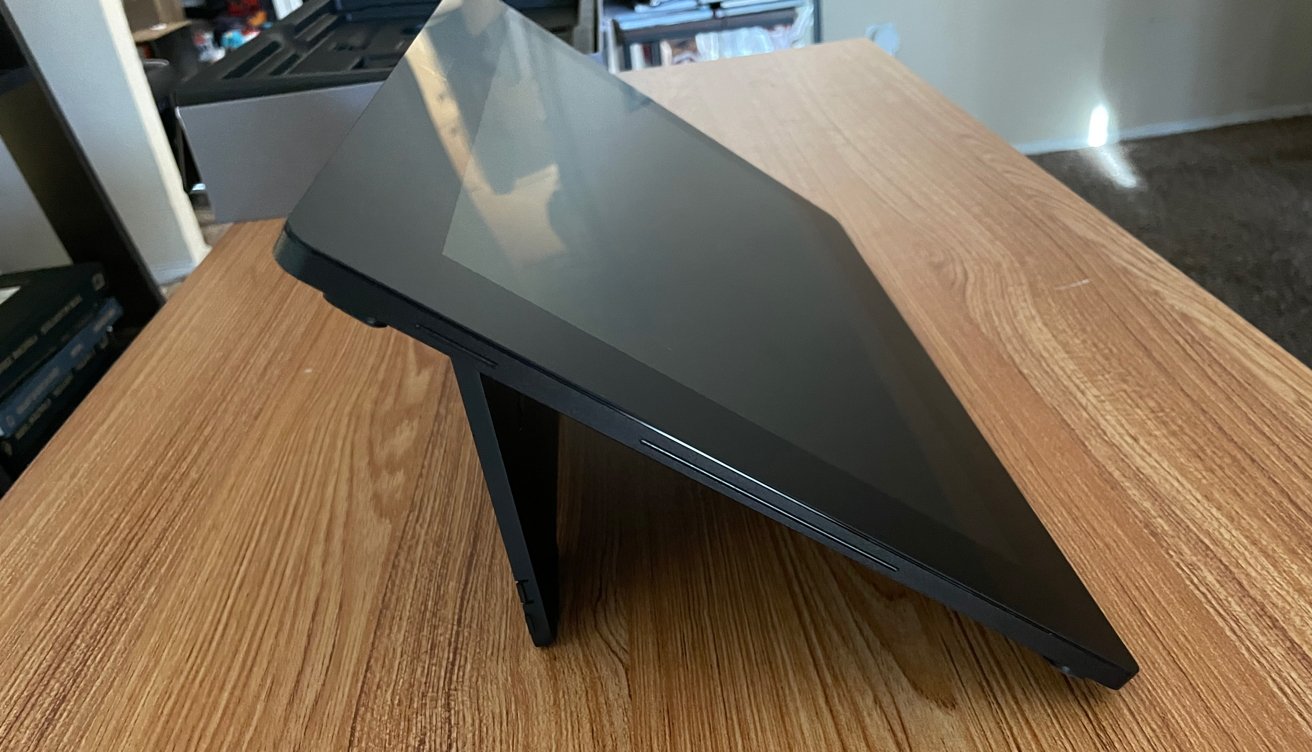
A side view of the Xencelabs Pen Display 16
While not tested, it feels like it could be bumped or dropped onto a desk or carpet, and not immediately feel like I ruined it.
Again, consistent design and application that focuses on quality.
Xencelabs Pen Display 16 review — Setup
Let me say this right at the top — I have never had an easier experience with setting up a new peripheral in my life.
I have unboxed, set up, and configured many pieces of hardware over my 20+ year career and this is by far the easiest. This includes the set-up of the Pen Display 24.
For my Mac Studio and working space, I unboxed the Pen Display, Mobile Easel, pen case, pens, and the included USB-C cable. After setting the display on the easel, plugging in the USB-C cable, and turning it all on,everything was there, visible, and ready to go.
The proprietary Xencelabs driver was already installed for my Pen Display 24. If it hadn’t the set-up instructions contain links and QR codes to take you to instructions and the drivers you will need for Windows, MacOS, or Linux.
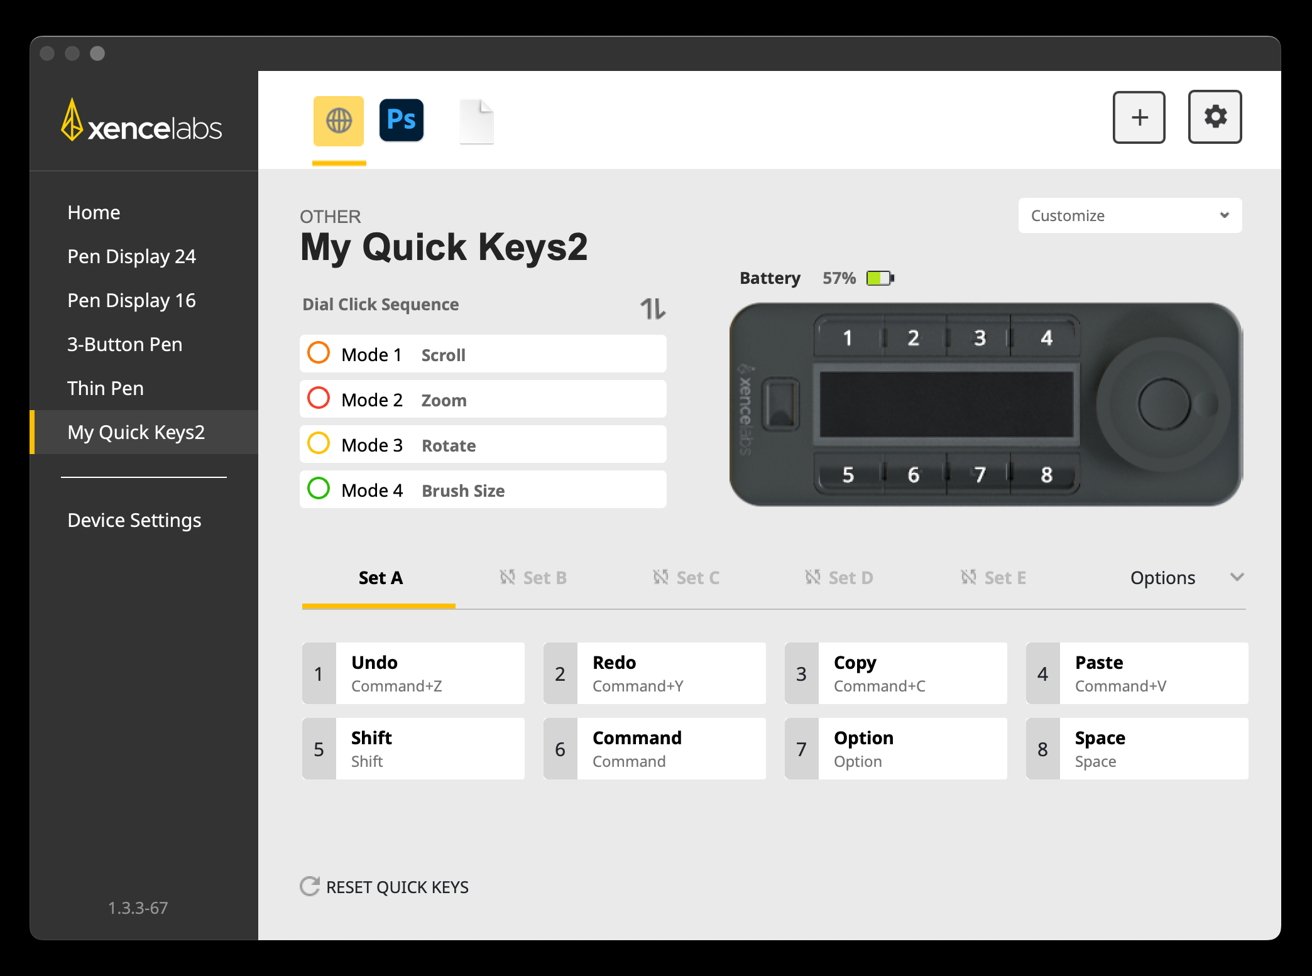
The driver interface for the Xencelabs Pen Display 16The driver interface for the Xencelabs Pen Display 16
Through the driver, I was able to calibrate everything for the pen buttons, the display itself, pen pressures, color profiles, etc.
The entire process from unboxing to working was a few minutes and you will need to adjust to find your own comfort zone. But the driver makes it an easy and intuitive experience.
I wish I could use the same pen for both my Pen Display 24 and Pen Display 16 at the same time. Especially for the moments where I might be using the Pen Display 16 as a second screen.
It is a small and very specific request, but as things stand with the hardware, the pens are separate for each unit type.
Xencelabs Pen Display 16 review — In use
First and foremost, there are no fan noises. This is a big deal for users, as it helps keep a pleasant working environment.
One of the big talking points for Xencelabs and this new display is the 4K OLED screen. There is an emphasis on vivid colors and more realistic and/or accurate representation of line art and paintings on screen.
Xencelabs delivered on those talking points. The screen is gorgeous, bright, sharp, and with the edge-to-edge anti-glare surface, it’s very easy on the eyes.
Simulating a public workspace in my office by turning on all the lights, the Pen Display 16 still works and works very, very well.
During testing, there was very little glare, and if you bring this display into your ideal space with non-direct light, it is going to excel. The colors and quality of detail for a 16-inch tablet is staggering.
Xencelabs provides two battery-free EMR pens with the Pen Display 16 — A chunkier 3-button model and a slim Apple Pencil style model. If you’ve used Wacom or Xencelabs products, you’ll be familiar with these types of pens.
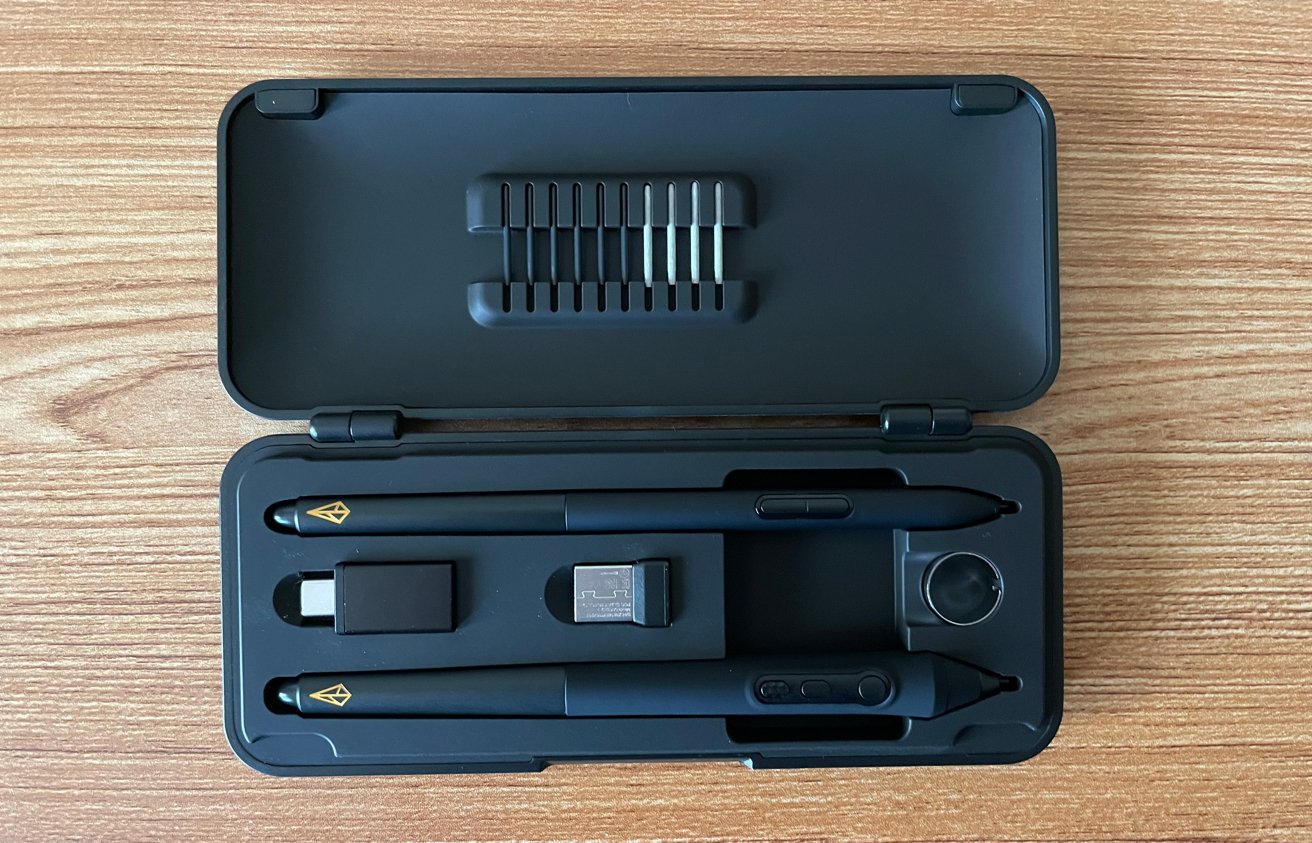
Pens included with the Xencelabs Pen Display 16
Both pens are completely customizable through the Xencelabs driver. It’s also great that both pens are made available to use.
I prefer the chunky stylus pen based on my own comfort and muscle memory, but I know many artists who appreciate the natural feel of something close to a pencil in shape and weight.
The smaller pen may be beneficial to folks who have carpal tunnel or other physical issues with grip strength. The size, weight, and responsiveness of the stylus on the Pen Display 16 could feel like a game changer.
Both pens deliver 8,192 different pressure levels with a resolution of 5,080 lpi. They can be used with a 60-degree tilt in any direction, consistent with the Pen Display 24.
Consistency is key, and for years, Wacom was the only company getting it right. It is a genuine relief to see that Xencelabs is holding their standards for quality and using these pens shines a spotlight on that.
Xencelabs Pen Display 16 review — Quick Keys
The Pen Display 16 Bundle also includes the Xencelabs Quick Keys Controller. I have covered this peripheral in my Pen Display 24 review, but it is worth covering the highlights here as well.
The Quick Keys Controller is a great tool that has the potential to add speed and flexibility to your overall workflow with the Pen Display 16.
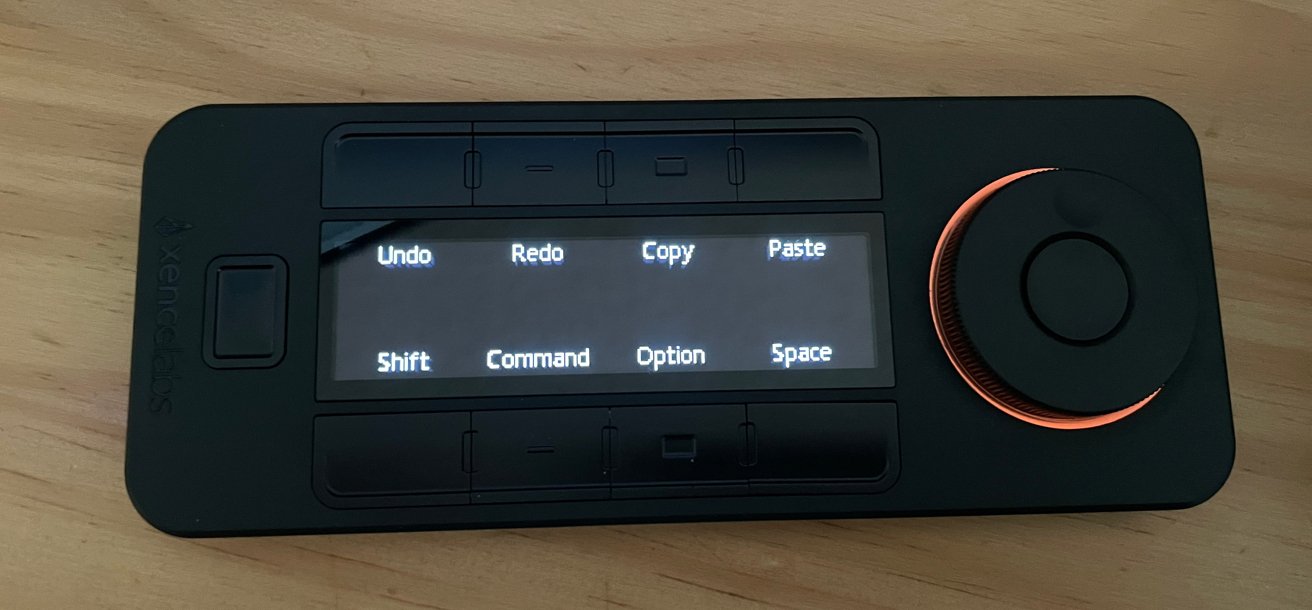
The Xencelabs Pen Display 16 Quick Keys controller
The Quick Keys Controller features eight customizable buttons that can be assigned and arranged into sets of shortcuts, commands, and options. There’s support for a wide range of software partners, including Adobe, Foundry, and many more.
A dial on the Quick Keys Controller adds more customization and that dial allows you to switch between saved configurations based on the software you are using.
If you are new to your preferred software or just aren’t the kind of person who retains key commands, the Quick Keys Controller is amazingly helpful. It can save you time and prevent you from doing the menu highlight/drop/select hundreds of times a day.
That time-saving alone is worth the cost to some.
However, unlike the Pen Display 24, this Quick Keys Controller does not attach to the Pen Display 16. It would be impractical based on the size, but you will need to place the Quick Keys Controller nearby to make the best use of it.
Xencelabs Pen Display 16 review — Mobile easel
Included with the Pen Display 16 Bundle is the Xencelabs Mobile Easel. This is a sturdy and lightweight stand for the Pen Display 16 that allows positioning between 18 degrees and 32 degrees for a wide range of motion and options to save your posture.
The Mobile Easel is strong, and it is nice to have the options, but it is still not ideal for someone on the taller side. They would need to elevate the easel and pen display further or drop into a lower seat.
A standing desk could help this quite a bit, but that is not an option for everyone.
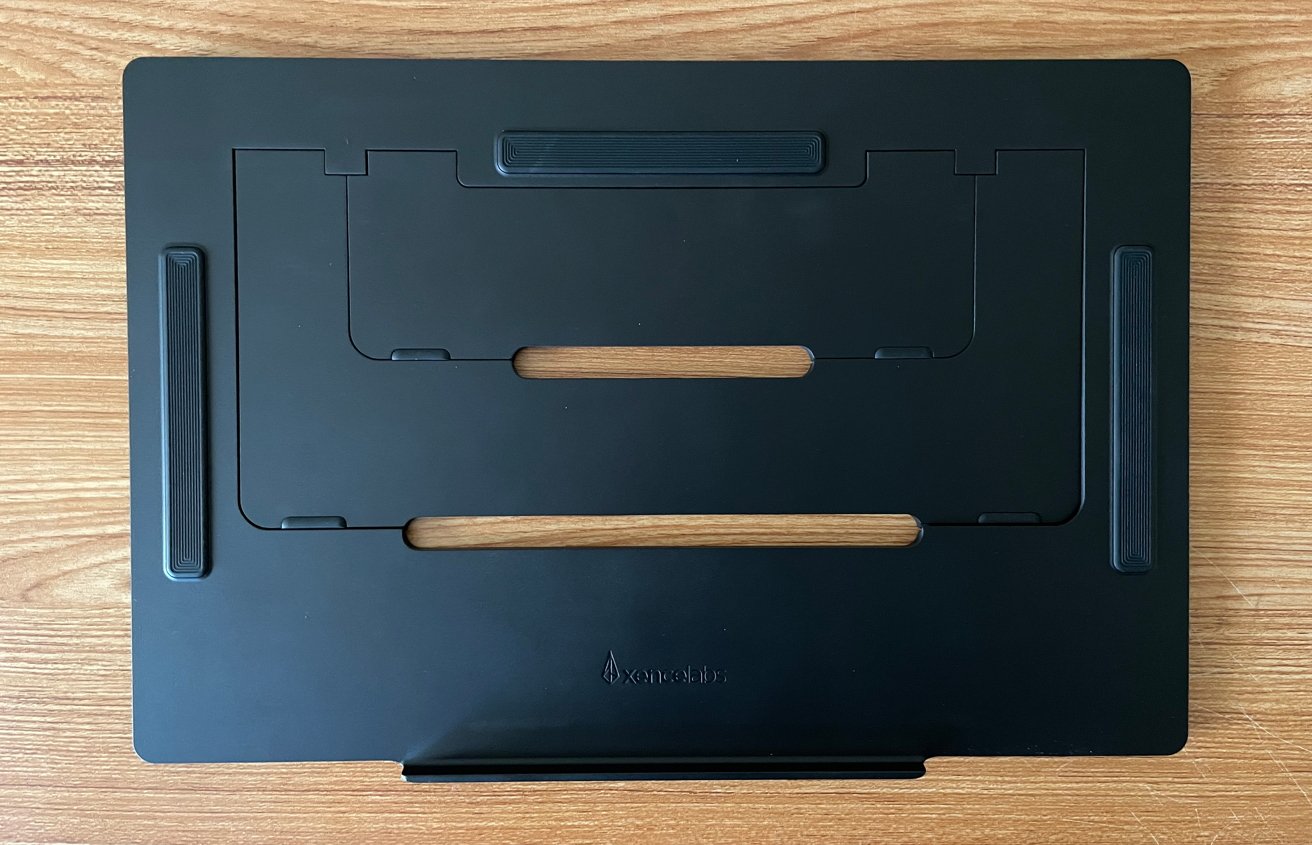
The Xencelabs Pen Display 16 mobile easel
Xencelabs states in its press literature that a Desktop Easel with a variety of tilt angles using a standard VESA mount and quick release is coming in the summer of 2024.
The idea of more options and a VESA mount for an Ergotron arm sounds very cool, and I will be looking forward to seeing what Xencelabs offers.
Xencelabs Pen Display 16 review — Working Experience
Spending days with the Pen Display 16 and creating artwork from start to finish with it, I can report that it is an excellent experience.
After testing a variety of display tablets that targeted the “mobile” lifestyle, from iPad to Wacom’s offerings, it’s safe to say that the Pro Display 16 is better overall for my use and standards.
The tablet is vivid, quiet, and insanely responsive. The only slight stumble was adjusting from the real estate of the Pen Display 24 down to the Pen Display 16 from a muscle memory standpoint.
I am a “shoulder illustrator,” meaning I have a range of motion in my arm when I draw and the smaller footprint took about an hour to get used to. Once I did, it was smooth sailing.
That said, the 4K OLED display is gorgeous. However, the native resolution and size of menus, toolbars, and UIs meant I had to adjust font sizes to account for my older eyes.
It is a small change to make, but other folks with progressive lenses or readers might want to keep this in mind.
To test the Pen Display 16, I created a recent commission piece that I knew would be vibrant and fun once completed.
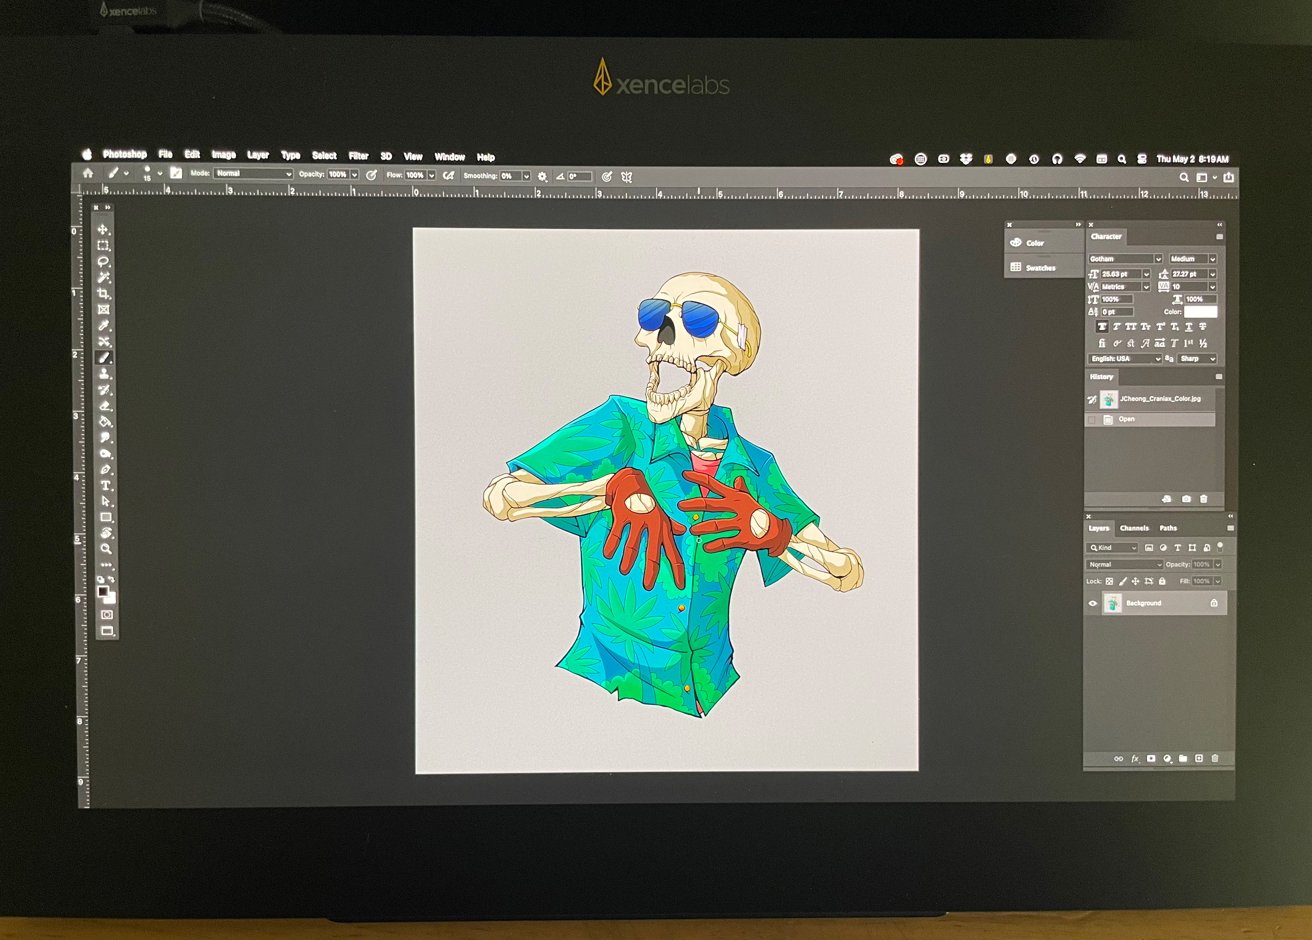
A commission piece drawn on the Xencelabs Pen Display 16
The process was wonderful and as an added test, I worked to implement the use of the Quick Keys Controller as well. I can say that while it is not my standard, it did give me ideas for how it could be worked into other apps that I use outside of Photoshop.
Ultimately, it feels like Xencelabs took the approach it always takes. Namely looking at the industry and focusing on aspects it can improve or just do flat out better than everyone else.
As someone who was a decades-long Wacom fan who thought the era of quality display tablets had come to an end, it is a genuine relief to see Xencelabs thriving.
Having a display tablet like this for mobile work, meetings, and for the simple, occasional change in venue, is amazing. It is good for artists, and it is good for the industry.
Xencelabs Pen Display 16 review — Pricing and Value
With all of this said, it always comes down to the bottom line. It is easily worth anyone’s investment.
Xencelabs is offering the Pen Display 16 Bundle for $1,249 MSRP USD and the Pen Display Essentials for $999 MSRP USD.
Neither of these options are what you would call inexpensive, but you are getting great value for money. Wacom’s Cintiq Pro 16 retails for $1,599 MSRP USD in the Wacom eStore and while it is a good display tablet, I think the Pro Display 16 is better overall.
The Pen Display 16 is not a casual purchase. It’s still recommended that hobby artists should experiment with working on an iPad for a while before making the leap and investment.
However, if you love the idea of having a dedicated pen display that delivers, this is the best option out there. You’ll save a little money with even the Pen Display 16 Bundle compared to the Wacom, and you’ll have a better pen display.
Hardware like this is an investment of time and money. You need a pen display that will not only meet those needs but vastly exceed them.
Xencelabs continues to show the world what is possible with hardware, common sense features, and pricing. They are still the breath of fresh air this industry needs.
Xencelabs Pen Display 16 review — Pros
- Easy set up and driver installation.
- Incredible screen display.
- Clean proprietary driver with buckets of customization options.
- Zero fan noise.
- Sturdy construction.
- Quick Key Controller (not vital but a good peripheral).
- Excellent pen responsiveness and line quality.
- Costs less than comparable Wacom options (see below).
Xencelabs Pen Display 16 review — Cons
- Not a “cheap” option hobby for artists (see below).
- No native VESA mount.
- The native display size for UIs could be a strain on poor eyesight.
- The Mobile Easel is not included in both bundles.
Rating: 4.5 out of 5
Where to buy the Xencelabs Pen Display 16 review
The Xencelabs Pen Display 16 is available from Xencelabs, priced at $1,249 for the bundle.


Your iPhone Pro and iPad Pro may have a helpful and powerful feature you might not know about. Built directly into the last few generations of devices, the Light Detection and Ranging (LiDAR) scanner emits a laser to measure the distances of surrounding objects. This feature provides a few key benefits.
Also: How to use split-screen on iPad (and why you should)
First, LiDAR helps the camera take sharper photos, particularly in dark conditions. Second, the scanner taps into AR, or augmented reality, to combine the real and virtual worlds. With AR, your phone or tablet acts as a virtual tape measure, shows you how new furniture would look in your home, scans and recreates 3D models, and immerses you in AR games.
Introduced a few years ago, the LiDAR scanner is available on the Pro and Pro Max models of the iPhone 12, 13, 14, and 15, as well as the 11-inch and 12.9-inch iPad Pro models from 2020 and later. Nestled among the rear cameras, the scanner can detect objects up to five meters, or 16.5 inches.
1. Take a photo in the dark
Snapping a sharp photo with your iPhone can be challenging, especially in low-light situations. Under those conditions, the LiDAR scanner detects the distance of your subject, allowing your camera to power up the autofocus quickly.
Also: How to take better iPhone photos
Apple claims that the LiDAR sensor helps the camera autofocus as much as six times faster, an advantage when you want to take a shot before it’s too late. There’s no need to do anything special. Aim your phone’s camera and the LiDAR automatically kicks in if necessary.
2. Measure distances
You need to measure a physical distance but don’t have a ruler or tape measure. There’s no need to worry when you can use a virtual measure. Included with iOS/iPadOS and downloadable from the App Store, Apple’s free Measure app can determine the distance between any two points, display the dimensions of an object, and tell you if a surface is straight.
Open the Measure app on your device. Then to measure the distance between two points, position your phone so the starting point is at the dot within the circle.
Also: The 4 best iPad models right now
Tap the plus icon, move your phone along the area you want to measure, and then tap the plus icon again. The distance appears on the screen.
To measure an object such as a square, you position your phone in the same way. Tap the plus icon and move your phone along the first area to measure it. Then double tap the plus icon. Move your phone to capture the next area and, once again, double-tap the plus icon. Continue this way until you’ve captured the entire object. Double-tap the plus icon at the endpoint, and the distance appears for all four sides.
To determine if an area is level, tap the Level icon in the app’s toolbar. Tilt your device horizontally or vertically along a surface until the screen turns to 0 and flashes green to indicate that you’re level.
Beyond using Apple’s Measure app, check out other free AR measuring apps from the App Store, including Tape Measure and AR Measure.
3. Try out furniture in your home
Are you looking at a new desk, chair, table, or other piece of furniture and wondering how it would look and fit in your home? Let the IKEA app give you a helping hand.
Start by browsing or searching for a specific piece of furniture or other item, including chairs, beds, desks, sofas, lamps, mirrors, clocks, dressers, or bookcases. When you find an item that interests you, select it and tap the View in room button. Choose an area in your home where you’d like to see the item. You can then move the item around the room by dragging and dropping it. When it’s in the right spot, tap the shutter button to snap a picture.
A few other apps that let you virtually position and view furniture in your home are Wayfair, Housecraft, and Bob’s Discount Furniture.
4. Scan a room
Maybe you’re redecorating an entire room and want to measure it to help with your home improvement efforts. One app up to the task is Canvas: LiDAR 3D Measurements.
After signing up for a free account, start a new home project, give it a name, and then kick off your scan. Move your phone to capture every nook and cranny of the room you want to measure. When done scanning, tap the checkmark, and you can view the scanned area and save or share the scan itself.
5. Try on glasses
Need a new pair of prescription glasses or sunglasses but want to check out some options before you head to the store? The Warby Parker app will let you try on virtual glasses to see how they look. Browse the different glasses on display in the app. Spot a pair you like and swipe down from the top of the screen for the Virtual Try-On feature. The glasses automatically appear on your face, where you can check your appearance.
6. Hear your environment described
Designed for people who are blind or sight-impaired, Microsoft’s Seeing AI acts as a talking camera able to analyze and describe nearby people and objects.
Also: The best iPhone models you can buy right now (including the iPhone 15)
After launching the app, tap one of the icons at the bottom for the item you want to be described, choosing from short text, a document, a product, a person, currency, or a scene. Tap the shutter button and the app shows text and provides a spoken description of the item.
7. Scan a 3D model
If you want to capture a 3D image of an object in the real world, Scaniverse – 3D Scanner is an effective tool. Fire up the app, tap the shutter button, and then select the size of the object you want to scan — small, medium, or large. Move your phone around the object to capture as much of it as possible. Tap the shutter button when you’re finished. Ten choose how you want to process the scan. You can view the scan of the object by moving it around the screen and then edit and share the scan.
Other 3D AR scanner apps worth trying include 3D Scanner App, Polycam – LiDAR & 3D Scanner, and ARama!
8. Play a game
Finally, many AR games are available for the iPhone and iPad. Here are just a few you may want to check out.
Also: Meet Apple’s Vision Pro: Price, features, hands-on insights, and everything you need to know
Angry Birds AR: Isle of Pigs offers a twist on Angry Birds-style gameplay by letting you overlay a virtual island of piggies in the real world and aim your slingshot to take down their buildings.
ARia’s Legacy – AR Escape Room offers a variation of the usual escape room scenario by overlaying a virtual room in a real room. You must discover and use the right virtual objects to solve the underlying mystery.
Who doesn’t like to watch robots duking it out? With AR Robot, virtual robots fight to the death in your home.
Choose the room, pick your mechanical champion, and let the match begin. Strive toward victory by building and customizing your bot and tapping into the right abilities in the heat of the battle.
In Defend It! AR, you shoot a horde of robots before they take over your living room. But the AR element here is that the robots burst through your wall as you struggle to get them before they steal your magic crystal of power.

For the longest time, type 1 diabetes was known as a childhood disease. Even until recently, it was still called “juvenile diabetes.” I’m here to tell you that just because you’re an adult doesn’t mean you’ve escaped the wrath of this illness.
I know this because it happened to me. At the age of 30, I was misdiagnosed with type 2 diabetes for over six months. It wasn’t until I started sharing my diagnosis on TikTok that I discovered the truth and that this could happen to someone my age.
Roughly 60% of diagnoses today occur in adults who are 20 years of age or older. This form of type 1 diabetes is called Latent Autoimmune Diabetes of Adults. On top of that, 90% of those diagnosed with type 1 have no family history.
Rates for people living with diabetes are expected to more than double to 1.3 billion by 2050. This will impact both people with type 1 and type 2 diabetes. Spreading awareness about symptoms and early screening for type 1 diabetes will help people get the correct diagnosis and treatment they need sooner.

Research published in The Lancet projects a steady increase in the prevalence of type 2 diabetes in coming years.
There is a lack of awareness about diabetes, even within the medical community. Because of this, many people go undiagnosed or misdiagnosed with type 2 diabetes for months or even years. Here’s what you need to know.
The difference between type 1 and type 2 diabetes
Type 1 diabetes occurs when the pancreas no longer produces insulin, the hormone that regulates blood glucose, because the immune system attacks itself. Meanwhile, type 2 diabetes occurs due to insulin resistance, often due to lifestyle factors, and tends to be hereditary. As many as 11% of patients diagnosed with type 2 diabetes might actually have LADA. There are a couple things we can all do to prevent others from going undiagnosed and feeling ill for as long as I did.
The first is to know the signs of type 1 diabetes. The tell-tale symptoms are excessive thirst and urination, extreme feeling of fatigue, blurred vision and weight loss. When I was diagnosed, I was experiencing all of these symptoms and had lost over 20 pounds. After months of misdiagnosis, I saw an endocrinologist who ordered blood tests, and within weeks, I had the correct type 1 diagnosis.
Had my glucose levels gone unchecked for longer, I could have gone into diabetic ketoacidosis or DKA, which can be deadly. Up to 30% of those diagnosed in the US are discovered at this stage.
Another way we can prevent loss of life or sickness is with early screening for indicators of type 1 diabetes. Two blood tests are used to aid in diagnosis: A c-peptide test, which measures how much insulin a person is making themselves, and an islet autoantibody test, which screens for markers of the autoimmune process associated with type 1 diabetes. With these results, people can prepare and seek out treatment to offset the disease and/or treat it.
New legislation could help
Recent legislation aims to bring early screening for type 1 diabetes to the forefront of preventative care.
Last month, a bipartisan bill called the Strengthening Collective Resources for Encouraging Education Needed for Type 1 Diabetes Act was introduced in the House of Representatives. The bill directs the Centers for Disease Control and Prevention to conduct a national campaign to increase awareness and knowledge of type 1 detection, screening and management, and will allocate $5 million to the CDC to carry it out.
On my end, I will continue to share my story through articles like this one, videos on social media and interviews on my podcast, Diabetech. My hope is that no one will experience the long stretch of illness I experienced before getting the correct diagnosis and treatment needed.
Diabetes is a complex and complicated disease to manage. Devices like insulin pumps, smart insulin pens and continuous glucose monitors make living with the disease easier to manage, but they come with a steep learning curve.
I’m fortunate to be able to interview experts in the field on my podcast who help me and my audience stay informed on the latest tools and technology. I encourage anyone living with this disease to connect with me on YouTube, Instagram or TikTok to feel less alone and more in charge of your personal health.
Sci-Tech
Midjourney is creating Donald Trump pictures when asked for images of ‘the president of the United States’

Midjourney, a popular AI-powered image generator, is creating images of Donald Trump and Joe Biden despite saying that it would block users from doing so ahead of the upcoming US presidential election.
When Engadget prompted the service to create an image of “the president of the United States,” Midjourney generated four images in various styles of former president Donald Trump.
When asked to create an image of “the next president of the United States,” the tool generated four images of Trump as well.
When Engadget prompted Midjourney to create an image of “the current president of the United States,” the service generated three images of Trump and one image of former president Barack Obama.
The only time Midjourney refused to create an image of Trump or Biden was when it was asked to do so explicitly. “The Midjourney community voted to prevent using ‘Donald Trump’ and ‘Joe Biden’ during election season,” the service said in that instance. Other users on X were able to get Midjourney to generate Trump’s images too.
The tests show that Midjourney’s guardrails to prevent users from generating images of Trump and Biden ahead of the upcoming US presidential election aren’t enough — in fact, it’s really easy for people to get around them. Other chatbots like OpenAI’s ChatGPT, Microsoft’s Copilot, Google’s Gemini and Meta AI did not create images of Trump or Biden despite multiple prompts.
Midjourney did not respond to a request for comment from Engadget.
Midjourney was one the first AI-powered image generators to explicitly ban users from generating images of Trump and Biden. “I know it’s fun to make Trump pictures — I make Trump pictures,” the company’s CEO, David Holz, told users in a chat session on Discord, earlier this year. “However, probably better to just not — better to pull out a little bit during this election. We’ll see.” A month later, Holz reportedly told users that it was time to “put some foots down on election-related stuff for a bit” and admitted that “this moderation stuff is kind of hard.” The company’s existing content rules prohibit the creation of “misleading public figures” and “events portrayals” with the “potential to mislead.”
Last year, Midjourney was used to create a fake image of Pope Benedict wearing a puffy white Balenciaga jacket that went viral. It was also used to create fake images of Trump being arrested ahead of his arraignment at the Manhattan Criminal Court last year for his involvement in a hush money payment made to adult film star Stormy Daniels. Shortly afterwards, the company halted free trials of the service and, instead, required people to pay at least $10 a month to use it.
Last month, the Center for Countering Digital Hate, a non-profit organization that aims to stop the spread of misinformation and hate speech online, found that Midjourney’s guardrails against generating misleading images of popular politicians including Trump and Biden failed 40% of its tests. The CCDH was able to use Midjourney to create an image of president Biden being arrested and Trump appearing next to a body double. The CCDH was also able to bypass Midjourney’s guardrails by using descriptions of each candidate’s physical appearance rather than their names to generate misleading images.
“Midjourney is far too easy to manipulate in practice – in some cases it’s completely evaded just by adding punctuation to slip through the net,” wrote CCDH CEO Imran Ahmed in a statement at the time. “Bad actors who want to subvert elections and sow division, confusion and chaos will have a field day, to the detriment of everyone who relies on healthy, functioning democracies.
Earlier this year, a coalition of 20 tech companies including OpenAI, Google, Meta, Amazon, Adobe and X signed an agreement to help prevent deepfakes in elections taking place in 2024 around the world by preventing their services from generating images and other media that would influence voters. Midjourney was absent from that list.


Tui encourages Riu Hotels agent bookings with VIP trip incentive

The toll of extreme heat is rising in California

Olympics 2024: Seonaid McIntosh’s journey to Paris

8 cool ways to use LiDAR on your iPhone and iPad
The 15 Best Men’s Dress Shirts for Every Occasion

UK polls point to a big Labour win. The party fears voter complacency

China’s BYD posts 21% jump in quarterly EV sales, closes gap with Tesla

Ad-supported Murdoch Netflix rival to launch in the UK

Review: ‘A Quiet Place: Day One’

Biden slams SCOTUS presidential immunity ruling, ignores questions about dropping out

A Closer Look: Afro-Mexicans 🇲🇽

Black History Facts I had to Learn on My Own pt.6 📜
A Closer Look: Afro-Mexicans 🇲🇽

Major African Tribes taken away during the Atlantic Slave Trade🌍 #slavetrade #africanamericanhistory

Cameroon 🇨🇲 World Cup History (1962-2022) #football #realmadrid #shorts

PROOF AFRICAN AMERICANS AIN'T FROM AFRICA DOCUMENTED EVIDENCE

Black History Inventors: Mary Kenner 🩸

Mr Incredible Becoming Canny/Uncanny Mapping (You live in Paraguay 🇵🇾)

No African pre-Columbus DNA? 🤯🤯 #history #mesoamerica #mexico #african

How Did Normal Medieval People Survive Winter? | Tudor Monastery Farm | Chronicle

Evidence of African Nobility all over Medieval Europe.

african presence in mexico part 1

Did Africans Discover America Before Christopher Columbus?

The Black Presence in Renaissance Europe in 4K- Historical Paintings of Africans Brought To Life

Africans Visited the Americas Long Before Columbus | African History

Dr. Ivan Van Sertima – African Presence in Early Asia

African Presence in Early Europe – Dr Ivan Sertima – PART 1

History of Cameroon

Black History (It’s Yours) | Black History Month Rap Anthem | Animated Music Video

History of Africa from the 16th to the 20th Century
-
 African History5 years ago
A Closer Look: Afro-Mexicans 🇲🇽
-
 African History5 months ago
Black History Facts I had to Learn on My Own pt.6 📜
-
African History5 years ago
A Closer Look: Afro-Mexicans 🇲🇽
-
 African History1 year ago
Major African Tribes taken away during the Atlantic Slave Trade🌍 #slavetrade #africanamericanhistory
-
 African History1 year ago
Cameroon 🇨🇲 World Cup History (1962-2022) #football #realmadrid #shorts
-
 African History1 year ago
PROOF AFRICAN AMERICANS AIN'T FROM AFRICA DOCUMENTED EVIDENCE
-
 African History5 months ago
Black History Inventors: Mary Kenner 🩸
-
 African History5 months ago
Mr Incredible Becoming Canny/Uncanny Mapping (You live in Paraguay 🇵🇾)