Health
Easy Low-Calorie Gluten Free Bread Recipe

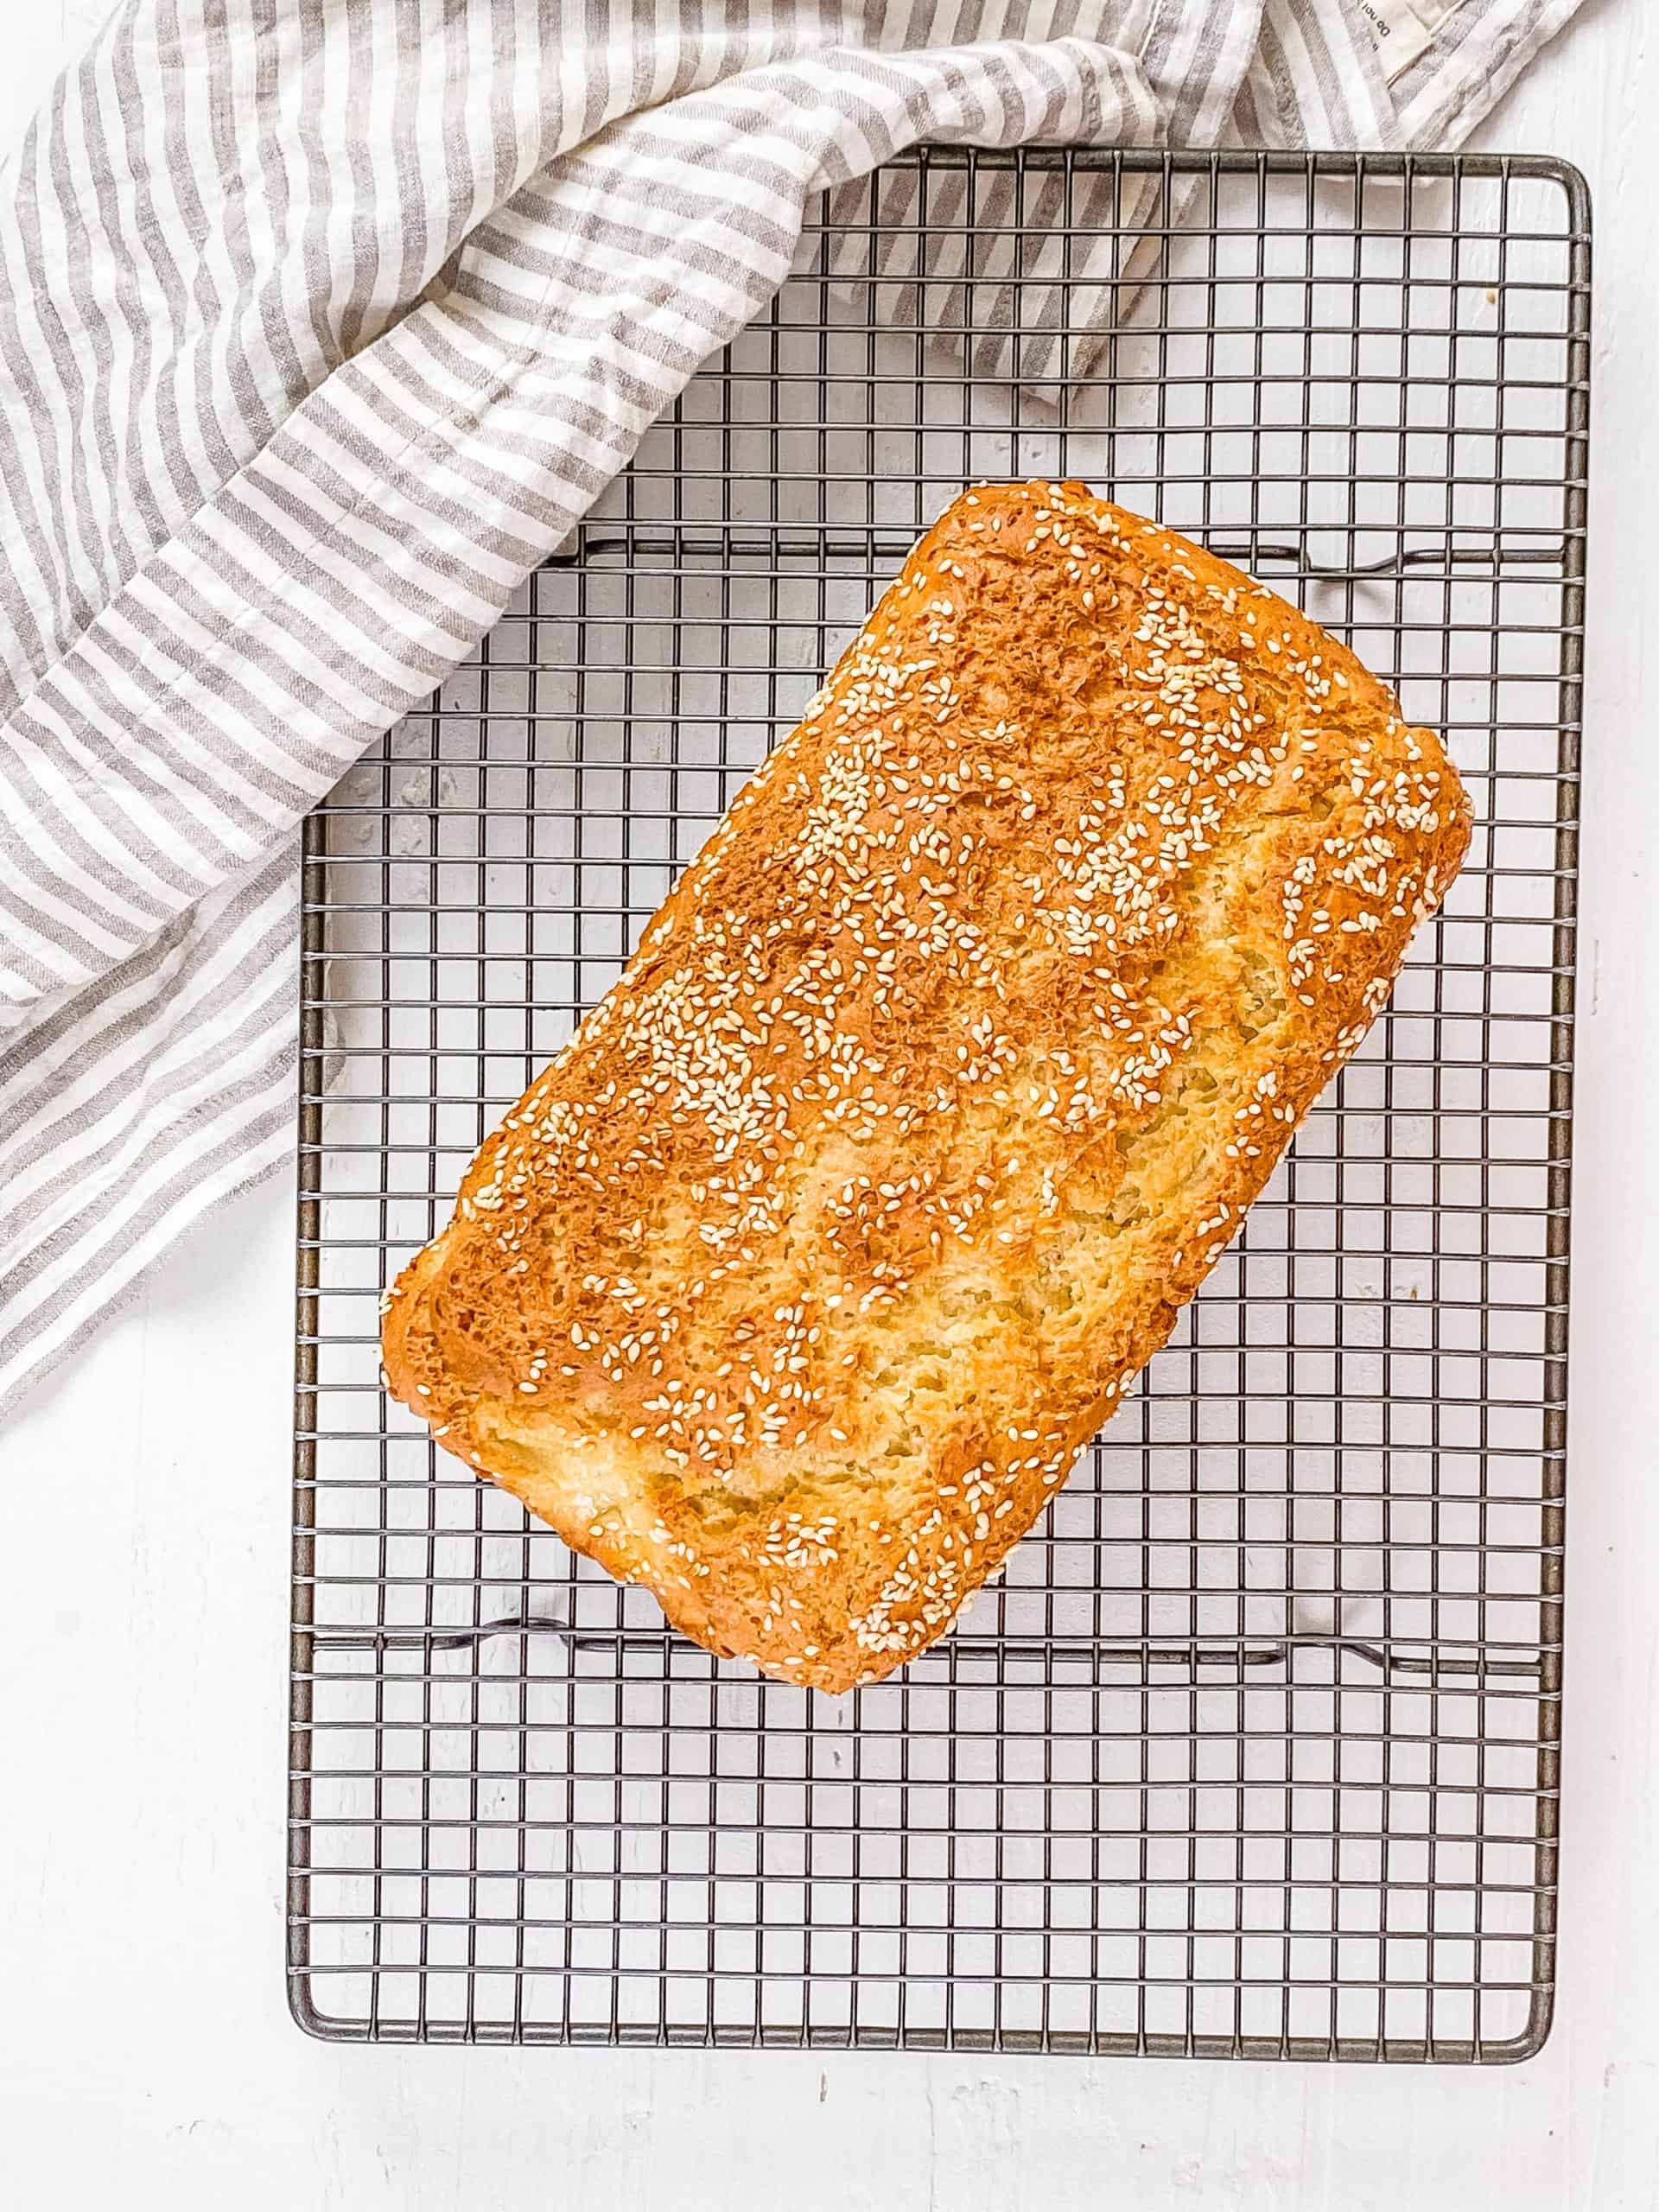
My homemade gluten-free bread recipe is incredibly delicious and super easy to make in both the oven and a bread machine. It slices effortlessly and has the perfect soft, chewy texture that is ideal for sandwiches, toast, and all your favorite bread-based meals. This is such a simple low calorie gluten free bread that anyone can make!

I’ve been eating gluten-free for quite a few years now, and when I first started switching to gluten-free items, bread was one of the hardest swaps to make! On top of that, I don’t love most store-bought gluten-free bread because it has a ton of additives and processed starches to make up for the lack of wheat flour or other gluten-containing grains like rye or barley. So while it’s gluten-free, you end up eating bread that’s higher in refined carbs and sugar and low in fiber, protein, and other critical nutrients.
I have found a handful of good gluten-free bread brands out there like Happy Campers, Canyon Bakehouse, and Udi’s, but they can be hard to find and are also pretty expensive compared to regular bread!
That’s why I am super excited to share my easy gluten free bread recipe. It’s not only good for you but is also soft, fluffy, and tastes great! Whether you have celiac disease, a gluten allergy or sensitivity, are following a gluten-free diet, or just want to try a different homemade healthy bread, this recipe is for you!
Making gluten-free bread at home can be tricky, which is why I have tested this recipe over 50 times so that I could guarantee the end result!
I’m happy to share that this is the most delicious and healthiest gluten free bread recipe I’ve ever made. It tastes just like regular bread with a soft and tender crumb that will win over any bread lover!
My recipe is just as healthy as it is delicious. Made with whole grains, it’s a high-fiber gluten-free bread recipe that is also high in protein and low in sugar. One slice has almost 6 grams of fiber, 8 grams of protein and 2 grams of sugar.
Plus, it’s really easy to customize this low fat gluten free bread. You can easily make my recipe vegan and dairy free with just a few swaps (see my variations section below). That makes it the perfect gluten free sandwich bread for anyone.
But my favorite thing is that my homemade gluten free bread recipe doesn’t require any kneading or fancy ingredients. It’s perfect for beginner bakers. You also have the option of baking it in your oven or a bread machine — see my notes below on how to do this!
Latest Recipe Video!
🥘 Ingredients
You only need a few basic ingredients to make my gluten-free homemade bread. You can find everything you need at your local grocery store. Scroll down to the recipe card at the bottom of the post for the exact amounts and nutritional information.

Gluten Free Flour: Almost any gluten free flour will work as long as it includes xanthan gum, which mimics gluten. Typically gluten free flour is a mixture of brown rice flour, potato flour, tapioca starch (or potato starch), maybe a few other gf flours, and xanthan gum.
Dried Yeast, Apple Cider Vinegar, and Baking Powder: These leavening agents are essential for helping my healthy gluten free bread rise. The dried yeast ferments to produce carbon dioxide, giving the bread lift, while apple cider vinegar reacts with the baking powder to create bubbles, enhancing the texture.
Cane Sugar, Warm Almond Milk, And Salt: Together, these ingredients activate the yeast and add flavor. Using unsweetened almond milk instead of regular milk also keeps this recipe dairy-free. While I haven’t tested other plant-based milks, I believe that any low-fat non-dairy milk should work, just make sure it’s unsweetened.
Egg Whites And Olive Oil: These act as binders that bring the dough together. To make my recipe vegan and dairy-free, you can replace the egg whites with aquafaba, which is one of many vegan egg substitutes. In the variations section below, I’ve included details on how much aquafaba you’ll need and how to use it.
Sesame Seeds: I use this for topping the bread, and trust me, a little bit goes a long way! I have also used sunflower seeds, pumpkin seeds, or a mix of chopped nuts and seeds – and all work well. Or, if you prefer, make your bread without a topping and omit this ingredient.
What Gluten-Free Flour Is Best For Bread?
One of the most important things I’ve found when making any gluten free bread recipe is choosing the right flour. For yeast bread, you must use a gluten-free flour blend meant for yeast recipes that includes xanthan gum or add xanthan gum to the blend. Gluten free bread without xanthan gum won’t have the proper texture.
I would recommend these five flours for yeast breads:
- Arrowhead Mills Organic Gluten Free All Purpose Flour
- Better Batter Blend
- Judee’s All Purpose Gluten Free Bread Flour
- Bob’s Red Mill Gluten Free All Purpose Baking Flour (need to add xanthan gum)
- Pillsbury Gluten Free Flour Blend
You can also experiment with mixing your own gluten-free flour blend! It’s a great way to control what grains you’re using if you have other grain allergies or if you live at high elevations or in places where baking is impacted by environmental factors.
Custom flour blends can also improve the texture of your bread and other baked goods. Here are some gluten-free flours that I have used to make my own custom flour blends, and that work well for baking bread:
- Buckwheat Flour
- Sorghum Flour
- Cassava Flour
- Millet Flour
- Oat Flour
- Brown Rice Flour
🔪 How To Make Gluten-Free Bread
I promise, learning how to make healthy gluten free bread is easy, even if you’re not an experienced baker. The dough comes together effortlessly, and I’ve included instructions on how to bake the bread in both the oven and a bread machine.
Watch my video below to see the step-by-step process of making my gluten free low calorie bread.
Proof The Yeast: In a small bowl, I mix together the yeast, sugar, and warm milk. Then I cover the bowl and set it aside in a dry, warm place (typically room temperature) to proof for about 10 minutes.

Combine The Dry Ingredients: While the yeast is proofing, I whisk together the flour, baking powder, and salt in the large bowl of a stand mixer.
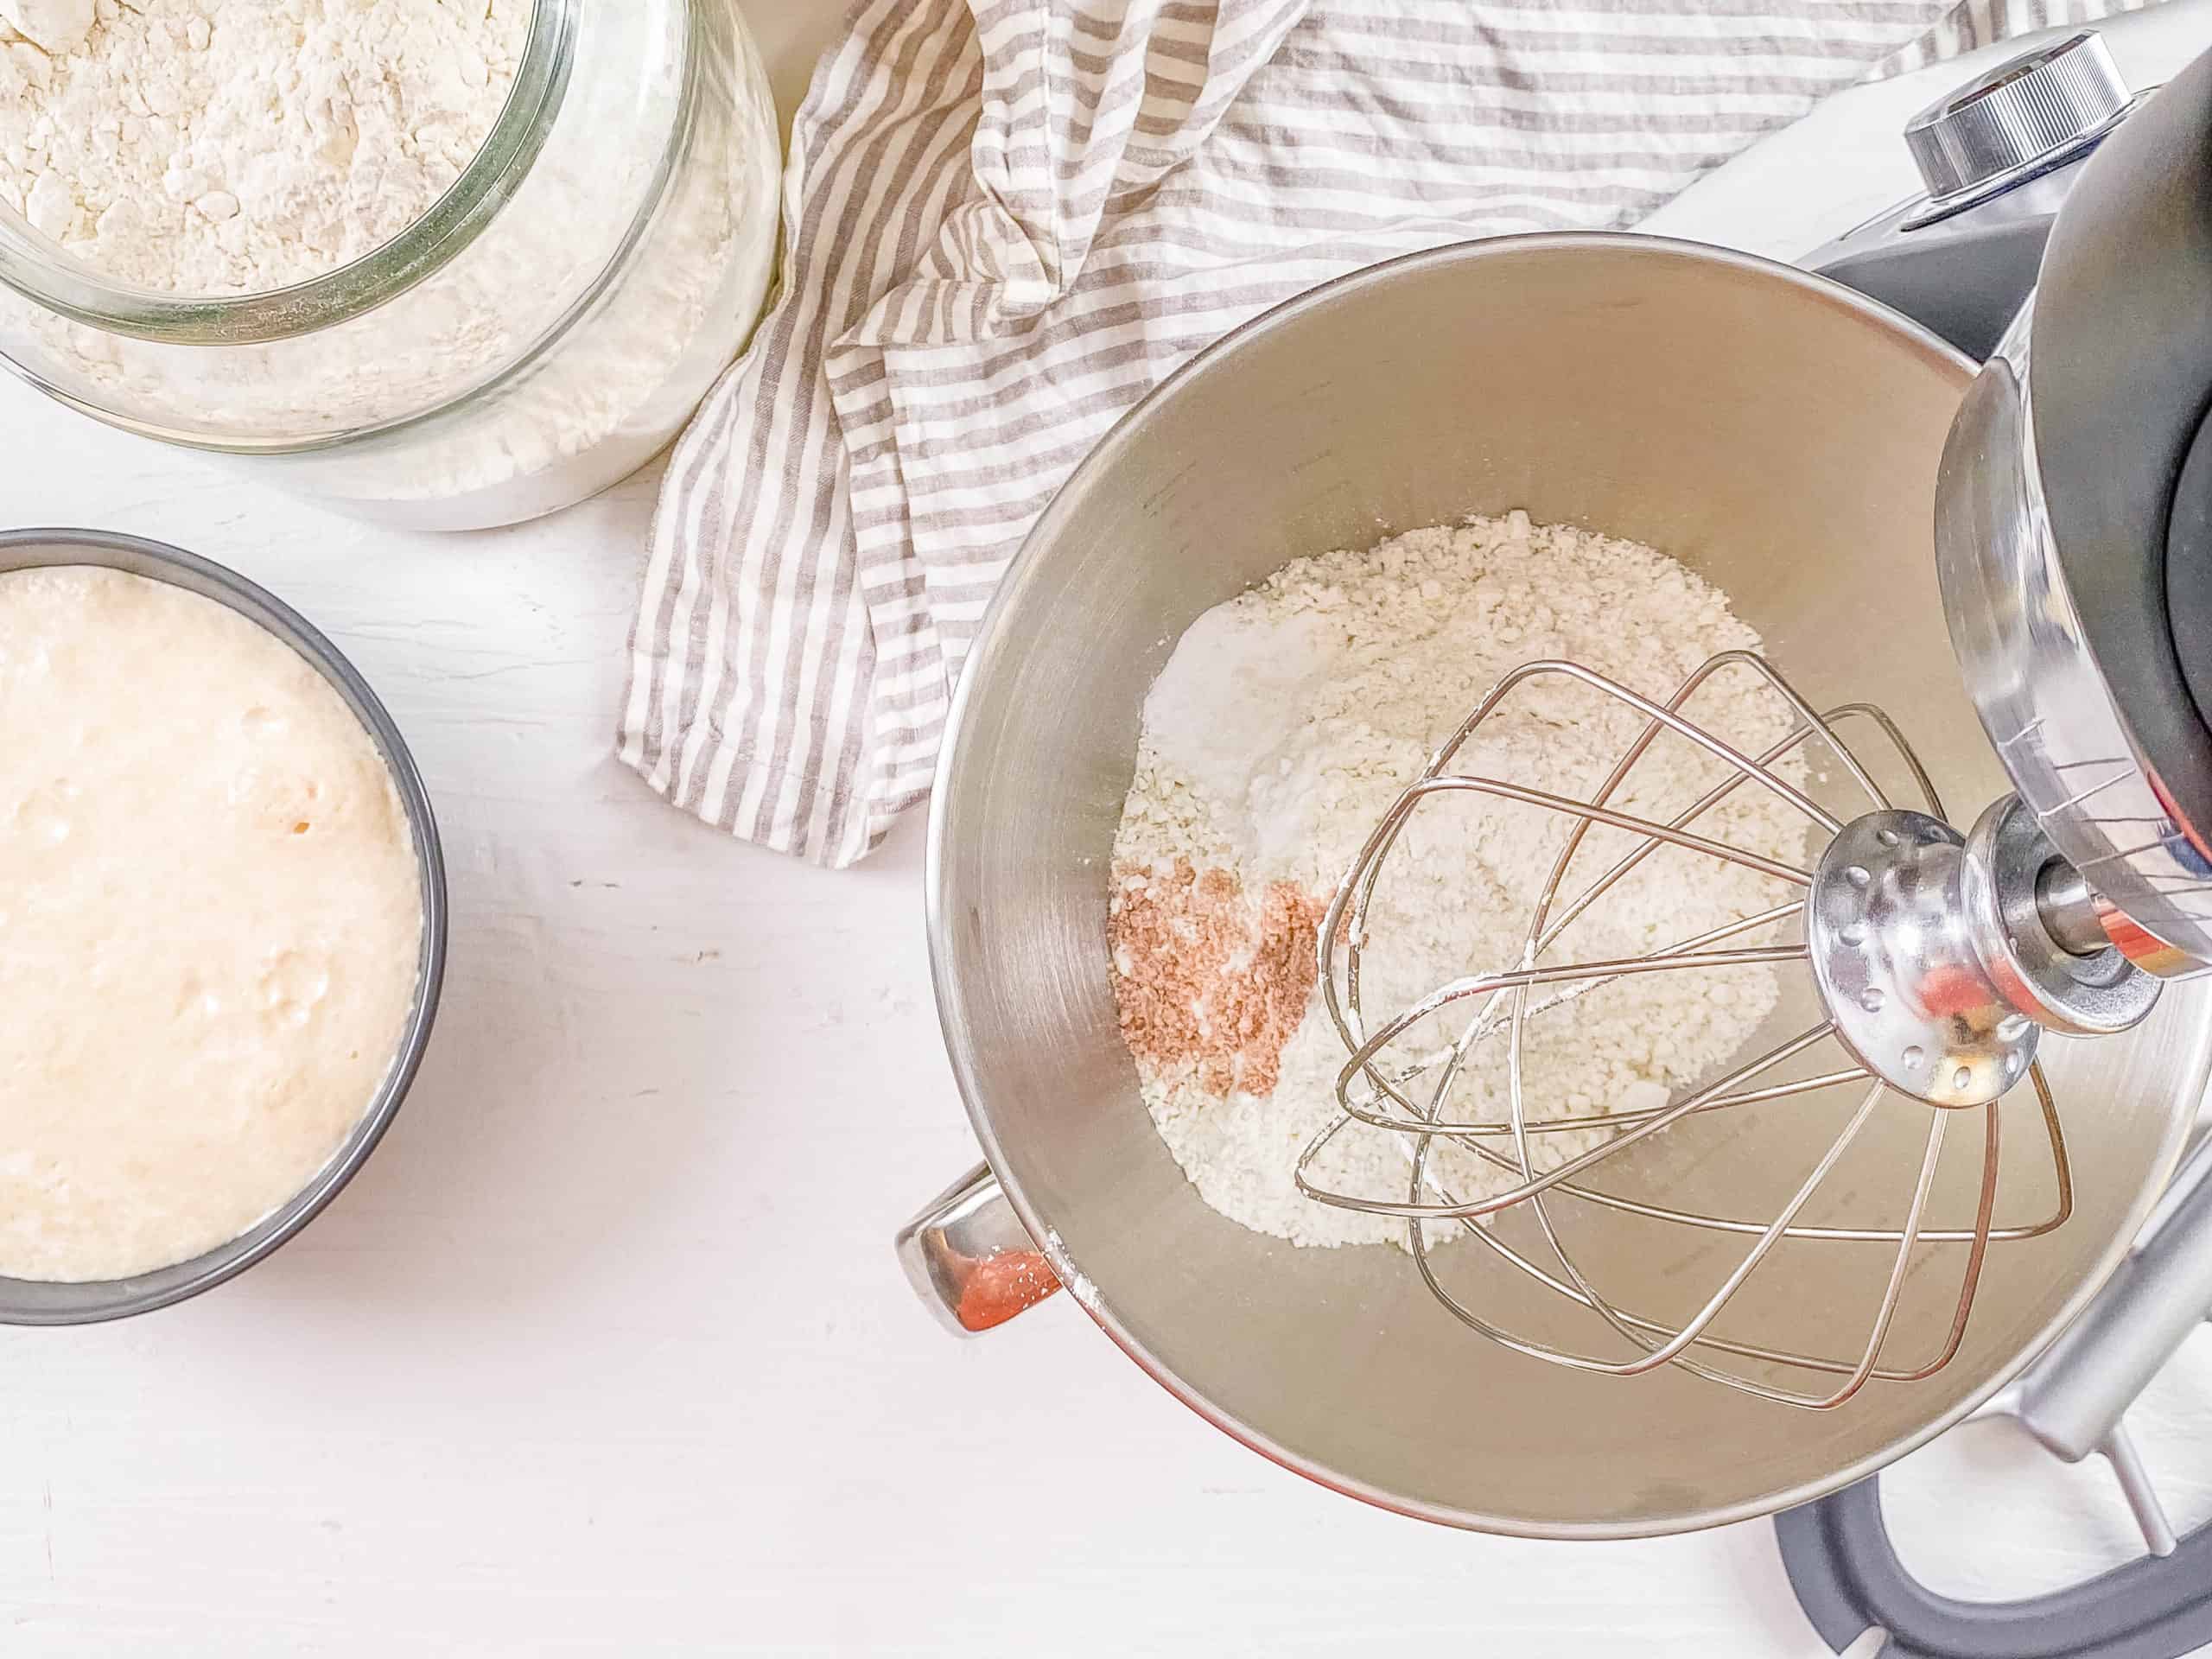
Mix The Wet Ingredients: Once the yeast starts to bubble, I add it to the flour mixture along with the apple cider vinegar, oil, and egg whites.
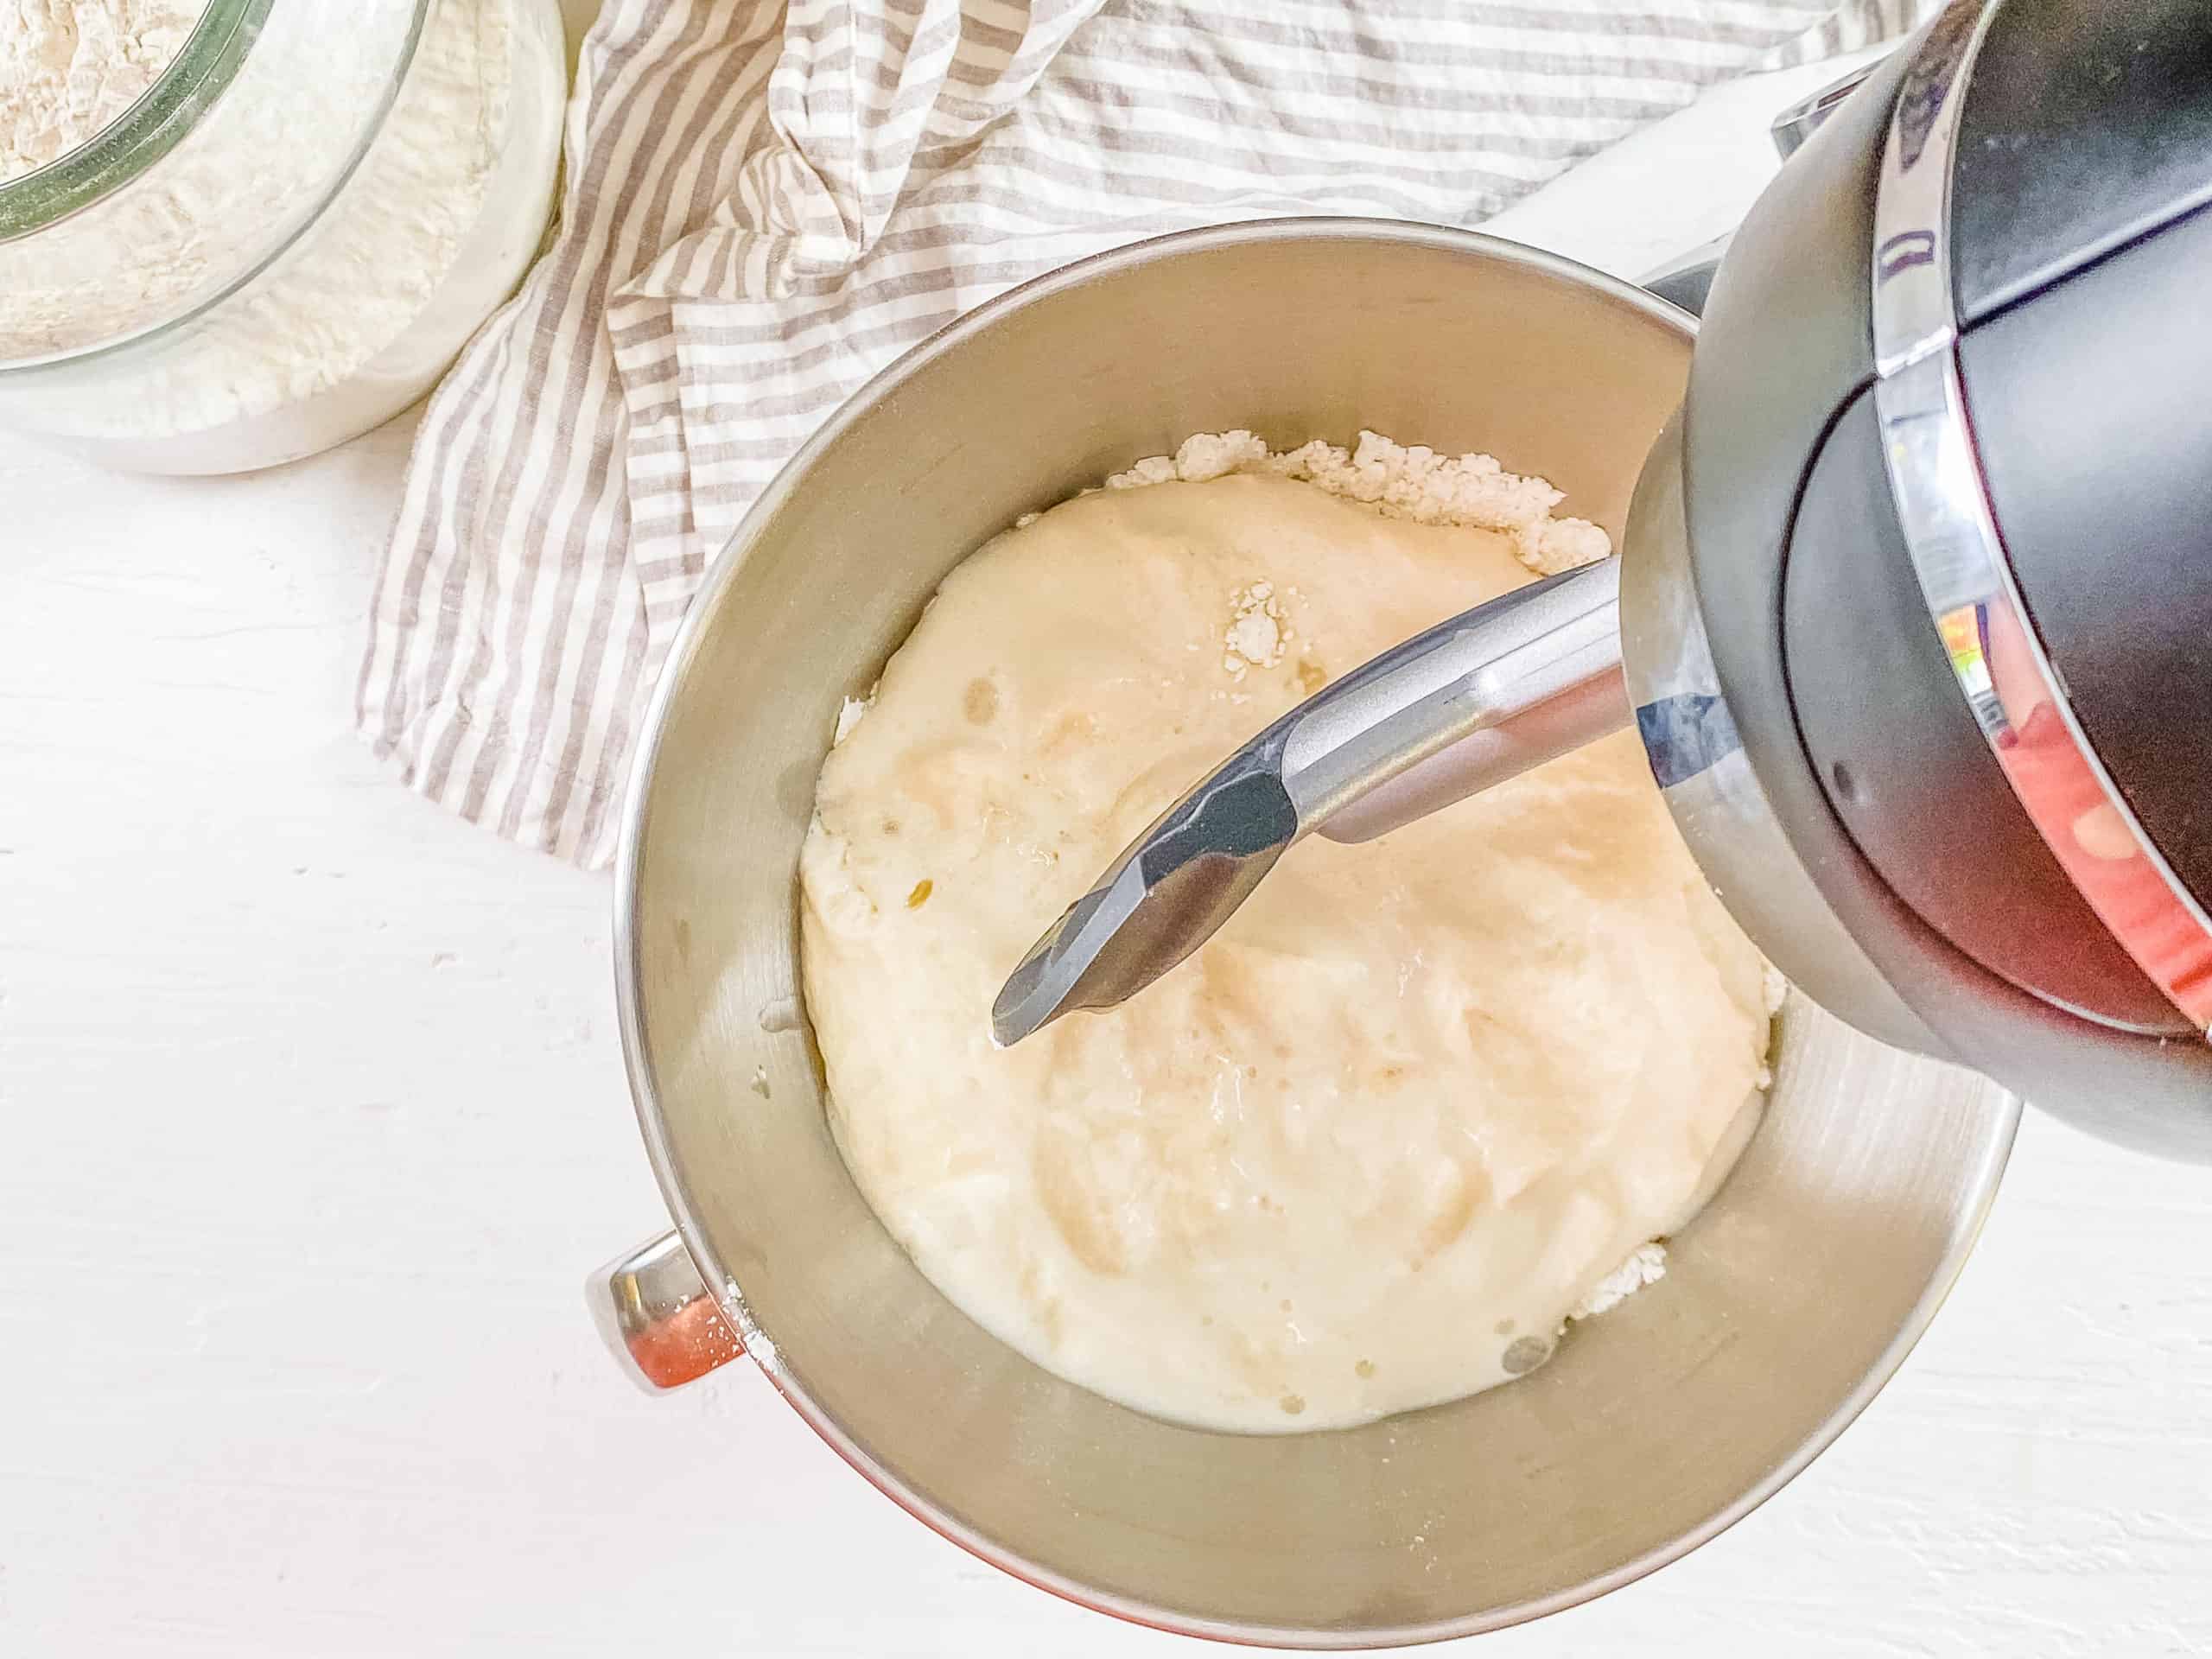
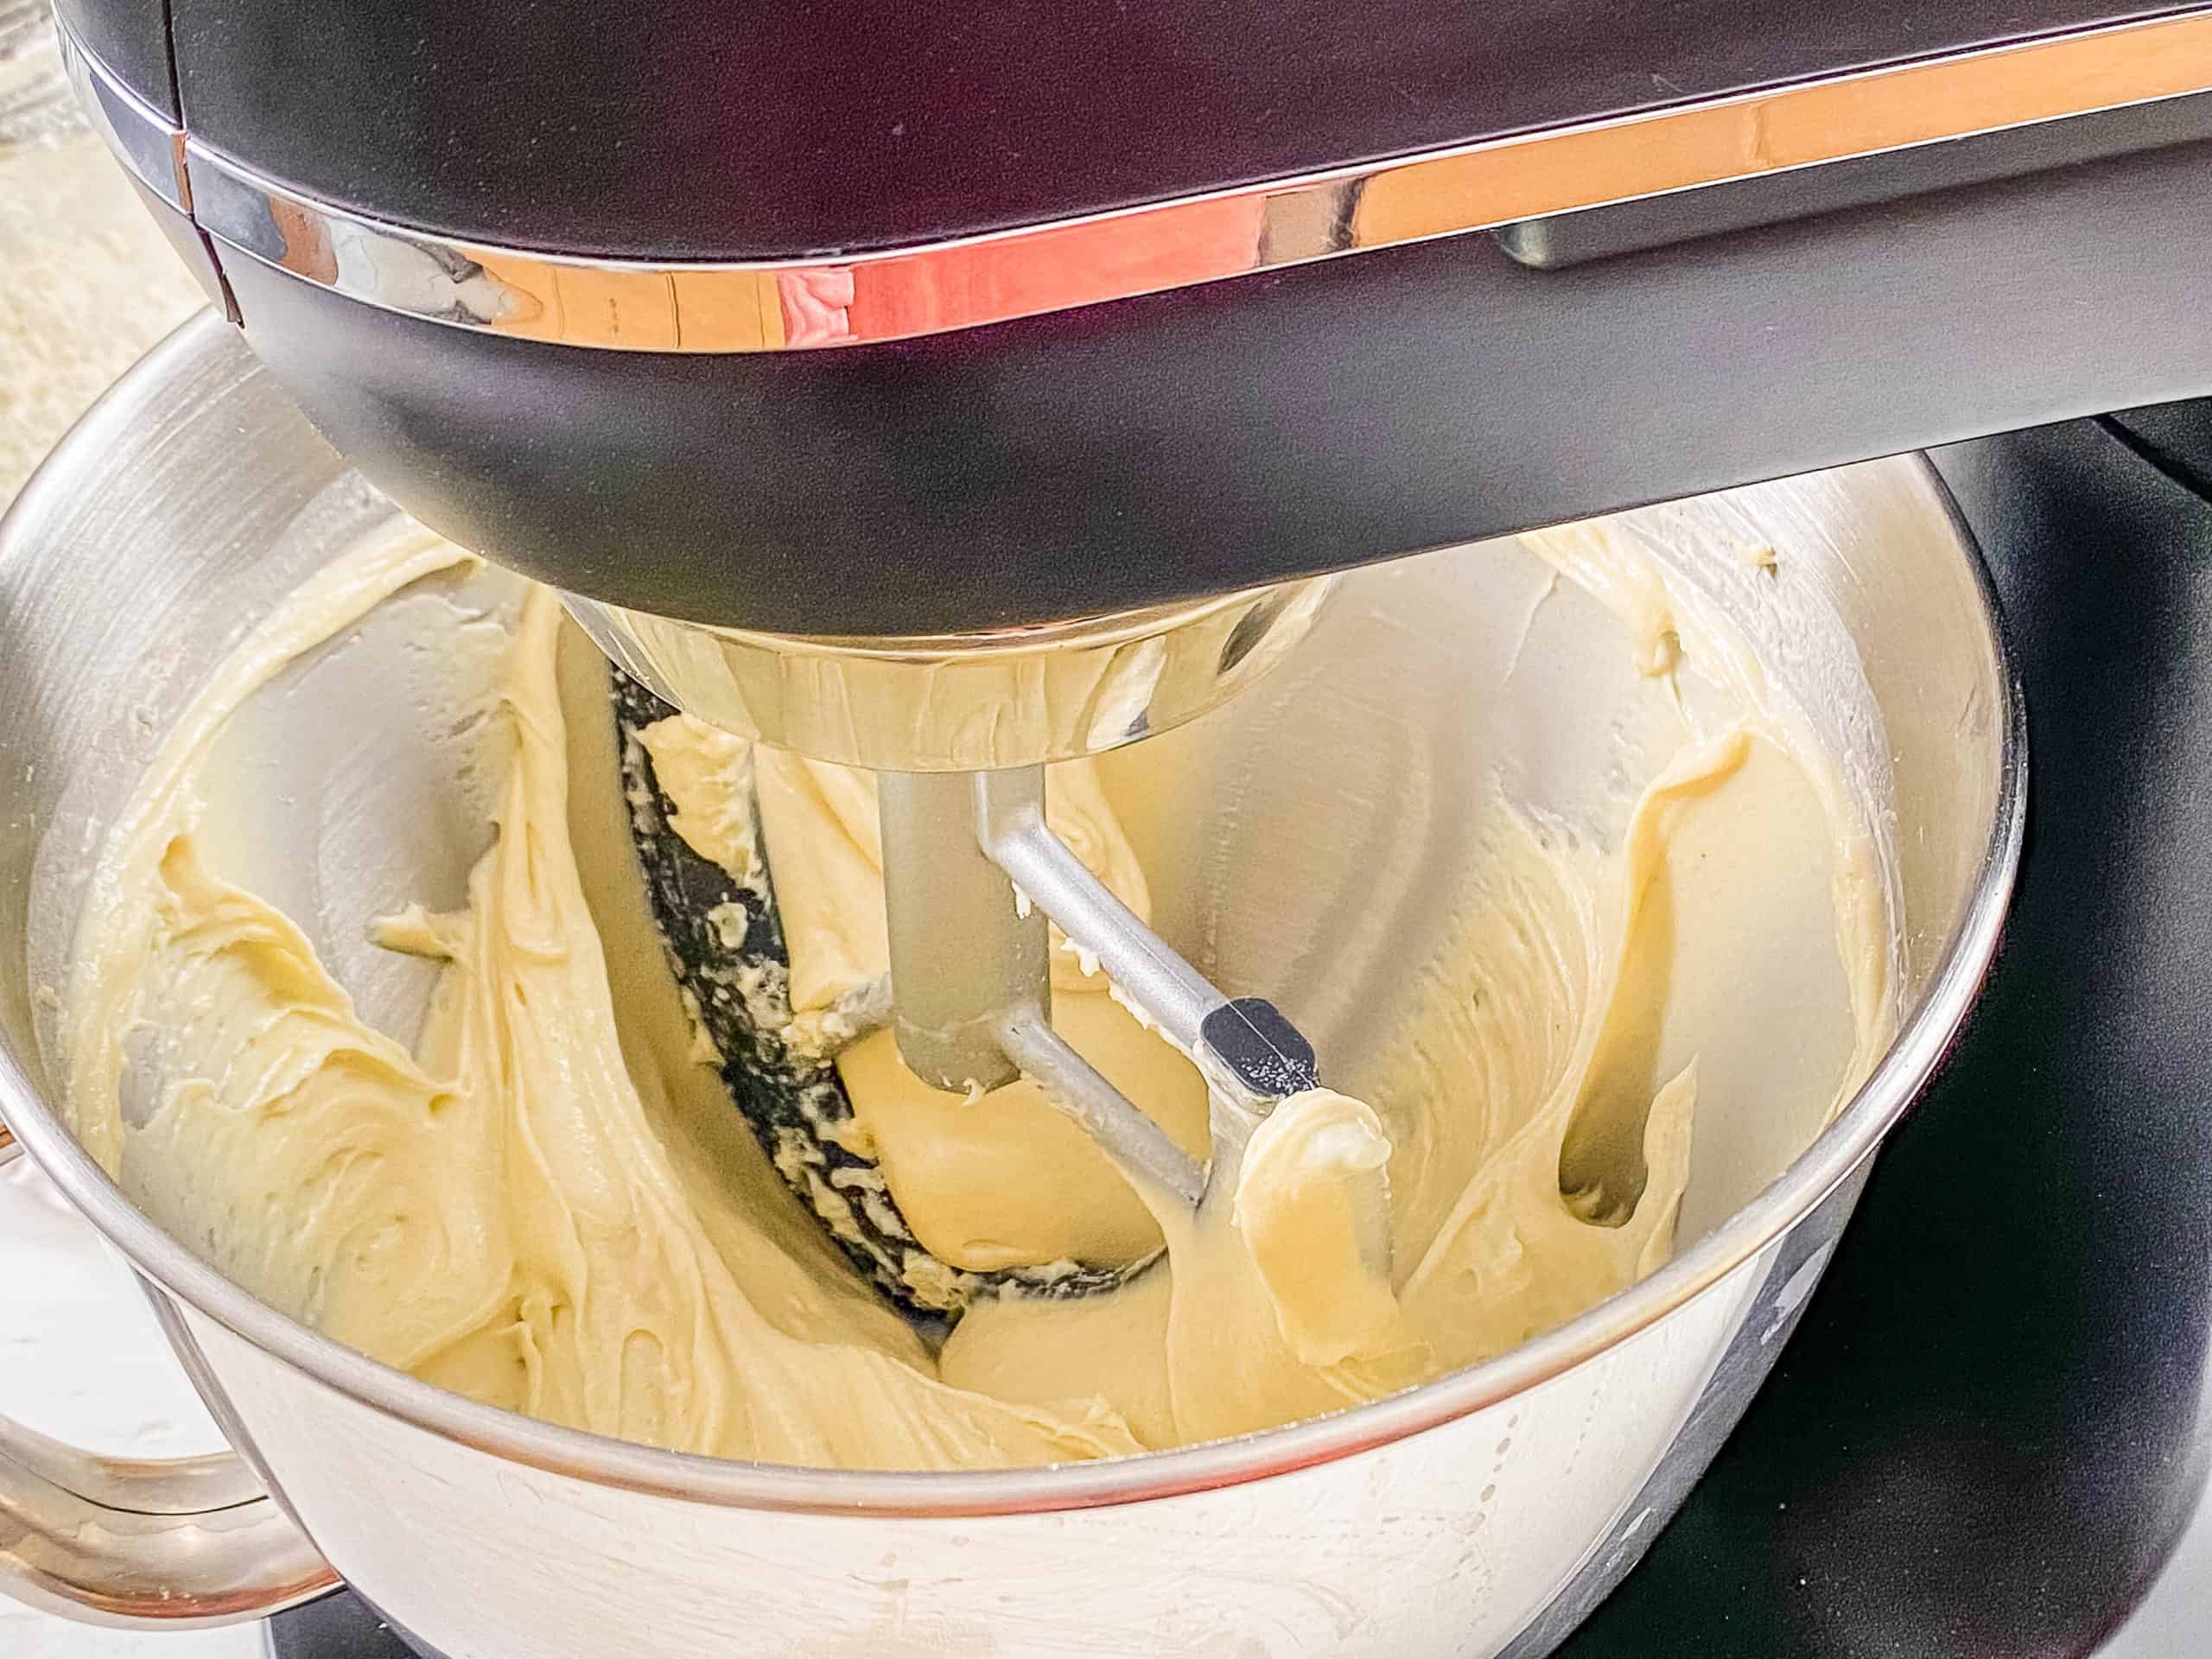
Mix The Dough: With everything in the bowl, I use the paddle attachment (not a dough hook) and beat the batter for 30 seconds until combined. Then I scrape down the sides of the bowl and continue to beat for another 3 minutes on medium speed.
Add The Dough To Bread Pan: First, I line a 13 x 5 inch bread tin with baking paper, lightly spray it with oil, and pour the gluten-free bread dough into the pan. Then I smooth out the top with a rubber spatula.

Allow The Dough To Rise: Once in the pan, I sprinkle the top of the bread with sesame seeds. Next, I loosely cover it with plastic wrap and a tea towel and place it in a warm spot to allow the dough to rise for 1 hour. When there are about 15 minutes, I preheat the oven to 350 degrees Fahrenheit (180 degrees Celsius).

Bake The Bread: After the dough has had time to rise, I remove the plastic wrap and place the bread loaf pan in the oven. Then I let it bake for 60 to 65 minutes, covering it with foil midway through to stop it from burning.
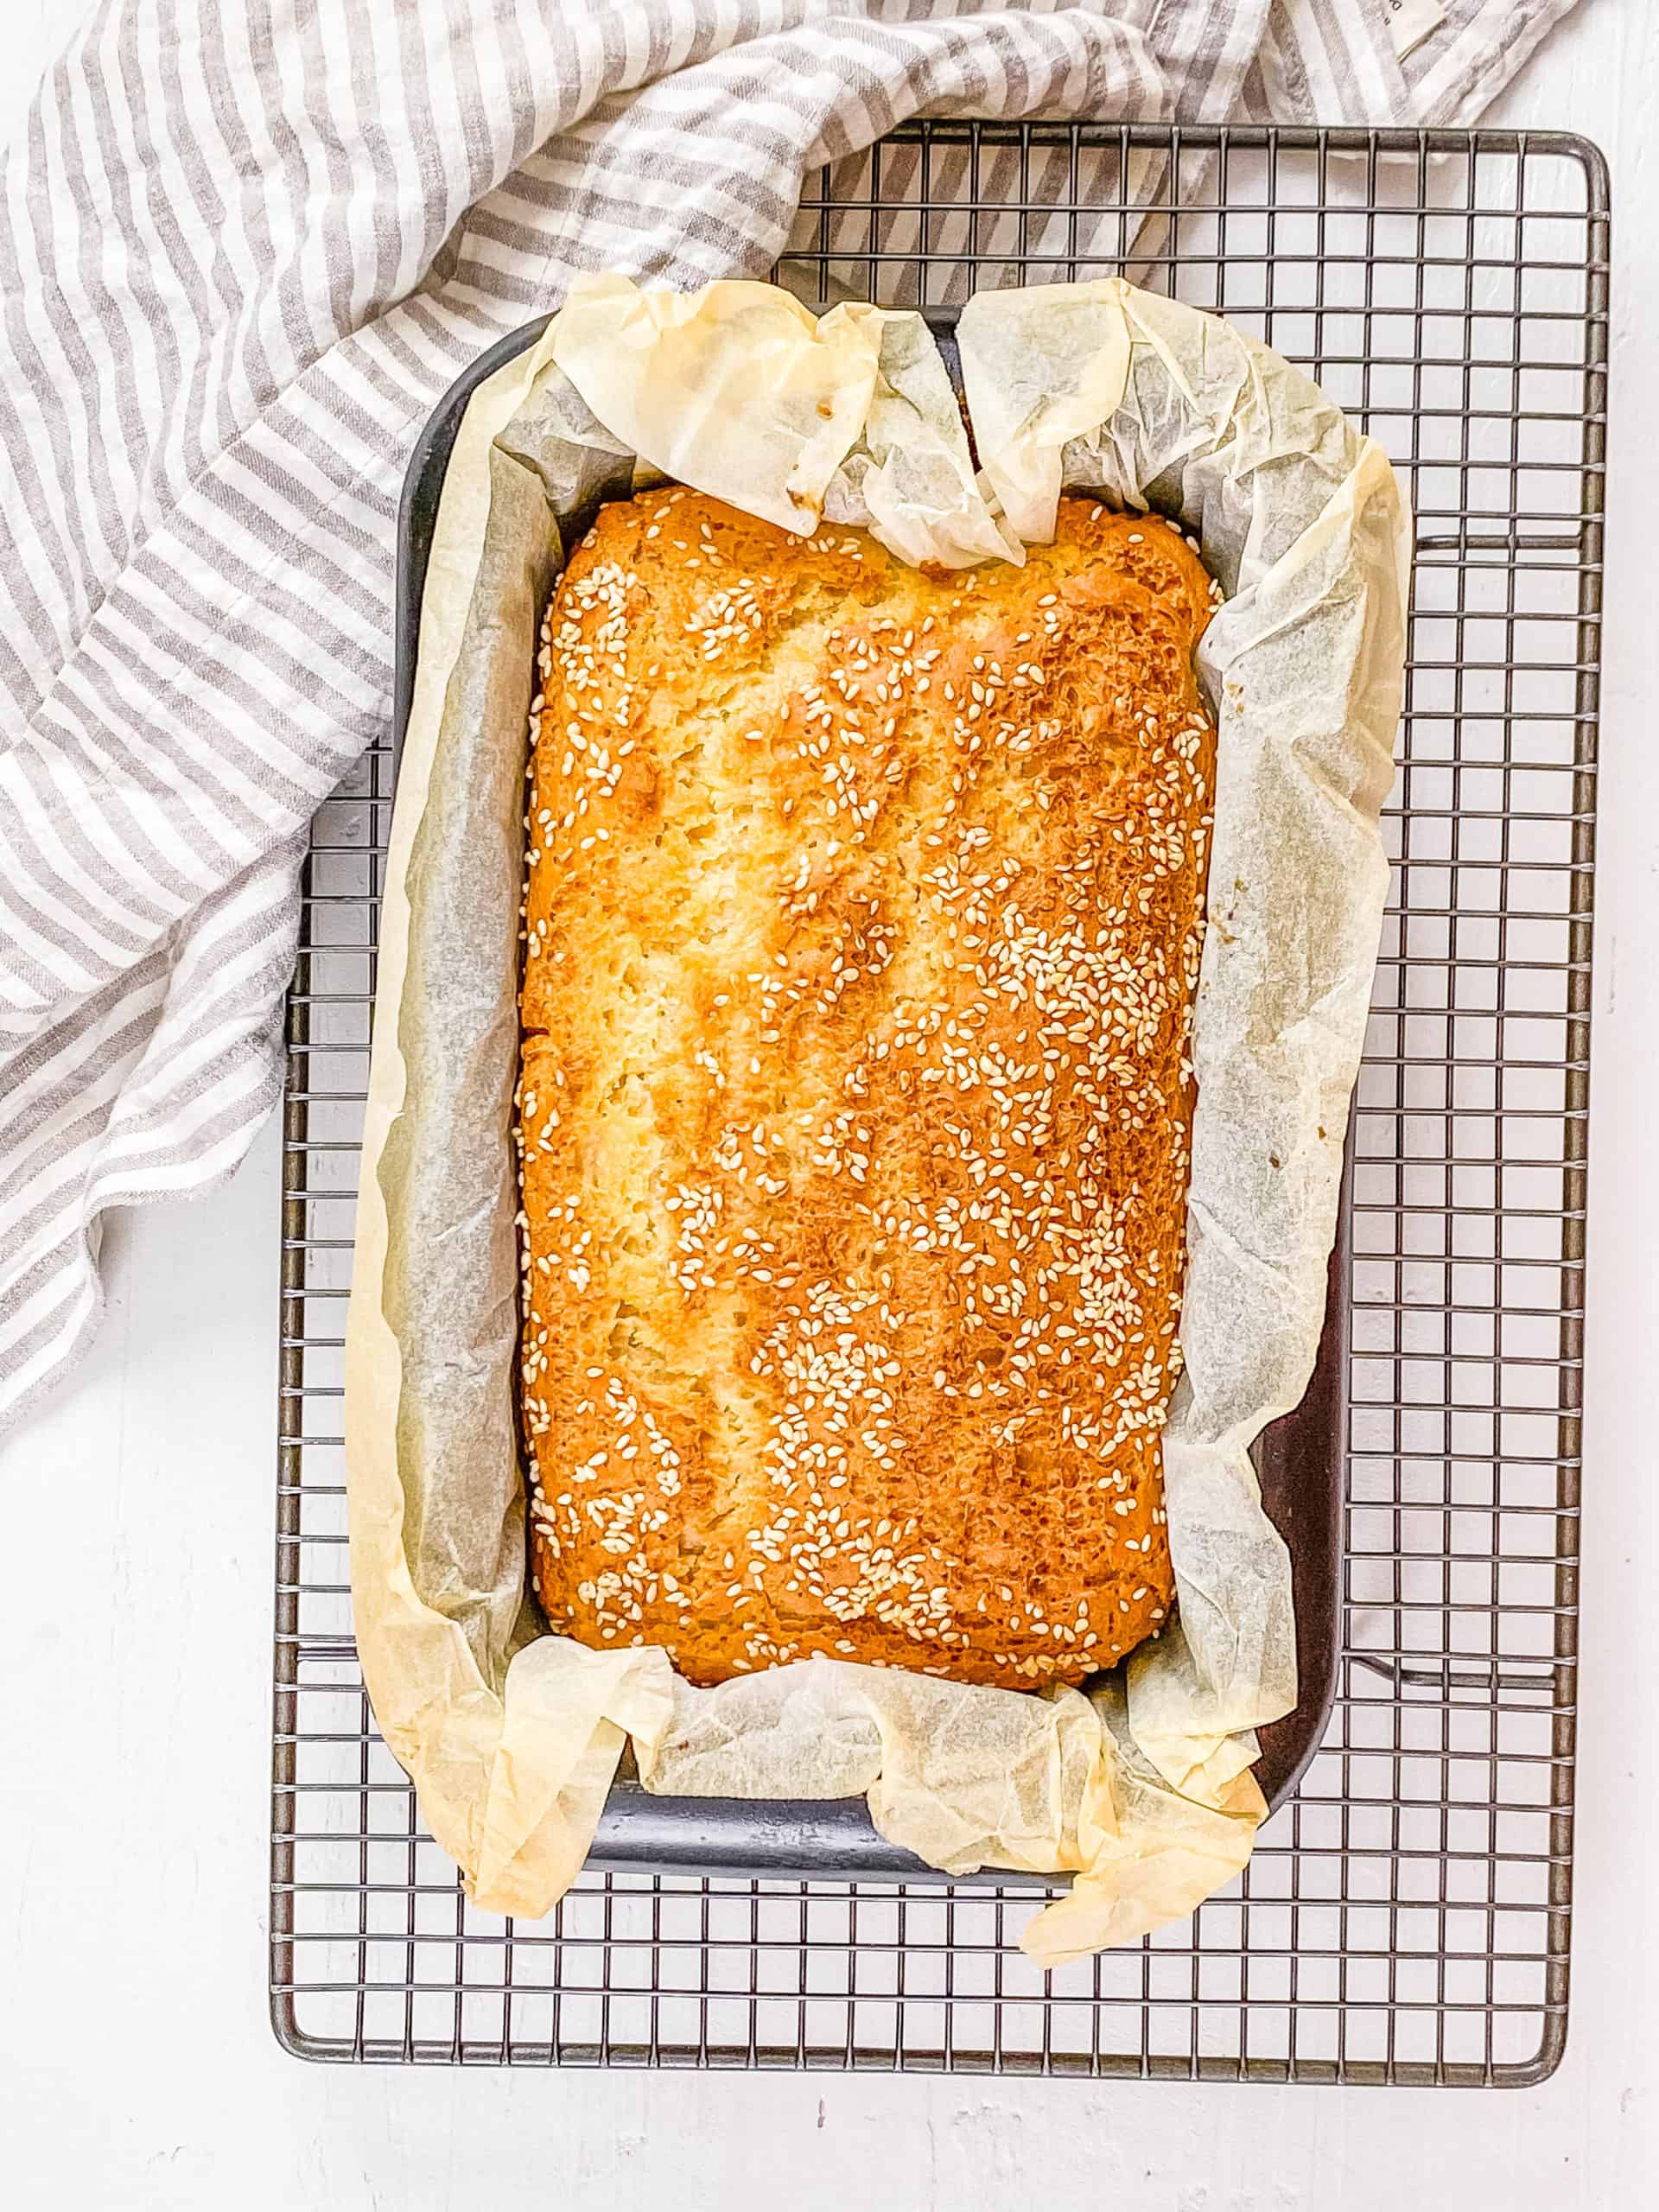
Cool On A Wire Rack: When baked through, I remove the bread from the oven and let it cool in the bread pan for five minutes. Then, I transfer it to a cooling rack to cool completely.
Slice And Serve: Once the bread has cooled completely, I slice it with a bread knife or any serrated knife, and serve it at room temperature.

How To Make Gluten-Free Bread In A Bread Machine
It’s actually really easy to make my low calorie gluten free bread recipe in a bread machine. You just have to use instant yeast instead of regular active dry yeast. Here’s how you do it:
- Add your wet ingredients into the bread pan: almond milk, olive oil, sugar, egg whites, and apple cider vinegar, in that order.
- Add your dry ingredients into the bread pan: flour, baking powder, and salt.
- Make a hole in the center of the dry ingredients and pour your instant yeast into the hole.
- Select the “gluten-free bread” setting and start your bread machine.
Alternatively, you could add all the ingredients at once, and if you did that, the order of the ingredients would be: almond milk, egg whites, oil, apple cider vinegar, flour, salt, sugar, instant yeast. Then you’d select “gluten free bread” for the setting and hit start. Let the bread cool completely before slicing.
Note: If your bread machine does not have a gluten-free setting, choose the setting that has only one mixing cycle (typically it’ll be the “quick” or “basic” or “rapid” cycle). Select light or medium for the crust.
My #1 Secret Tip for making my simple gluten-free bread recipe is to ensure your yeast isn’t expired and to test it if it’s a little old. Having fresh yeast is so important for getting your bread to rise and making sure it has the right soft and fluffy texture!
You can test-proof the yeast before adding it to your flour mixture by dissolving it in warm water (between 95 to 100 degrees Fahrenheit) with a little honey or sugar.
If it forms small bubbles and becomes creamy, your yeast is still active. You can also proof yeast in milk or plant-based milk, as used in this recipe.
Other Tips To Keep In Mind:
- Use Room Temperature Ingredients: For baking, room temperature ingredients work best. It’s also important not to substitute any ingredients in this recipe as I can’t guarantee it will turn out as well (bread recipes can be finicky!)
- Try Different Flour Blends: All gluten free flours are slightly different, so you might need to try one or two to get the right texture. Remember trying to make a gluten free bread recipe without xanthan gum added to the mix won’t work.
- Spoon And Level Dry Ingredients: When measuring out your dry ingredients, spoon them into your measuring cup and then level the top. This ensures you don’t end up with too much flour and your bread won’t be overly dense.
- Don’t Use Hot Milk: The ideal temperature for instant yeast is 95 to 110 degrees Fahrenheit (35 to 43 degrees Celsius). If the almond milk is any hotter, it could kill the yeast and your bread will not rise.
- Use A Stand Mixer: I really do recommend using a stand mixer for making your bread batter. It’s much harder to mix it by hand!
- No Need To Knead: My whole grain gluten-free bread recipe with yeast comes together with very little work. It’s as simple as mixing until a smooth batter is formed, allowing it to rise, and then baking it.
- Line Your Bread Pan: If you are using a bread tin or loaf pan, line it with parchment paper to give your loaf a more traditional shape and ensure easy removal. The narrower your bread pan, the taller your bread will be. I used a 13×5 inch pan for this recipe. If you want your bread to be super soft, the Pullman loaf pan is the best choice!
- Find A Warm Dry Place: Make sure you let your bread rise in a warm dry place. Room temperature is fine, but don’t let it rise in the oven or the fridge! The oven is too hot and will kill the yeast, the fridge is too cold and it will take forever to rise.
- Remove From The Pan: Don’t let your bread cool completely in the bread pan. The moisture from the bread will get trapped by the pan and the bottom of your bread will get soggy. Instead, let it cool for 5 minutes in the pan and then transfer it to a wire rack to finish cooling.
- Toast Lightly: My low calorie gluten free bread tastes best slightly toasted and warm, but not so toasted that it becomes crunchy!
✔️ Troubleshooting Gluten-Free Bread Making
Don’t give up if your first attempts at making my low calorie gluten free bread don’t yield a perfect loaf. For the best results, see my expert tips, and try these additional solutions to the most common gluten-free baking issues.
How To Fix Gluten-Free Bread That’s Too Crumbly
With normal bread, chains of gluten proteins help hold the bread together. That’s why so many bread recipes don’t call for many binders, like eggs. But when it comes to gluten-free bread you need something else to help the bread hold together and prevent too much crumbliness.
There are typically 3 reasons why your bread might be too crumbly: 1) You didn’t have enough liquid in the batter, 2) The batter needs more fat 3) You need to use more binder.
Solution: The easiest way to add a little more binding power is to add an egg (or flax-eggs) to your bread to help keep everything together. Chia seeds or even plain flax seeds can also be good options.
How To Fix A Loaf That Is Too Dense
Typically a dense loaf of bread can be caused by two things: 1) Your leavening agent (baking powder, yeast) has expired or is stale, or you need more of it! 2) You didn’t measure the ingredients accurately. If your loaves are too dense (but still taste and look great) then you might want to add a little more leavening to the mix.
Solution: Baking soda, baking powder, and gluten-free yeast are all good options to achieve an airy texture. Yeast especially can also add a little more flavor.
In terms of measuring ingredients, I use the spoon and level method (spooning my ingredients into a measuring cup, level with the back of a knife). I also recommend weighing your ingredients for even more precision.
How To Fix A Gritty Bread Texture
Gritty bread is one of the most common struggles when making gluten free bread. The issue can be either with the flour, or your baking time.
Solution: All gluten free flour blends are slightly different, so the texture of the bread will vary depending on which flour you use. I had to test a few to find the right one when I was making this recipe.
Also, check your baking time, and make sure you’re not trying to bake your bread too quickly which doesn’t give the dough any time to rise and settle.
If you’re still struggling with gritty texture you can try giving your bread batter a little more time to rise before you put it in the oven. The extra time should give the dough a chance to soften and also help bread batters even out.
What To Do If Your Gluten-Free Sandwich Bread Is Too Dry
Moisture is another challenge with any healthy gluten-free bread recipe, but simply adding more water or milk to your dough usually isn’t an option. Instead, try to add moisture by adding a more substantial ingredient that’s less likely to evaporate in the oven.
Solution: Apple sauce is one of my go-to ingredients because it’s a great way to add a little more moisture. For savory breads, sour cream or yogurt can also add some moisture and protein to your finished bread. Just remember that sour cream and yogurt also add to the fat content and increase the calories.
What To Do If Your Bread Has A Mushy Center Or A Dense Bottom
This problem is common in almost all bread baking. Mushy centers and dense bottoms are a sign that your bread is underbaked. It can also sometimes mean that you didn’t use enough leavener, especially if baking longer leads to an overly dense texture or hard bread.
Solution: Start by lowering your oven temperature and extending the cooking time slightly. Try reducing the temperature by degrees Fahrenheit (10 degrees Celsius) and baking for another 20-30 minutes. Make sure to check the bread a couple of times to make sure it isn’t finished baking early.
📖 Variations
Vegan: You can easily turn this into an easy vegan gluten free bread recipe! To make this vegan, I will typically substitute aquafaba for the egg whites. When doing this, I use the ratio of use 6 tablespoons of aquafaba as a replacement for the 3 egg whites to make a gluten-free egg-free bread recipe.
Nut Free: To make gluten-free nut-free bread just use a different plant milk (like unsweetened oat milk or soy milk) instead of the almond milk.
Different Flours: The best flour to use is a gluten free flour blend meant for yeast baking, with xanthan gum added. I like Bob’s Red Mill Gluten Free All Purpose Baking Flour, which is made specifically for baking yeast breads. While I also like Bob’s Red Mill Gluten Free 1:1 Flour, it’s not supposed to work as well for gluten free bread with yeast. I’ve heard that Better Batter and Pillsbury gluten free flour also works well. Keep in mind that if you use the Bob’s Red Mill, you will have to add 3.5 teaspoons of xanthan gum to this yeast bread recipe or your bread won’t rise properly.
Different Toppings: You can easily elevate my gf bread recipe with toppings. I used sesame seeds, but you can use any mixture of nuts or seeds to top this bread! I like the texture and flavor the seeds provide. You can also just omit them altogether.
🍽 Serving Suggestions
My healthy gluten free bread recipe is incredibly versatile and can be used in a variety of dishes. From sandwiches to breakfast ideas, it’s perfect for almost anything you can think of. Here are some delicious ways to enjoy this bread:
For Breakfast: It’s a fantastic base for breakfast toast ideas! My gluten free bread is also wonderful with this low calorie omelette or vegan frittata. You can even use it to make regular healthy french toast or a crock pot french toast casserole.
For Sandwiches: I’ll use this low calorie gluten free bread to make some of my favorite sandwiches like this Panera Mediterranean veggie sandwich copycat recipe or a classic banana peanut butter sandwich. It also makes for a delicious grilled sandwich like this grilled cheese with pickles.
With Soups & Stews: Pair it with your favorite soups and stews. Its soft, chewy texture is perfect for dipping and soaking up flavors. It’s fantastic with this mushroom soup and vegan tomato soup. For a heartier meal, I have served some slices of this low-calorie gf bread with this vegan minestrone or vegan white bean chili. My bread also makes great gluten-free croutons to top your soups and stews with!
🧊 Storage Directions
Fridge: Since my low calorie gluten free bread doesn’t have any preservatives, I recommend storing it in the fridge to maintain freshness. Once the bread has cooled, I slice it and wrap it tightly in plastic wrap, then wrap it in foil and place it in an airtight container. You can store it in the fridge for up to 2 weeks.
Freezer: If you want to make the bread in bulk and use it for months, freezing is the perfect solution. I wrap the loaf tightly and place it in an airtight freezer bag or container. The bread will last in the freezer for up to 3 months. When you’re ready to use it, defrost the bread in the fridge and then heat it in a toaster oven or regular oven.
❓Recipe FAQs
Most yeast is gluten-free, but there are a couple of exceptions. Brewer’s yeast and yeast extract are the types that typically contain gluten. However, these aren’t usually used for baking. The most common types of yeast for baking—baker’s yeast, dry yeast, and instant yeast—are generally gluten-free. To be safe, always choose a gluten-free certified yeast brand before baking!
To ensure your low calorie gluten free bread is fully baked, I recommend using a few simple methods. First, visually inspect the bread: it should be golden brown on top, and the edges should start to pull away from the sides of the pan. Another reliable method is to check the internal temperature with a kitchen thermometer; it should read around 200-210 degrees Fahrenheit (93-99 degrees Celsius).
Yes, but since this is a batter dough and doesn’t hold its shape, you’ll need to use a muffin tin or small molds. Simply pour the batter into the muffin tin or molds, filling each about halfway to allow room for rising. Then bake as directed but keep an eye on them as they will require less time in the oven.
In traditional bread making, gluten is what causes bread to rise. Without gluten, you need a rising agent to help your bread rise! We make our gluten free bread recipe with yeast and baking powder, and choose a flour that has xanthan gum added to help this bread become nice and fluffy. Yeast, baking powder (or baking soda), and xanthan gum are the three ingredients that help gluten-free bread to rise.

Want to Save This Recipe?
Enter your email & I’ll send it to your inbox. Plus, get great new recipes from me every week!
By submitting this form, you consent to receive emails from The Picky Eater.

Love this plant based gluten free recipe? Please leave a 5-star rating 🌟 in the recipe below and/or a review in the comments section further down the page!
You can also FOLLOW ME on FACEBOOK, INSTAGRAM, and PINTEREST to see more delicious, healthy, family-friendly food, and if you have any questions, I’m here to help!
📋 Recipe Card
Easy Low-Calorie Gluten Free Bread Recipe
My homemade healthy gluten-free bread recipe is super easy to make, is low-calorie, and has a soft chewy texture! It’s the perfect substitute for traditional bread for anyone needing a gluten-free option. It slices well and works for sandwiches, toast, and all of your other favorite bread-based meals!
Servings: 8 servings
Calories: 268kcal
Shop Ingredients on JupiterTo Make In The Oven
In a small bowl mix together the yeast, sugar and warm milk. Stir, cover and set aside to proof for approx 10 minutes.
Whisk together the flour, baking powder and salt in the bowl of a stand mixer.
When the yeast starts to bubble add it, along with the apple cider vinegar, oil and egg whites to the flour mixture.
Use the paddle attachment and beat the batter for 30 seconds until combined. Scrape down the edges and continue to beat for a further 3 minutes on a medium speed.
Line a 13 x 5 inch bread tin with baking paper, lightly spray it with oil and fill the tin with batter. Smooth off the top with a spatula.
Sprinkle with sesame seeds if using, loosely cover with plastic wrap and a tea towel and place in a warm spot to allow the dough to rise for 1 hour.
When you have about 15 minutes left for your dough to finish rising, preheat the oven to 350 degrees F / 180 C.
Remove the plastic wrap and place the bread tin in the oven. Cook for 60 – 65 minutes, cover with foil midway through to stop it from burning.
When cooked through, remove from the oven, cool in the tin for 5 minutes then allow to cool completely on a cooling rack.
To Make In A Bread Machine
Note: You will need instant yeast, not active dry yeast for this version. Add your wet ingredients into the bread pan: that would be the almond milk, olive oil, sugar, egg whites, and apple cider vinegar, in that order.
Add your dry ingredients into the bread pan: the flour, baking powder, and salt.
Make a hole in the center of the bread pan, and pour your yeast into the hole. Select the “gluten free bread” setting and start your bread machine.
Alternatively, you could add all the ingredients at once, and if you did that, the order of the ingredients would be: almond milk, egg whites, oil, apple cider vinegar, flour, salt, sugar, yeast. Then you’d select “gluten free bread” for the setting and hit start. Let the bread cool completely before slicing.
Note: If your bread machine does not have a gluten-free setting, choose the setting that has only one mixing cycle (typically it’ll be the “quick” or “basic” or “rapid” cycle). Select light or medium for the crust.
- Add xanthan gum to the mix if the gluten free flour that you’re using doesn’t have it already added.
- There’s no need to knead this bread mixture, it’s as simple as mixing until a smooth batter is formed, allowing it to rise and baking. Super simple!
- Topping your bread with seeds is optional although they do add a delicious flavor.
- Store bread in an airtight container in a cool dry place.
- Allow bread to completely cool before slicing.
- Bread is best used within 24 hours of making.
- This bread toasts really well.
- Use a slightly wet spatula when smoothing off the top of the bread, this helps the batter to smooth evenly in the tin.
- For best results make sure to use baking powder and yeast that are not expired, and are fresh, and that all ingredients are at room temperature.
- Make sure your water is between 95-110 degrees before mixing it with the yeast and other ingredients.
- When you’re measuring out your dry ingredients, spoon both into your measuring cup and then level. That will ensure you don’t end up with too much flour and your bread won’t be overly dense.
Serving: 2slices | Calories: 268kcal | Carbohydrates: 41g | Protein: 8g | Fat: 10g | Saturated Fat: 1g | Polyunsaturated Fat: 2g | Monounsaturated Fat: 6g | Sodium: 363mg | Potassium: 112mg | Fiber: 4g | Sugar: 5g
Source link

This pea-sized organ regulates various bodily functions such as hormone production, so when a pituitary tumor grows, it can wreak havoc on the body, Tidelands Health neurosurgeon Dr. Oluwaseun Omofoye says.

By Elaine Veltri, @MyCarolinaLife.com
Positioned at the base of the brain is the tiny – yet powerful – pituitary gland.
This pea-sized organ regulates various bodily functions such as hormone production, so when a pituitary tumor grows, it can wreak havoc on the body, Tidelands Health neurosurgeon Dr. Oluwaseun Omofoye says.
Dr. Omofoye is part of the advanced neurosciences program at Tidelands Health, our region’s largest health care provider.
“Pituitary tumors are typically benign, but they can still cause problems by overproducing or underproducing hormones or by pressing on surrounding structures in the brain,” says Dr. Omofoye. “One of the most common symptoms is a problem with vision.”
The pituitary gland is close to the optic nerve. Pituitary tumors can press on the nerve and cause vision difficulties. Patients with large tumors will often experience peripheral vision loss, which may be identified during a routine eye exam.
“I’ll get patients with a large pituitary tumor referred to me after a vision exam and MRI,” Dr. Omofoye adds. “Most of the time, if it is small and vision is fine, we will watch it over time because they typically grow slowly.”
Pituitary tumor types
Pituitary tumors are classified based on their size, hormone production and whether they are cancerous or noncancerous. The two types are:
- Functioning tumors: These tumors produce hormones and can lead to hormonal imbalances.
- Nonfunctioning tumors: These tumors do not produce hormones and can affect nearby structures within the brain.
Common pituitary tumor symptoms
In addition to vision problems, common symptoms of a pituitary tumor include:
- Headaches
- Hormonal imbalances causing irregular periods and breast discharge
- Fatigue
- Nausea and vomiting
- Changes in weight and appetite
- Mood changes
Some pituitary tumors secrete a hormone that triggers the adrenal glands to make too much cortisol. When that happens, the patient can develop a condition called Cushing disease. Symptoms include a rounded face, stretch marks, areas of darkened skin, acne and slow-healing cuts and infections.
Other tumors make too much growth hormone, which can lead to unwanted facial hair, body odor, joint pain and large hands and feet.
How is a pituitary tumor diagnosed and treated?
To diagnose a pituitary tumor, your care provider will typically order blood tests to measure hormone levels, an MRI or CT scan to visualize the gland and visual field testing to assess vision changes.
If a pituitary tumor is detected and symptoms are minimal or non-existent, treatment may include monitoring the growth. Hormone-suppressing medications can help control imbalances caused by the tumor and reduce the tumor’s size. Radiation therapy may also be considered to shrink or control the tumor’s growth.
For larger and more troublesome tumors, surgery may be required.
“We can access the pituitary gland at the base of the brain through the nose,” says Dr. Omofoye.
Patients without complications typically do well after surgery and are able to go home relatively quickly.
Dr. Omofoye says the key takeaway is to remember pituitary tumors are uncommon and mostly benign, but with early detection and appropriate treatment when symptoms start, the condition can be managed effectively.
“If you notice any vision difficulties, blurriness, peripheral vision issues, talk to your doctor and make sure to get your eye checkups,” Dr. Omofoye says.
—
Previously Published on mycarolinalife
***
You Might Also Like These From The Good Men Project
Join The Good Men Project as a Premium Member today.
All Premium Members get to view The Good Men Project with NO ADS. A $50 annual membership gives you an all access pass. You can be a part of every call, group, class and community. A $25 annual membership gives you access to one class, one Social Interest group and our online communities. A $12 annual membership gives you access to our Friday calls with the publisher, our online community.
Register New Account
Need more info? A complete list of benefits is here.
—
Photo credit: iStock


—
This content is for informational purposes only and is not intended to provide medical advice.
BMI stands for Body Mass Index. It’s a simple number calculated from a person’s weight and height, providing a reliable indicator of body fatness for most people.
How is BMI Calculated?
Calculating BMI is straightforward. You take your weight in kilograms and divide it by the square of your height in meters.
Here’s the Metric formula:
BMI= Weight (kg) / Height (m)2
Or
[weight (kg) / height (cm) / height (cm)] x 10,000
For example, if you weigh 70 kilograms and are 1.6 meters tall, your BMI would be:
BMI= 7/(1.6)2 = 27.34
Check Your BMI Easily
For those looking to quickly and accurately calculate their BMI, the Modern60 BMI calculator is a handy tool. It offers an easy way to input your weight and height to determine your BMI, helping you stay informed about your health status. Adrian, a Health expert from Modern60, emphasizes the importance of regularly checking your BMI as part of a comprehensive approach to health management.
Importance of BMI in Assessing Overall Health
BMI is an important tool because it helps gauge whether you’re within a healthy weight range for your height. Maintaining a healthy BMI can lower your risk for health problems like heart disease, diabetes, and other conditions. For seniors, particularly those around 70 years old, understanding and managing BMI is crucial for maintaining overall well-being and longevity. It gives a general idea of whether you might need to gain or lose weight to improve your health.
BMI Categories
BMI categories help to classify a person’s weight relative to their height, indicating potential health risks associated with different weight ranges. Here are the main categories:
Underweight: BMI Less Than 18.5
If your BMI is less than 18.5, you are considered underweight. Being underweight might indicate malnutrition, osteoporosis, or other health issues. It’s important to seek advice from a healthcare provider if you fall into this category to ensure you are getting the necessary nutrients for good health.
Normal Weight: BMI 18.5 – 24.9
A BMI between 18.5 and 24.9 is considered normal or healthy weight. This range is associated with the lowest risk of developing weight-related health problems. Maintaining a BMI in this range generally indicates a balance of appropriate weight and height, contributing to overall well-being.
Overweight: BMI 25 – 29.9
A BMI between 25 and 29.9 is categorized as overweight. While this doesn’t necessarily mean you are unhealthy, it may increase your risk for conditions such as heart disease, high blood pressure, and type 2 diabetes. It’s a good idea to consult with a healthcare provider for advice on achieving a healthier weight.
Obesity: BMI 30 and Above
A BMI of 30 or higher is classified as obesity. This category significantly raises the risk of numerous health issues, including cardiovascular diseases, diabetes, and certain cancers. Managing obesity often requires a comprehensive approach involving diet, exercise, and possibly medical intervention. Seeking guidance from a healthcare provider is crucial for addressing obesity and improving overall health.
Specifics for Seniors
How BMI Ranges May Differ for Older Adults
As we age, our bodies undergo various changes that can affect BMI. For seniors, especially those around 70 years old, the standard BMI ranges might not fully capture their health status. Factors like muscle mass, bone density, and fat distribution shift with age, potentially altering what is considered a healthy BMI.
Changes in Muscle Mass, Bone Density, and Fat Distribution
- Muscle Mass:Older adults often experience a decrease in muscle mass, known as sarcopenia. This reduction can lead to a lower weight and, consequently, a lower BMI.
- Bone Density:Bone density tends to decrease with age, contributing to changes in weight and BMI.
- Fat Distribution:Fat distribution changes as well, with more fat being stored around the abdomen, which might not be as accurately reflected in BMI.
Recommended BMI for 70-Year-Old Females
General Healthy BMI Range
For most adults, including 70-year-old females, a BMI between 18.5 and 24.9 is generally considered healthy. This range is associated with the lowest risk of health complications related to weight.
Personalized Recommendations
It’s crucial to consult with healthcare providers for personalized advice. They can take into account individual health conditions, lifestyle, and other factors to provide a more accurate assessment of a healthy BMI.
Acceptable Slightly Higher BMI
Due to age-related changes like muscle loss and shifts in fat distribution, a slightly higher BMI might be acceptable for older adults. This is because having a bit more weight can sometimes offer protective benefits against conditions like osteoporosis and malnutrition.
Health Implications of BMI
Risks Associated with Low BMI
- Malnutrition:Low BMI can be a sign of inadequate nutrition, which can weaken the immune system and reduce muscle strength.
- Osteoporosis:Insufficient weight can lead to bone density loss, increasing the risk of fractures and osteoporosis.
Risks Associated with High BMI
- Cardiovascular Disease:Excess weight can strain the heart, leading to conditions like high blood pressure, heart attacks, and strokes.
- Diabetes:Higher BMI is associated with an increased risk of type 2 diabetes, which can lead to various complications if not managed properly.
Importance of Maintaining a Balanced BMI
Maintaining a balanced BMI is crucial for overall health and longevity. It helps in reducing the risk of chronic diseases, improving mobility, and enhancing the quality of life.
Factors Influencing BMI in Seniors
Chronic Conditions
Chronic conditions like arthritis, diabetes, and heart disease can impact weight and BMI. These conditions often require medication and lifestyle changes that can affect overall body weight.
Medications
Many medications can influence weight, either by increasing appetite, causing fluid retention, or leading to weight loss.
Physical Activity Levels and Metabolism
Physical activity levels often decrease with age, leading to a slower metabolism. This can result in weight gain if dietary habits remain unchanged.
Best Tips for Maintaining a Healthy BMI
Balanced Diet Recommendations
- Nutritious Foods:Focus on nutrient-dense foods like fruits, vegetables, whole grains, lean proteins, and healthy fats.
- Portion Control:Eating smaller, more frequent meals can help manage weight and ensure adequate nutrient intake.
Importance of Regular Physical Activity
- Walking:Regular walks can improve cardiovascular health and aid in weight management.
- Yoga:Gentle yoga helps with flexibility, balance, and strength.
- Light Resistance Exercises:These can help maintain muscle mass and support metabolic health.
Staying Hydrated
Adequate hydration is essential for overall health and can help regulate metabolism and digestion.
Regular Health Check-Ups
Frequent check-ups with healthcare providers help monitor weight, BMI, and overall health. They can offer personalized advice and adjustments to diet or exercise routines as needed.
Additionally, for great deals and discounts on health-related products and services for seniors, you can visit Discount for Seniors.
Conclusion
Maintaining a healthy BMI is vital for overall well-being, especially for seniors. It helps reduce the risk of chronic diseases, supports mobility, and enhances quality of life. A balanced BMI indicates that your weight is appropriate for your height, contributing to better health outcomes.
While BMI is a useful tool, it’s essential to remember that everyone is different. Consulting healthcare providers for personalized advice ensures that your health plan considers all factors, including existing medical conditions and lifestyle. Making small, manageable changes to your diet and exercise routine can have a significant impact on your BMI and overall health. Focus on consistency and gradual improvements to create lasting habits that support a healthy weight and well-being.
References
World Health Organization (WHO). “Body Mass Index (BMI).” Retrieved from WHO.
World Health Organization (WHO). “A Healthy Lifestyle – WHO Recommendations.” Retrieved from WHO.
Centers for Disease Control and Prevention (CDC). “About Adult BMI.” Retrieved from CDC.
National Heart, Lung, and Blood Institute (NHLBI). “Calculate Your Body Mass Index.” Retrieved from NHLBI.
—
This content is brought to you by Chris Reyes


By Kate Ruder
When powerful wind gusts created threatening wildfire conditions one day near Boulder, Colorado, the state’s largest utility cut power to 52,000 homes and businesses — including Frasier, an assisted living and skilled nursing facility.
It was the first time Xcel Energy preemptively switched off electricity in Colorado as a wildfire prevention tool, according to a company official. The practice, also known as public safety power shut-offs, has taken root in California and is spreading elsewhere as a way to keep downed and damaged power lines from sparking blazes and fueling the West’s more frequent and intense wildfires.
In Boulder, Frasier staff and residents heard about the planned outage from news reports. A Frasier official called the utility to confirm and was initially told the home’s power would not be affected. The utility then called back to say the home’s power would be cut, after all, said Tomas Mendez, Frasier’s vice president of operations. The home had just 75 minutes before Xcel Energy shut off the lights on April 6.
Staff rushed to prepare the 20-acre campus home to nearly 500 residents. Generators kept running the oxygen machines, most refrigerators and freezers, hallway lights, and Wi-Fi for phones and computers. But the heating system and some lights stayed off as the overnight temperature dipped into the 30s.
Power was restored to Frasier after 28 hours. During the shut-off, staff tended to nursing home and assisted living residents, many with dementia, Mendez said.
“These are the folks that depend on us for everything: meals, care, and medications,” he said.
Not knowing when power would be restored, even 24 hours into the crisis, was stressful and expensive, including the next-day cost of refilling fuel for two generators, Mendez said.
“We’re lucky we didn’t have any injuries or anything major, but it is likely these could happen when there are power outages — expected or unexpected. And that puts everyone at risk,” Mendez said.
As preemptive power cuts become more widespread, nursing homes are being forced to evaluate their preparedness. But it shouldn’t be up to the facilities alone, according to industry officials and academics: Better communication between utilities and nursing homes, and including the facilities in regional disaster preparedness plans, is critical to keep residents safe.
“We need to prioritize these folks so that when the power does go out, they get to the front of the line to restore their power accordingly,” said David Dosa, chief of geriatrics and professor of medicine at UMass Chan Medical School in Worcester, Massachusetts, of nursing home residents.
Restoring power to hospitals and nursing homes was a priority throughout the windstorm, wrote Xcel Energy spokesperson Tyler Bryant in an email. But, he acknowledged, public safety power shut-offs can improve, and the utility will work with community partners and the Colorado Public Utilities Commission to help health facilities prepare for extended power outages in the future.
When the forecast called for wind gusts of up to 100 mph on April 6, Xcel Energy implemented a public safety power shut-off. Nearly 275,000 customers were without power from the windstorm.
Officials had adapted after the Marshall Fire killed two people and destroyed or damaged more than 1,000 homes in Boulder and the neighboring communities of Louisville and Superior two and a half years ago. Two fires converged to form that blaze, and electricity from an Xcel Energy power line that detached from its pole in hurricane-force winds “was the most probable cause” of one of them.
“A preemptive shutdown is scary because you don’t really have an end in mind. They don’t tell you the duration,” said Jenny Albertson, director of quality and regulatory affairs for the Colorado Health Care Association and Center for Assisted Living.
More than half of nursing homes in the West are within 3.1 miles of an area with elevated wildfire risk, according to a study published last year. Yet, nursing homes with the greatest risk of fire danger in the Mountain West and Pacific Northwest had poorer compliance with federal emergency preparedness standards than their lower-risk counterparts.
Under federal guidelines, nursing homes must have disaster response plans that include emergency power or building evacuation. Those plans don’t necessarily include contingencies for public safety power shut-offs, which have increased in the past five years but are still relatively new. And nursing homes in the West are rushing to catch up.
In California, a more stringent law to bring emergency power in nursing homes up to code is expected by the California Association of Health Facilities to cost over $1 billion. But the state has not allocated any funding for these facilities to comply, said Corey Egel, the association’s director of public affairs. The association is asking state officials to delay implementation of the law for five years, to Jan. 1, 2029.
Most nursing homes operate on a razor’s edge in terms of federal reimbursement, Dosa said, and it’s incredibly expensive to retrofit an old building to keep up with new regulations.
Frasier’s three buildings for its 300 residents in independent living apartments each have their own generators, in addition to two generators for assisted living and skilled nursing, but none is hooked up to emergency air conditioning or heat because those systems require too much energy.
Keeping residents warm during a minus-10-degree night or cool during two 90-degree days in Boulder “are the kinds of things we need to think about as we consider a future with preemptive power outages,” Mendez said.
Federal audits of emergency preparedness at nursing homes in California and Colorado found facilities lacking. In Colorado, eight of 20 nursing homes had deficiencies related to emergency supplies and power, according to the report. These included three nursing homes without plans for alternate energy sources like generators and four nursing homes without documentation showing generators had been properly tested, maintained, and inspected.
For Debra Saliba, director of UCLA’s Anna and Harry Borun Center for Gerontological Research, making sure nursing homes are part of emergency response plans could help them respond effectively to any kind of power outage. Her study of nursing homes after a magnitude 6.7 earthquake that shook the Los Angeles area in 1994 motivated LA County to integrate nursing homes into community disaster plans and drills.
Too often, nursing homes are forgotten during emergencies because they are not seen by government agencies or utilities as health care facilities, like hospitals or dialysis centers, Saliba added.
Albertson said she is working with hospitals and community emergency response coalitions in Colorado on disaster preparedness plans that include nursing homes. But understanding Xcel Energy’s prioritization plan for power restoration would also help her prepare, she said.
Bryant said Xcel Energy’s prioritization plan for health facilities specifies not whether their electricity will be turned off during a public safety power shut-off — but how quickly it will be restored.
Julie Soltis, Frasier’s director of communications, said the home had plenty of blankets, flashlights, and batteries during the outage. But Frasier plans to invest in headlamps for caregivers, and during a town hall meeting, independent living residents were encouraged to purchase their own backup power for mobile phones and other electronics, she said.
Soltis hopes her facility is spared during the next public safety power shut-off or at least given more time to respond.
“With weather and climate change, this is definitely not the last time this will happen,” she said.
This article was produced by KFF Health News, a national newsroom that produces in-depth journalism about health issues and is one of the core operating programs at KFF — the independent source for health policy research, polling, and journalism.
KFF Health News is a national newsroom that produces in-depth journalism about health issues and is one of the core operating programs at KFF—an independent source of health policy research, polling, and journalism. Learn more about KFF.
USE OUR CONTENT
This story can be republished for free (details).
KFF Health News is a national newsroom that produces in-depth journalism about health issues and is one of the core operating programs at KFF—an independent source of health policy research, polling, and journalism. Learn more about KFF.
Subscribe to KFF Health News’ free Morning Briefing.
—
Previously Published on kffhealthnews.org
***
You Might Also Like These From The Good Men Project
Join The Good Men Project as a Premium Member today.
All Premium Members get to view The Good Men Project with NO ADS. A $50 annual membership gives you an all access pass. You can be a part of every call, group, class and community. A $25 annual membership gives you access to one class, one Social Interest group and our online communities. A $12 annual membership gives you access to our Friday calls with the publisher, our online community.
Register New Account
Need more info? A complete list of benefits is here.
—
Photo credit: iStock

Shaquille O’Neal’s Mom Lucille On The Emotions Of Her Son Winning His First Title

Keir Starmer hails historic Labour victory as Conservatives sink to worst-ever result

Germany v Spain – dissecting Euro 2024’s two best teams

Hilton expands presence in Ras Al Khaimah

Pituitary Tumors: What Are the Signs and Symptoms?

Yellowstone National Park ranger injured in shooting

What is a Healthy BMI for a 70-Year-Old Female?

Alanis Morissette Duets Ironic With Daughter on Her 8th Birthday!

Thompson Fire In Northern California Slowing As Some Residents Will Be Allowed To Return

what next for ‘The Everything Company’?

A Closer Look: Afro-Mexicans 🇲🇽

Black History Facts I had to Learn on My Own pt.6 📜
A Closer Look: Afro-Mexicans 🇲🇽

Major African Tribes taken away during the Atlantic Slave Trade🌍 #slavetrade #africanamericanhistory

Cameroon 🇨🇲 World Cup History (1962-2022) #football #realmadrid #shorts

Black History Inventors: Mary Kenner 🩸

PROOF AFRICAN AMERICANS AIN'T FROM AFRICA DOCUMENTED EVIDENCE

No African pre-Columbus DNA? 🤯🤯 #history #mesoamerica #mexico #african

Mr Incredible Becoming Canny/Uncanny Mapping (You live in Paraguay 🇵🇾)

How Did Normal Medieval People Survive Winter? | Tudor Monastery Farm | Chronicle

Evidence of African Nobility all over Medieval Europe.

african presence in mexico part 1

Did Africans Discover America Before Christopher Columbus?

The Black Presence in Renaissance Europe in 4K- Historical Paintings of Africans Brought To Life

Africans Visited the Americas Long Before Columbus | African History

Dr. Ivan Van Sertima – African Presence in Early Asia

African Presence in Early Europe – Dr Ivan Sertima – PART 1

History of Cameroon

Black History (It’s Yours) | Black History Month Rap Anthem | Animated Music Video

History of Africa from the 16th to the 20th Century
-
 African History5 years ago
A Closer Look: Afro-Mexicans 🇲🇽
-
 African History5 months ago
Black History Facts I had to Learn on My Own pt.6 📜
-
African History5 years ago
A Closer Look: Afro-Mexicans 🇲🇽
-
 African History1 year ago
Major African Tribes taken away during the Atlantic Slave Trade🌍 #slavetrade #africanamericanhistory
-
 African History1 year ago
Cameroon 🇨🇲 World Cup History (1962-2022) #football #realmadrid #shorts
-
 African History5 months ago
Black History Inventors: Mary Kenner 🩸
-
 African History1 year ago
PROOF AFRICAN AMERICANS AIN'T FROM AFRICA DOCUMENTED EVIDENCE
-
 African History1 year ago
No African pre-Columbus DNA? 🤯🤯 #history #mesoamerica #mexico #african