Health
Easy Low-Calorie Gluten Free Bread Recipe

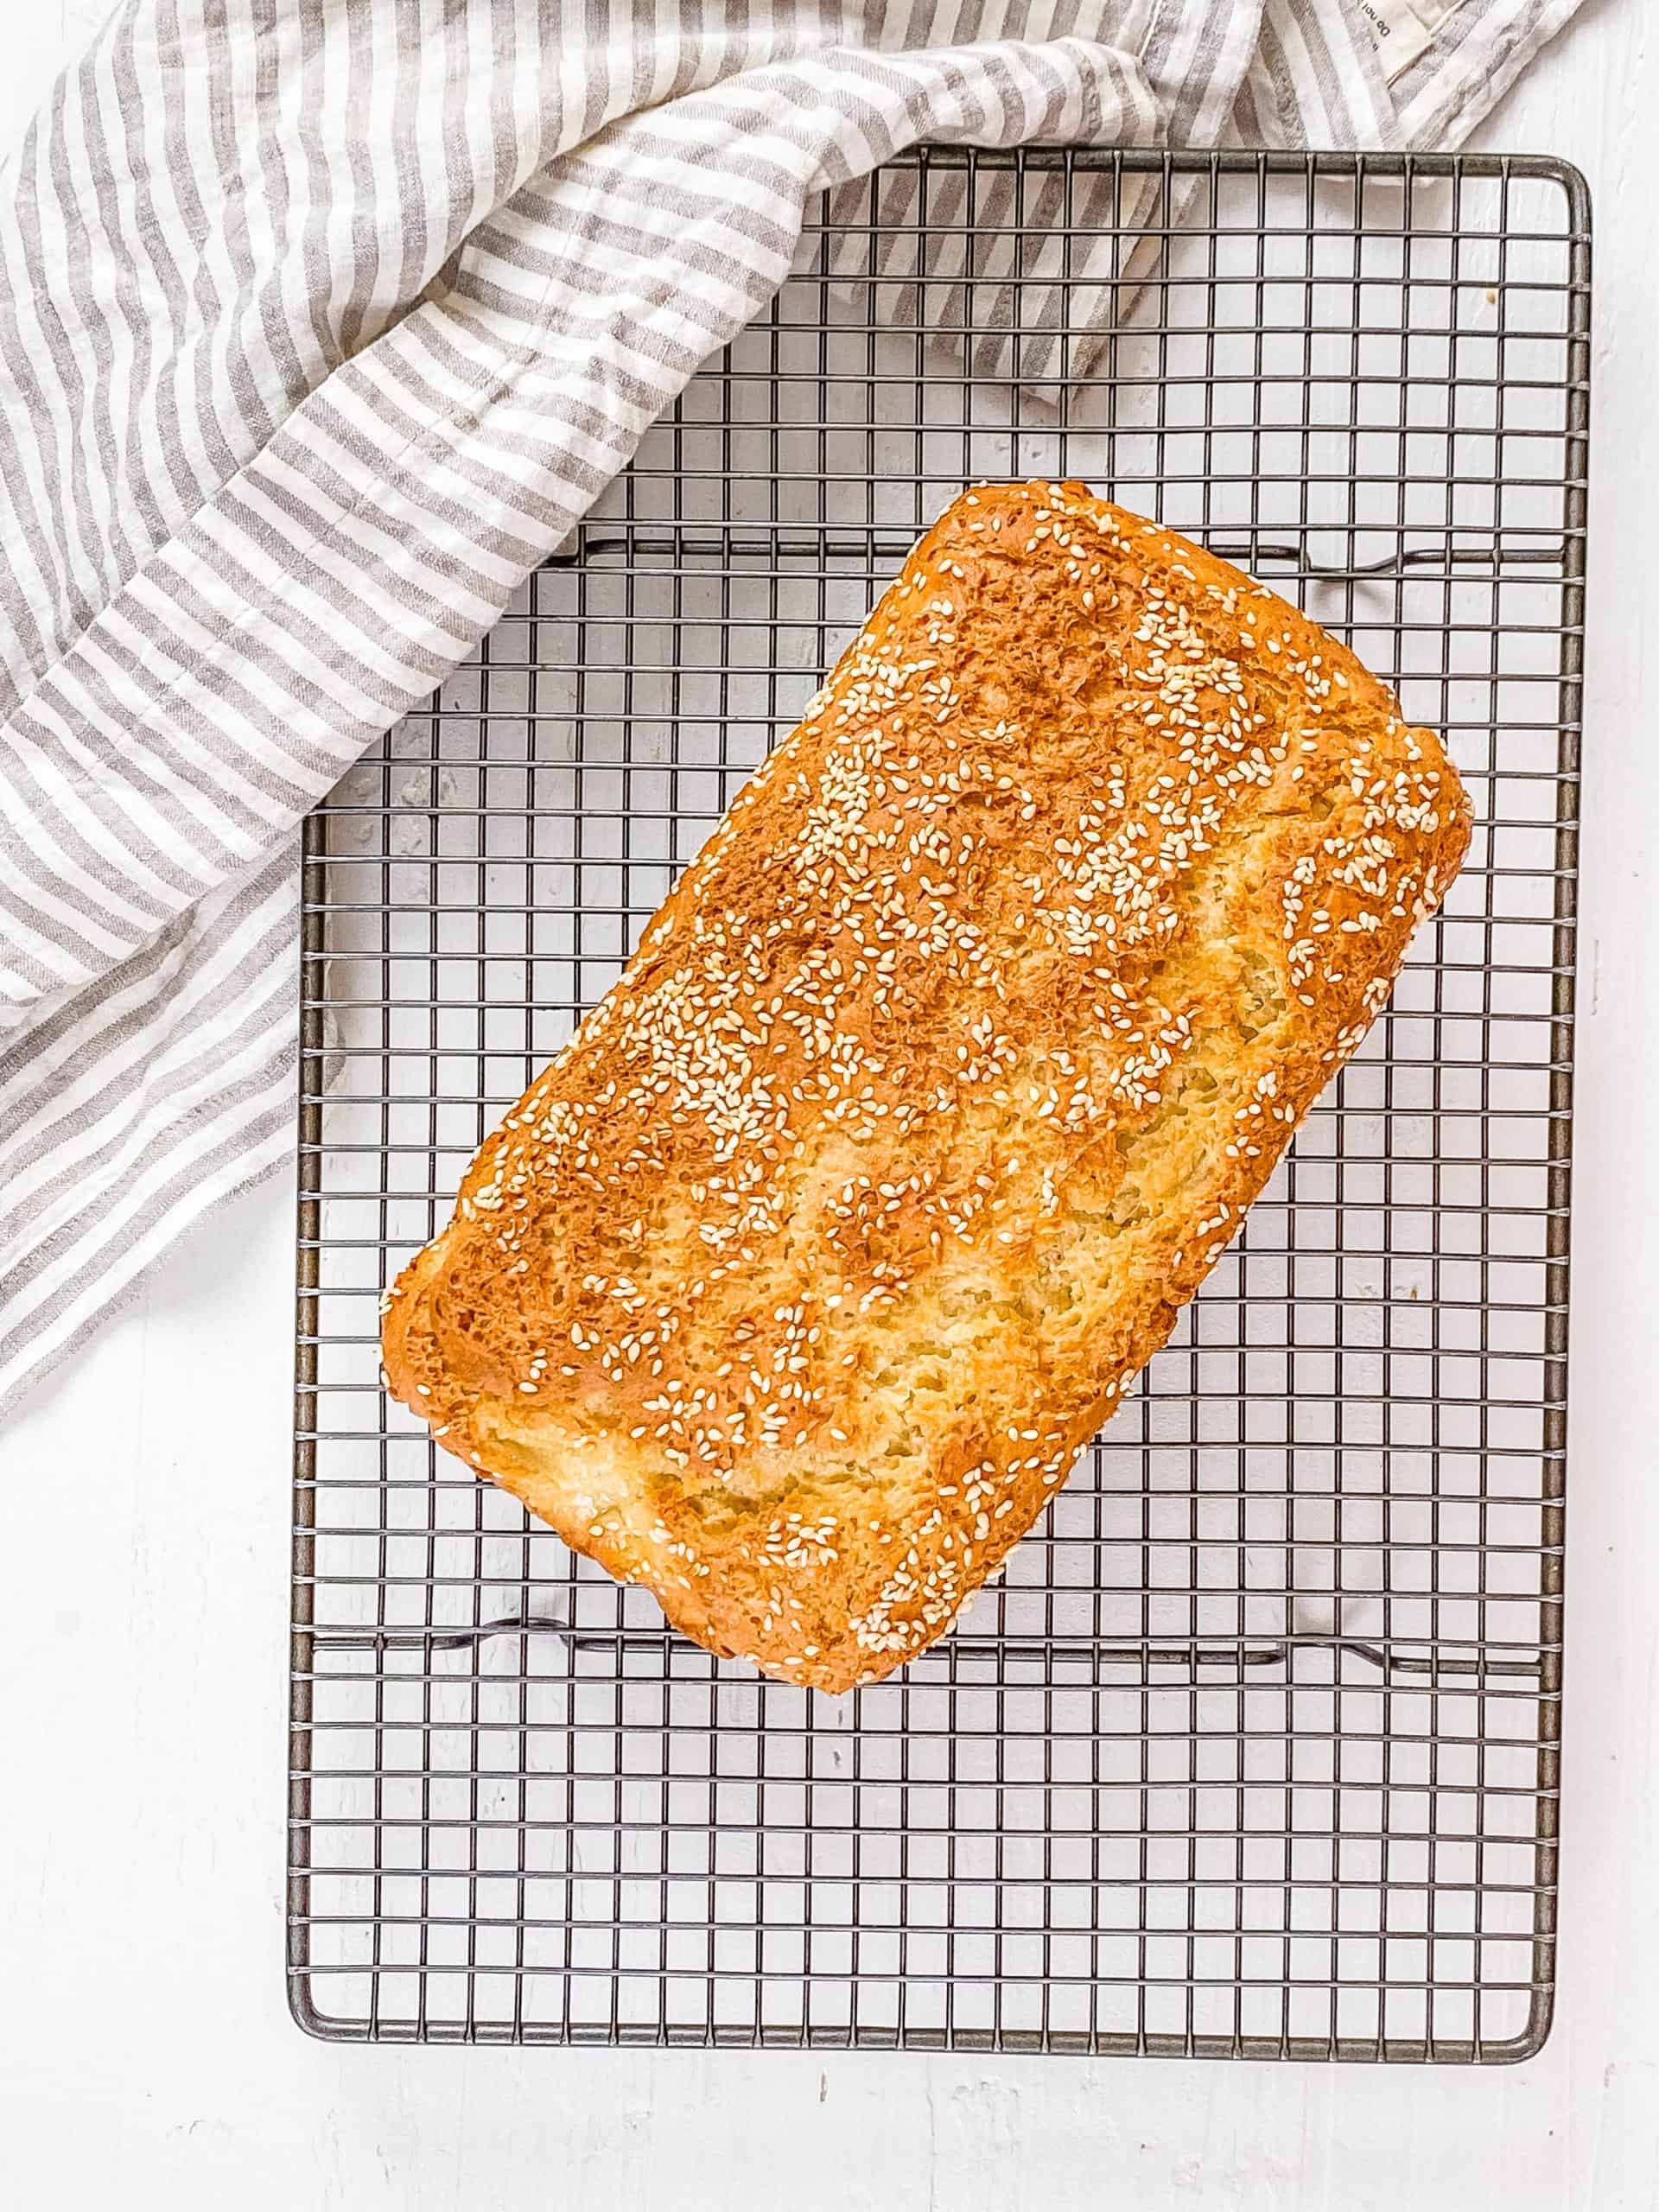
My homemade gluten-free bread recipe is incredibly delicious and super easy to make in both the oven and a bread machine. It slices effortlessly and has the perfect soft, chewy texture that is ideal for sandwiches, toast, and all your favorite bread-based meals. This is such a simple low calorie gluten free bread that anyone can make!

I’ve been eating gluten-free for quite a few years now, and when I first started switching to gluten-free items, bread was one of the hardest swaps to make! On top of that, I don’t love most store-bought gluten-free bread because it has a ton of additives and processed starches to make up for the lack of wheat flour or other gluten-containing grains like rye or barley. So while it’s gluten-free, you end up eating bread that’s higher in refined carbs and sugar and low in fiber, protein, and other critical nutrients.
I have found a handful of good gluten-free bread brands out there like Happy Campers, Canyon Bakehouse, and Udi’s, but they can be hard to find and are also pretty expensive compared to regular bread!
That’s why I am super excited to share my easy gluten free bread recipe. It’s not only good for you but is also soft, fluffy, and tastes great! Whether you have celiac disease, a gluten allergy or sensitivity, are following a gluten-free diet, or just want to try a different homemade healthy bread, this recipe is for you!
Making gluten-free bread at home can be tricky, which is why I have tested this recipe over 50 times so that I could guarantee the end result!
I’m happy to share that this is the most delicious and healthiest gluten free bread recipe I’ve ever made. It tastes just like regular bread with a soft and tender crumb that will win over any bread lover!
My recipe is just as healthy as it is delicious. Made with whole grains, it’s a high-fiber gluten-free bread recipe that is also high in protein and low in sugar. One slice has almost 6 grams of fiber, 8 grams of protein and 2 grams of sugar.
Plus, it’s really easy to customize this low fat gluten free bread. You can easily make my recipe vegan and dairy free with just a few swaps (see my variations section below). That makes it the perfect gluten free sandwich bread for anyone.
But my favorite thing is that my homemade gluten free bread recipe doesn’t require any kneading or fancy ingredients. It’s perfect for beginner bakers. You also have the option of baking it in your oven or a bread machine — see my notes below on how to do this!
Latest Recipe Video!
🥘 Ingredients
You only need a few basic ingredients to make my gluten-free homemade bread. You can find everything you need at your local grocery store. Scroll down to the recipe card at the bottom of the post for the exact amounts and nutritional information.

Gluten Free Flour: Almost any gluten free flour will work as long as it includes xanthan gum, which mimics gluten. Typically gluten free flour is a mixture of brown rice flour, potato flour, tapioca starch (or potato starch), maybe a few other gf flours, and xanthan gum.
Dried Yeast, Apple Cider Vinegar, and Baking Powder: These leavening agents are essential for helping my healthy gluten free bread rise. The dried yeast ferments to produce carbon dioxide, giving the bread lift, while apple cider vinegar reacts with the baking powder to create bubbles, enhancing the texture.
Cane Sugar, Warm Almond Milk, And Salt: Together, these ingredients activate the yeast and add flavor. Using unsweetened almond milk instead of regular milk also keeps this recipe dairy-free. While I haven’t tested other plant-based milks, I believe that any low-fat non-dairy milk should work, just make sure it’s unsweetened.
Egg Whites And Olive Oil: These act as binders that bring the dough together. To make my recipe vegan and dairy-free, you can replace the egg whites with aquafaba, which is one of many vegan egg substitutes. In the variations section below, I’ve included details on how much aquafaba you’ll need and how to use it.
Sesame Seeds: I use this for topping the bread, and trust me, a little bit goes a long way! I have also used sunflower seeds, pumpkin seeds, or a mix of chopped nuts and seeds – and all work well. Or, if you prefer, make your bread without a topping and omit this ingredient.
What Gluten-Free Flour Is Best For Bread?
One of the most important things I’ve found when making any gluten free bread recipe is choosing the right flour. For yeast bread, you must use a gluten-free flour blend meant for yeast recipes that includes xanthan gum or add xanthan gum to the blend. Gluten free bread without xanthan gum won’t have the proper texture.
I would recommend these five flours for yeast breads:
- Arrowhead Mills Organic Gluten Free All Purpose Flour
- Better Batter Blend
- Judee’s All Purpose Gluten Free Bread Flour
- Bob’s Red Mill Gluten Free All Purpose Baking Flour (need to add xanthan gum)
- Pillsbury Gluten Free Flour Blend
You can also experiment with mixing your own gluten-free flour blend! It’s a great way to control what grains you’re using if you have other grain allergies or if you live at high elevations or in places where baking is impacted by environmental factors.
Custom flour blends can also improve the texture of your bread and other baked goods. Here are some gluten-free flours that I have used to make my own custom flour blends, and that work well for baking bread:
- Buckwheat Flour
- Sorghum Flour
- Cassava Flour
- Millet Flour
- Oat Flour
- Brown Rice Flour
🔪 How To Make Gluten-Free Bread
I promise, learning how to make healthy gluten free bread is easy, even if you’re not an experienced baker. The dough comes together effortlessly, and I’ve included instructions on how to bake the bread in both the oven and a bread machine.
Watch my video below to see the step-by-step process of making my gluten free low calorie bread.
Proof The Yeast: In a small bowl, I mix together the yeast, sugar, and warm milk. Then I cover the bowl and set it aside in a dry, warm place (typically room temperature) to proof for about 10 minutes.

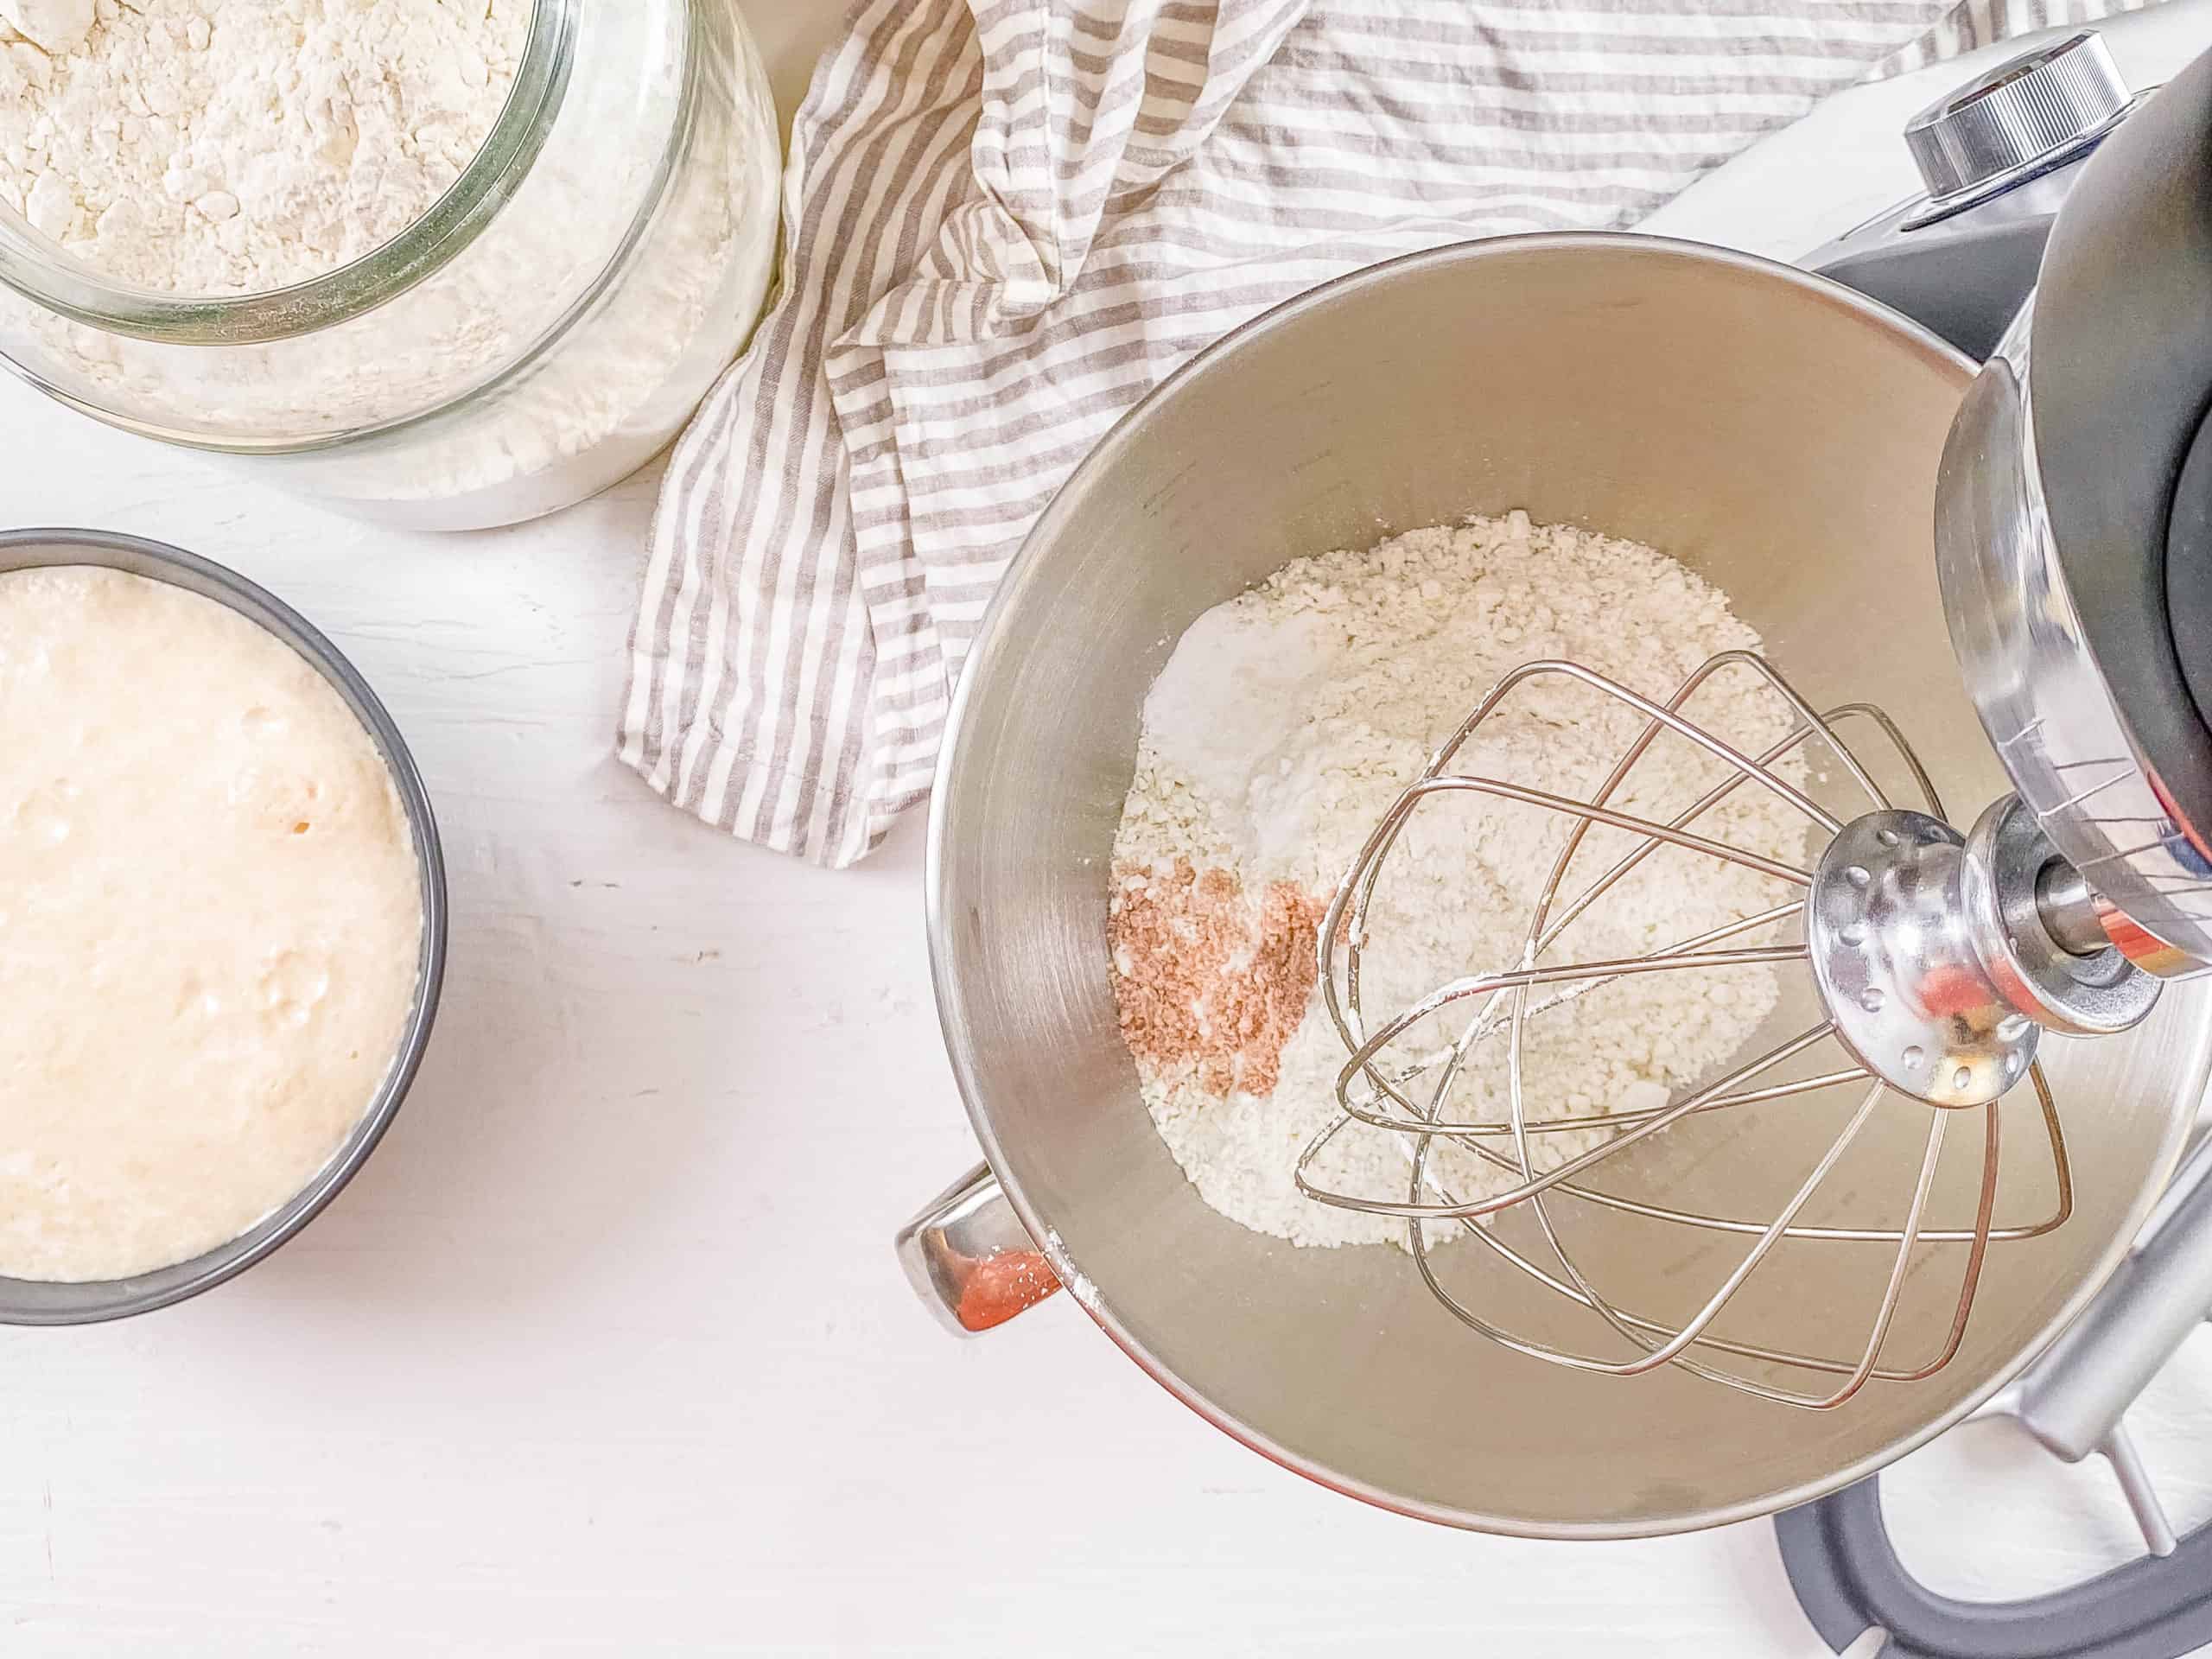
Combine The Dry Ingredients: While the yeast is proofing, I whisk together the flour, baking powder, and salt in the large bowl of a stand mixer.
Mix The Wet Ingredients: Once the yeast starts to bubble, I add it to the flour mixture along with the apple cider vinegar, oil, and egg whites.
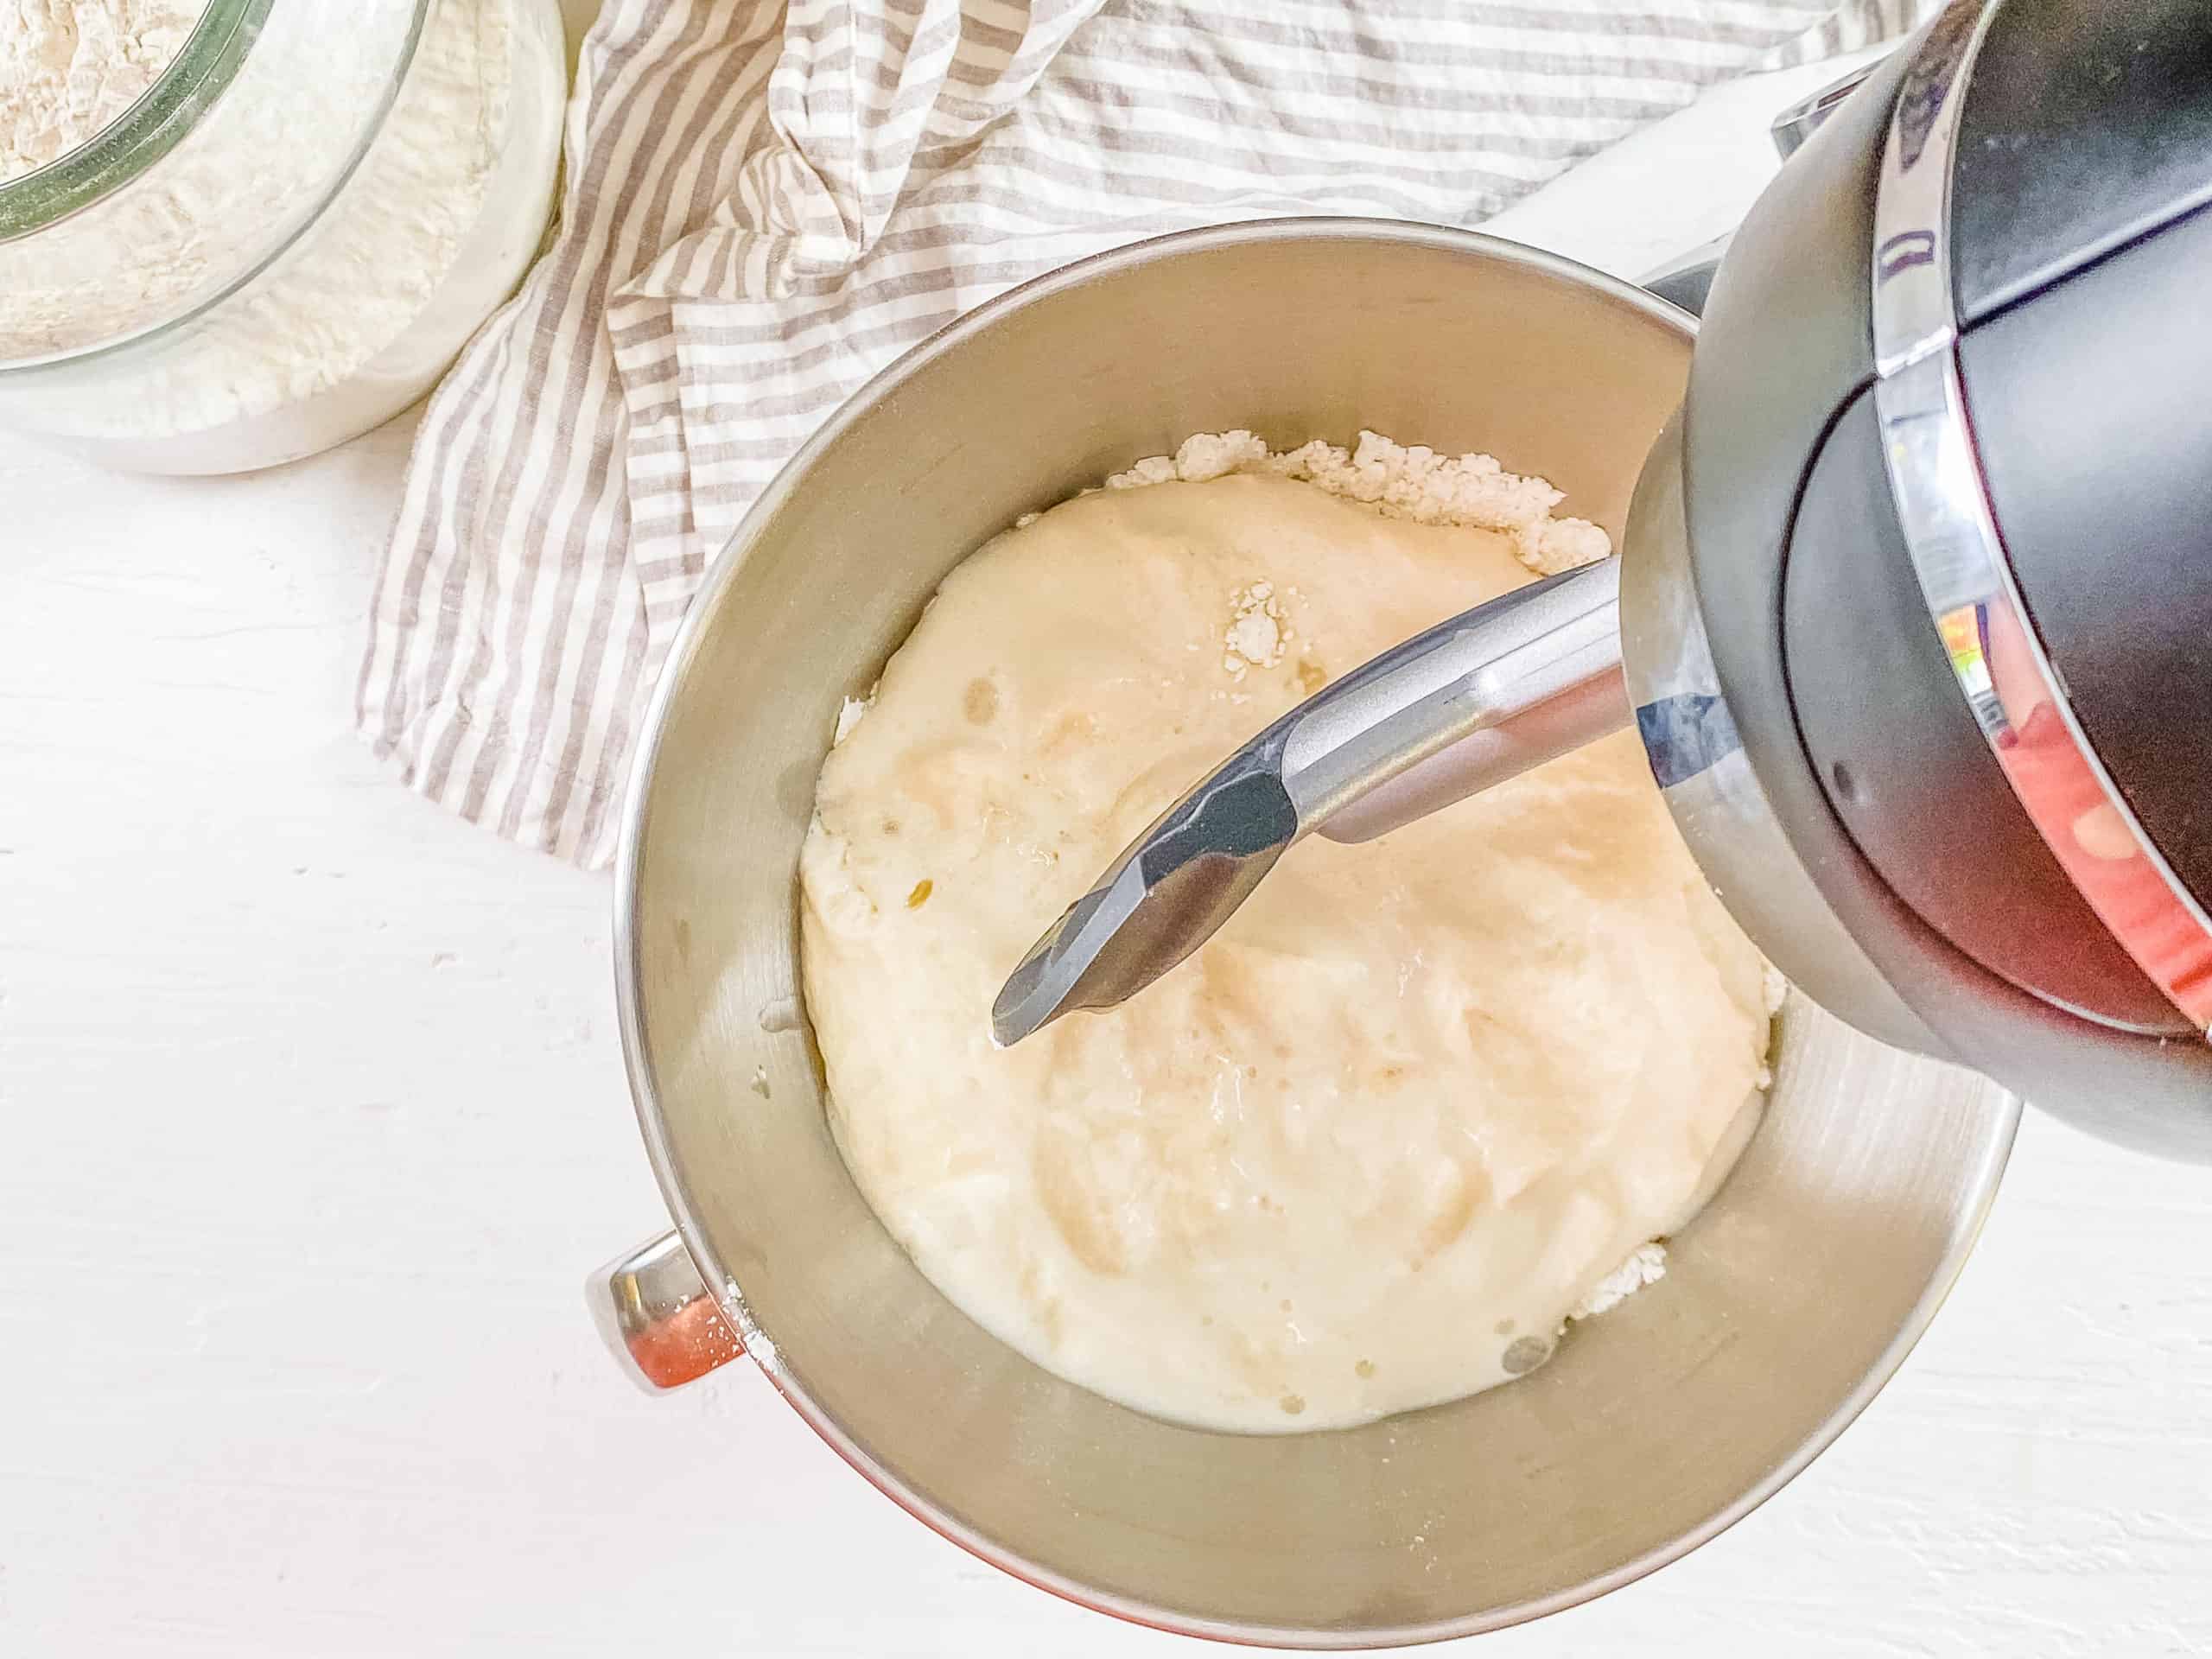
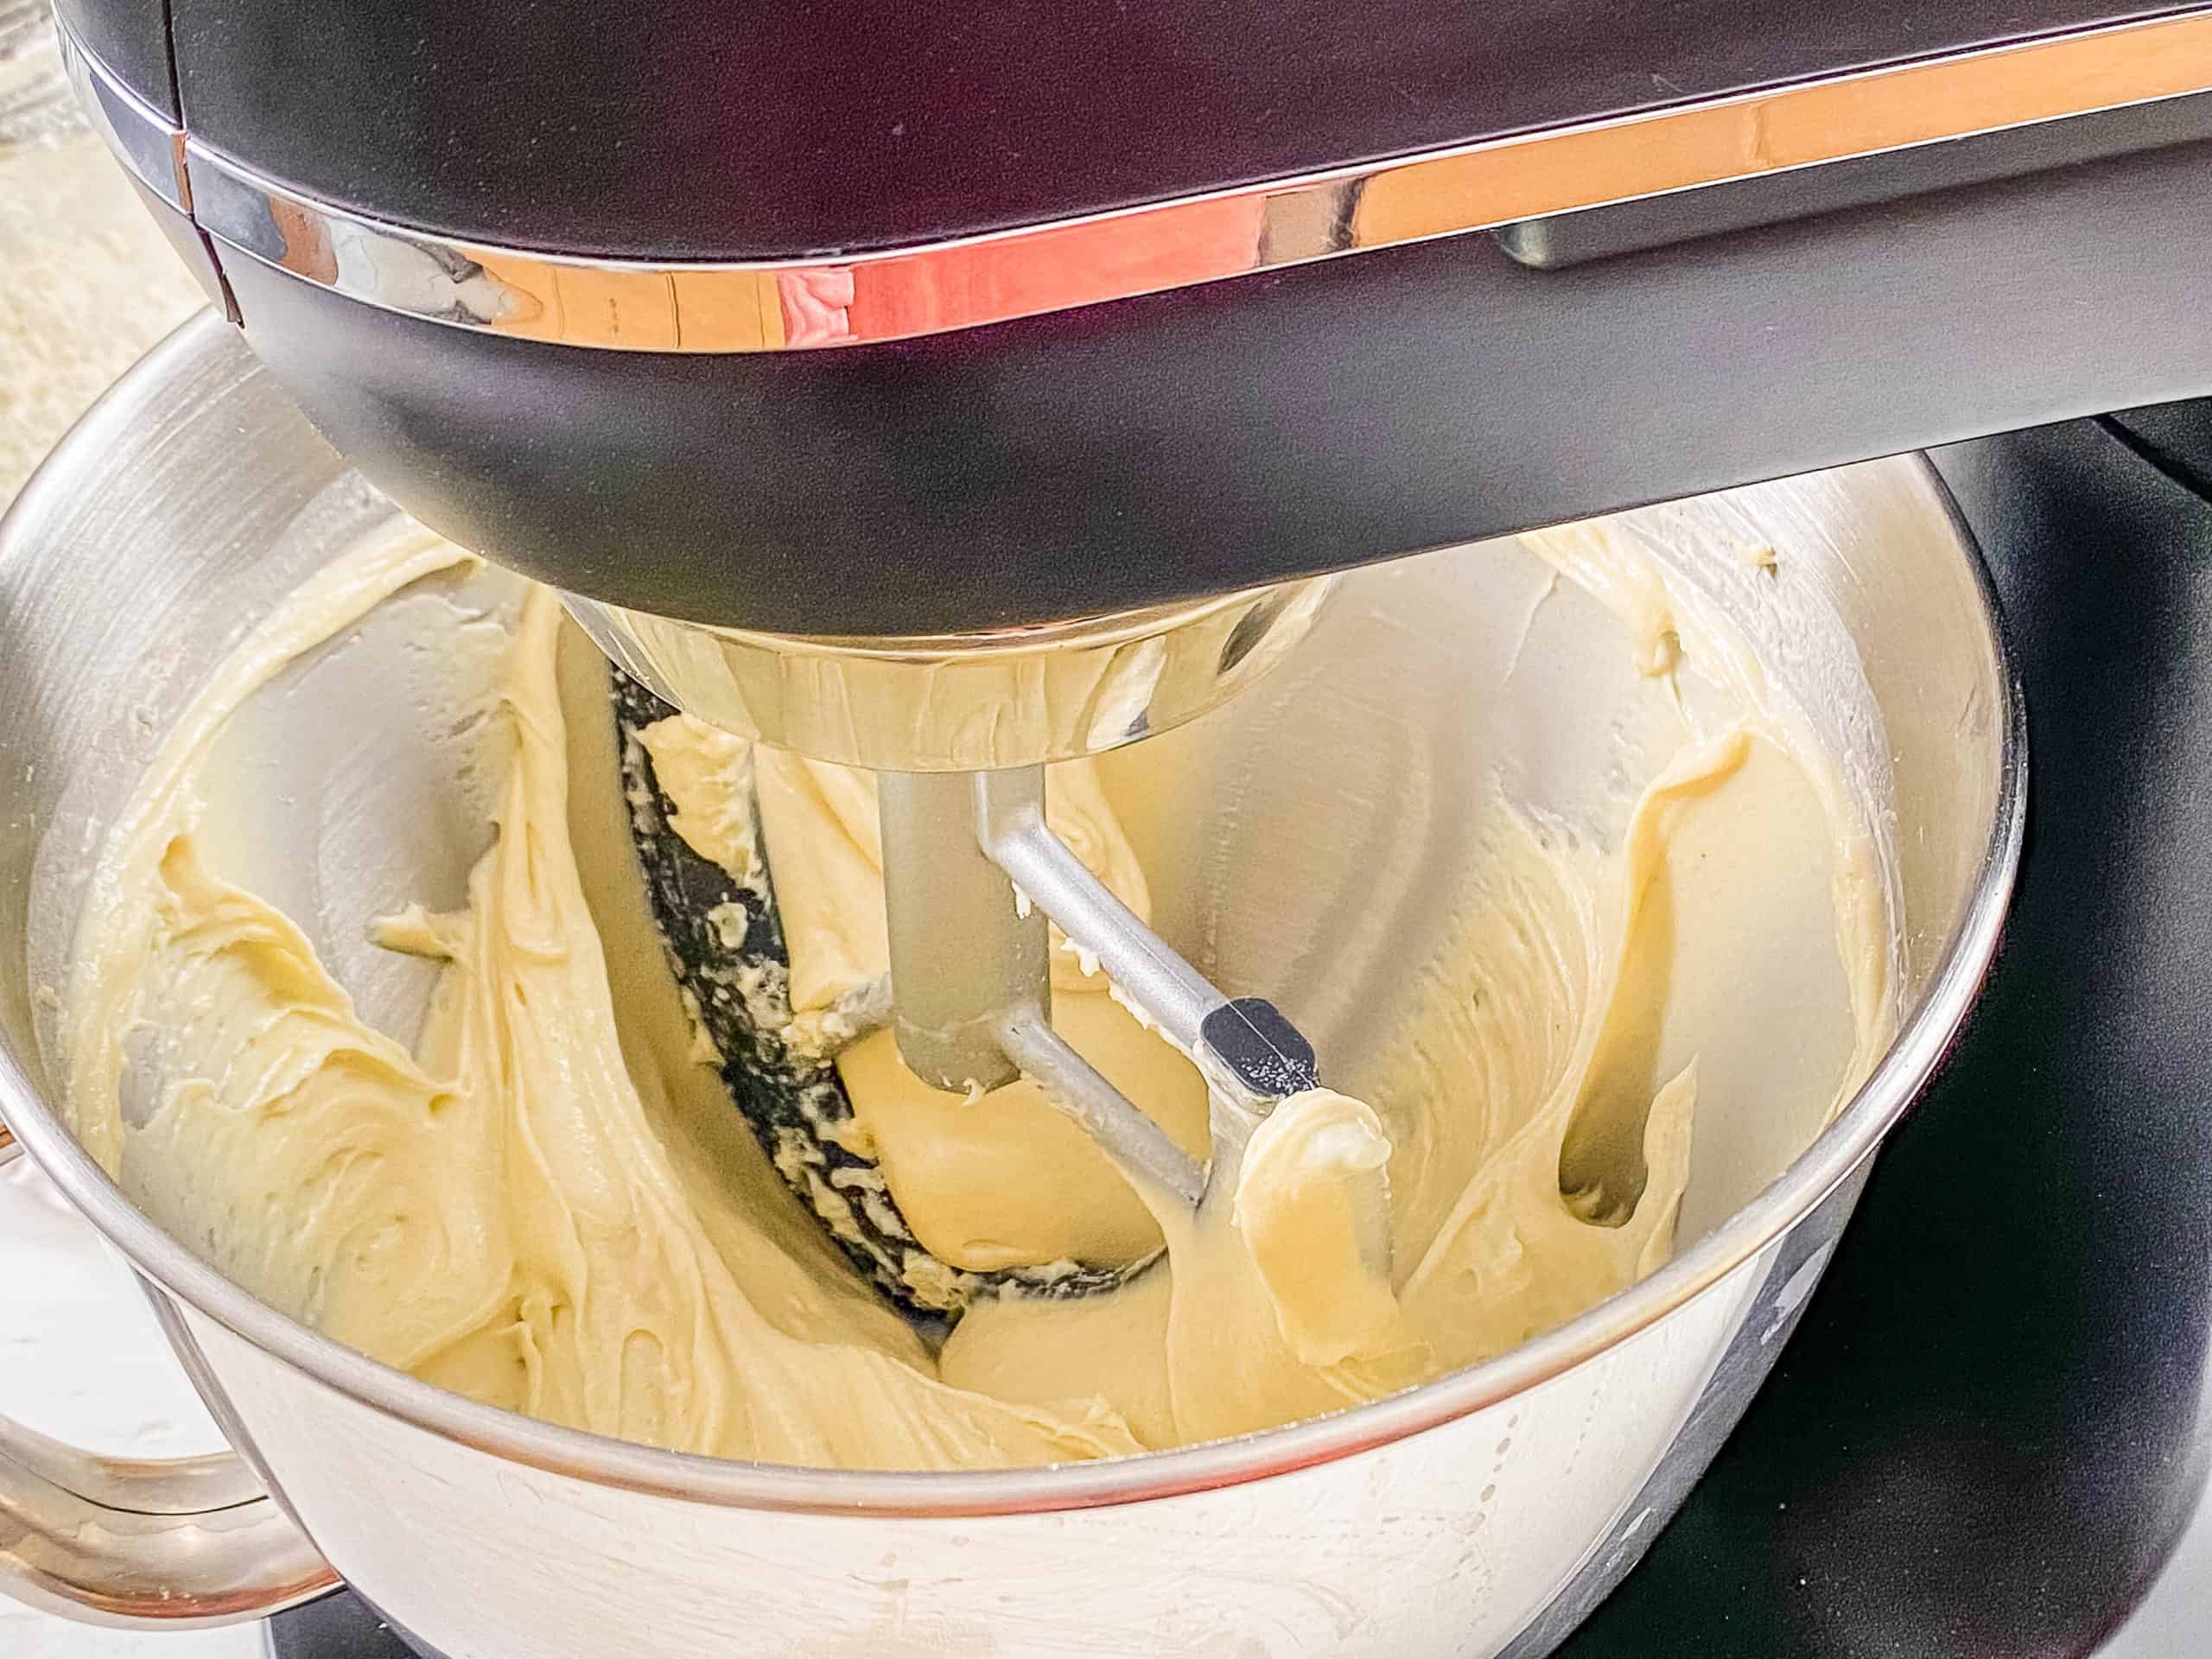
Mix The Dough: With everything in the bowl, I use the paddle attachment (not a dough hook) and beat the batter for 30 seconds until combined. Then I scrape down the sides of the bowl and continue to beat for another 3 minutes on medium speed.
Add The Dough To Bread Pan: First, I line a 13 x 5 inch bread tin with baking paper, lightly spray it with oil, and pour the gluten-free bread dough into the pan. Then I smooth out the top with a rubber spatula.

Allow The Dough To Rise: Once in the pan, I sprinkle the top of the bread with sesame seeds. Next, I loosely cover it with plastic wrap and a tea towel and place it in a warm spot to allow the dough to rise for 1 hour. When there are about 15 minutes, I preheat the oven to 350 degrees Fahrenheit (180 degrees Celsius).

Bake The Bread: After the dough has had time to rise, I remove the plastic wrap and place the bread loaf pan in the oven. Then I let it bake for 60 to 65 minutes, covering it with foil midway through to stop it from burning.
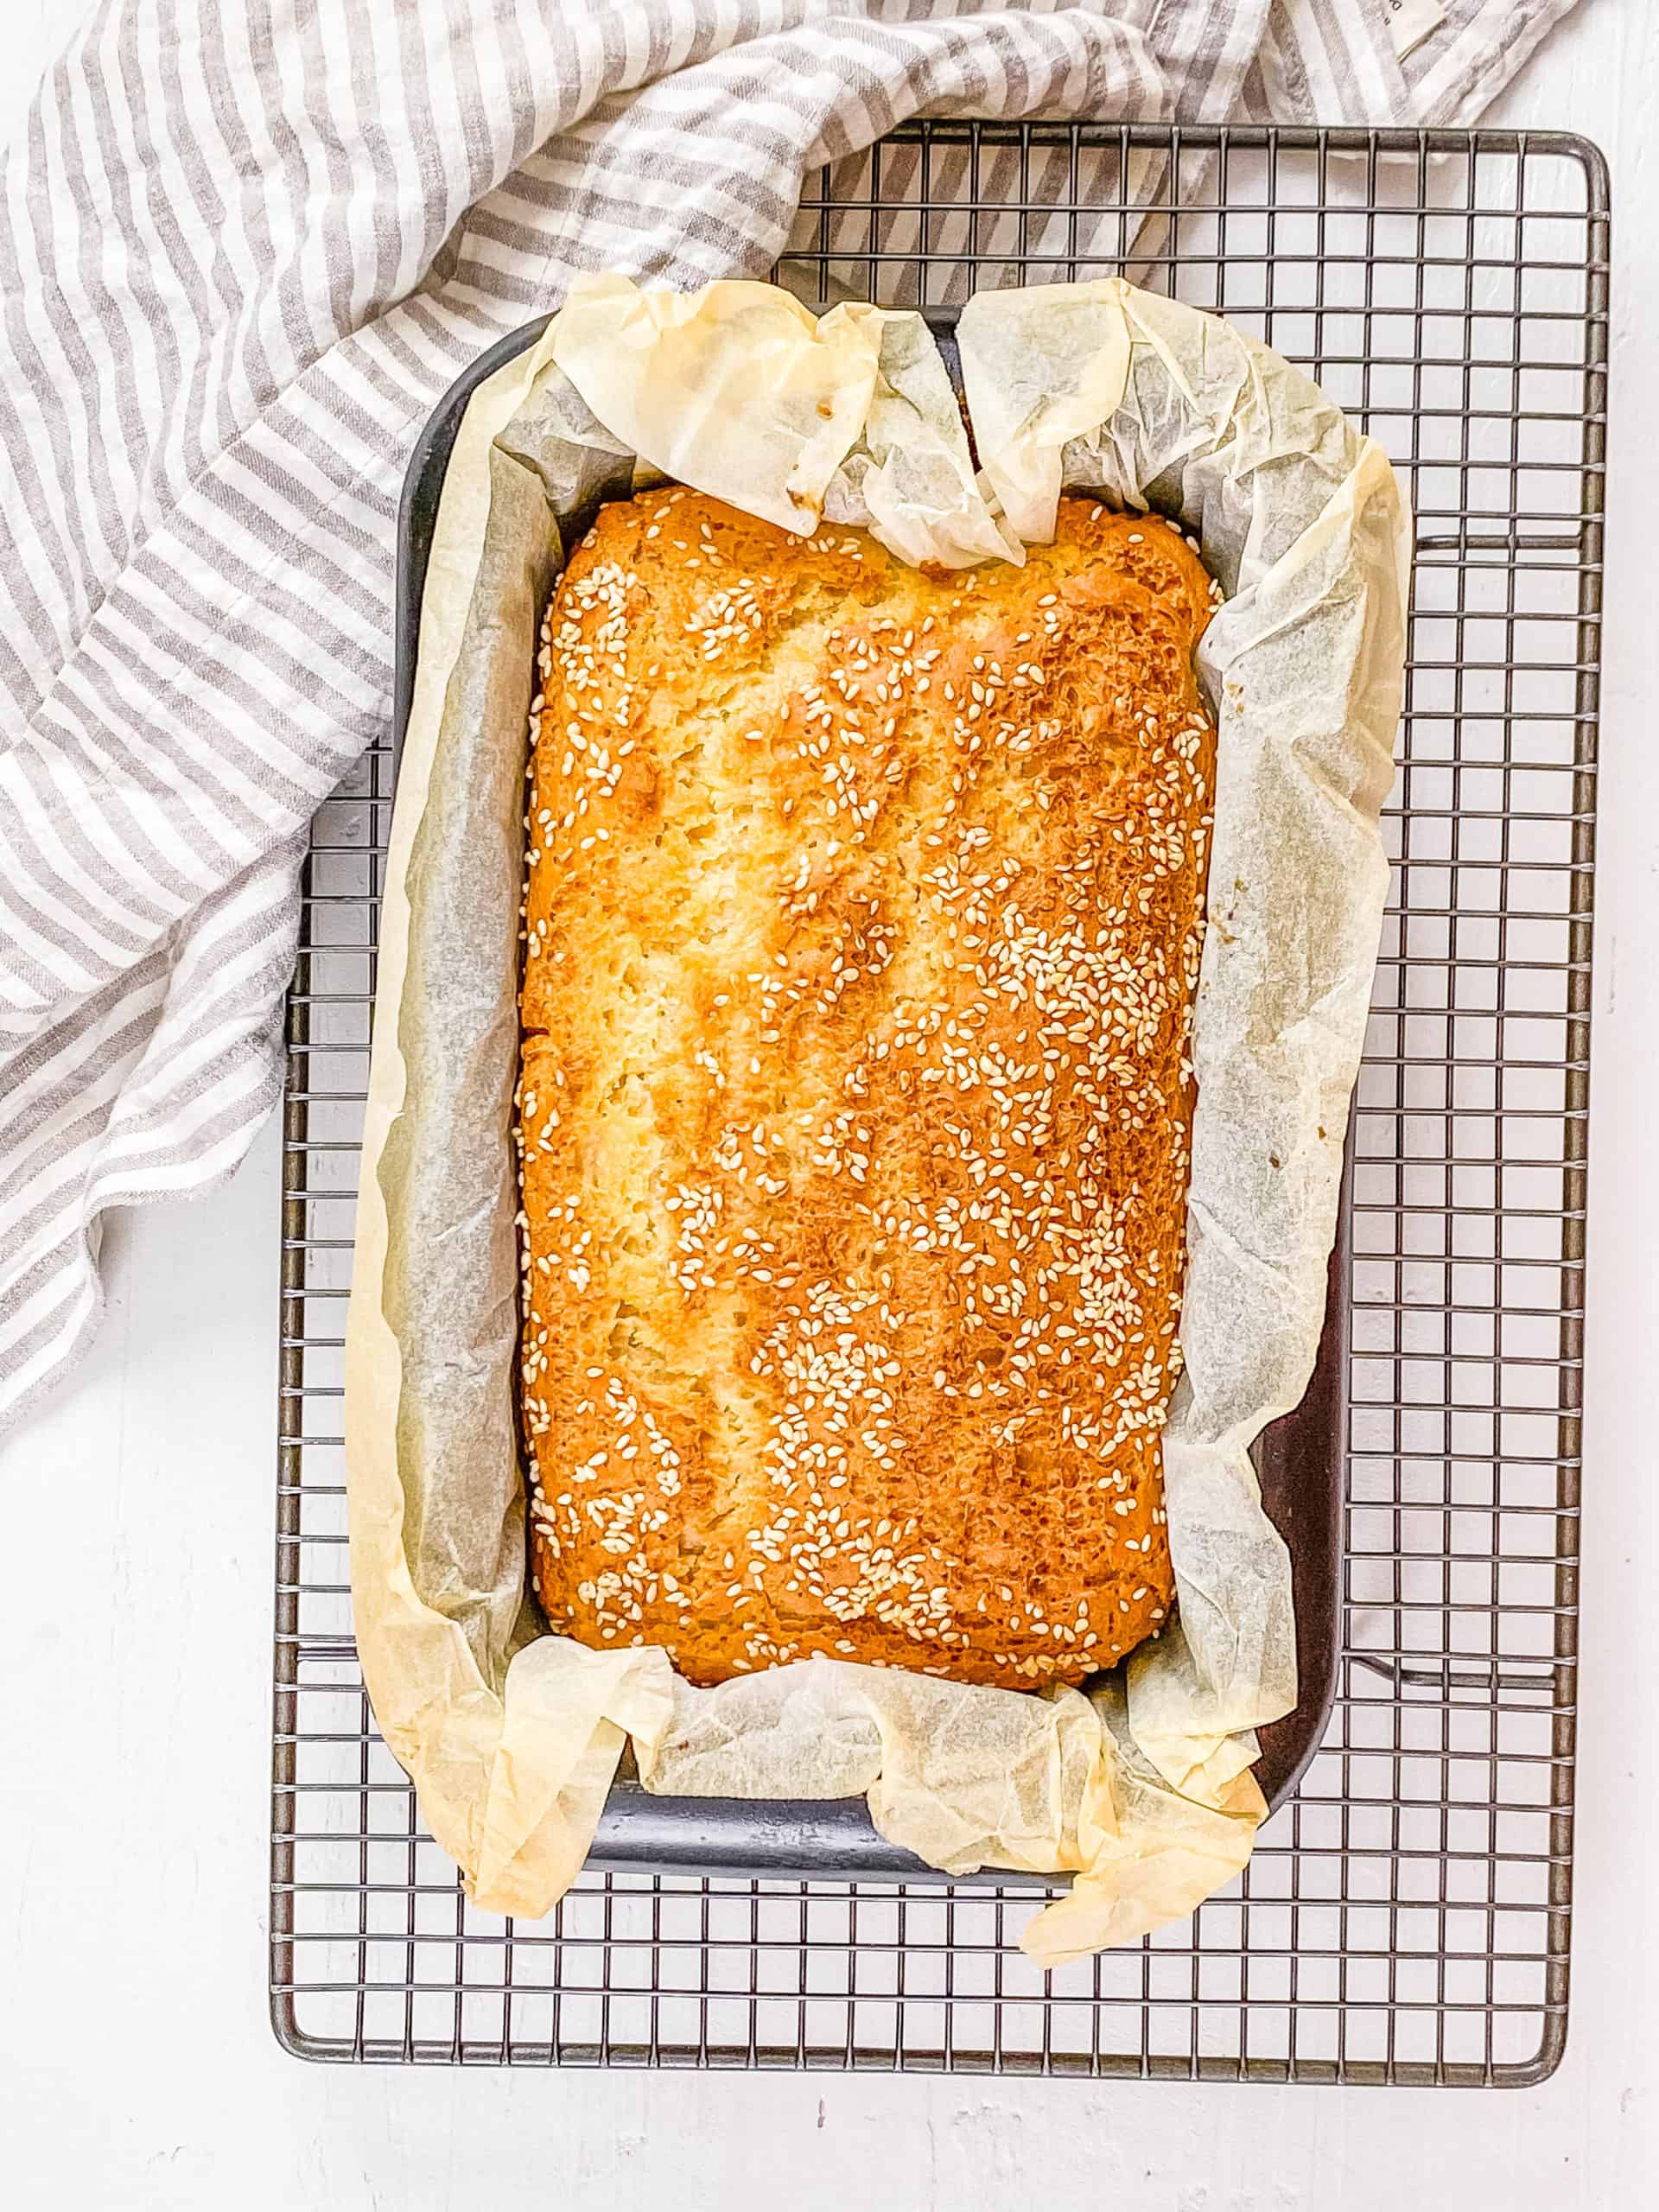
Cool On A Wire Rack: When baked through, I remove the bread from the oven and let it cool in the bread pan for five minutes. Then, I transfer it to a cooling rack to cool completely.
Slice And Serve: Once the bread has cooled completely, I slice it with a bread knife or any serrated knife, and serve it at room temperature.

How To Make Gluten-Free Bread In A Bread Machine
It’s actually really easy to make my low calorie gluten free bread recipe in a bread machine. You just have to use instant yeast instead of regular active dry yeast. Here’s how you do it:
- Add your wet ingredients into the bread pan: almond milk, olive oil, sugar, egg whites, and apple cider vinegar, in that order.
- Add your dry ingredients into the bread pan: flour, baking powder, and salt.
- Make a hole in the center of the dry ingredients and pour your instant yeast into the hole.
- Select the “gluten-free bread” setting and start your bread machine.
Alternatively, you could add all the ingredients at once, and if you did that, the order of the ingredients would be: almond milk, egg whites, oil, apple cider vinegar, flour, salt, sugar, instant yeast. Then you’d select “gluten free bread” for the setting and hit start. Let the bread cool completely before slicing.
Note: If your bread machine does not have a gluten-free setting, choose the setting that has only one mixing cycle (typically it’ll be the “quick” or “basic” or “rapid” cycle). Select light or medium for the crust.
My #1 Secret Tip for making my simple gluten-free bread recipe is to ensure your yeast isn’t expired and to test it if it’s a little old. Having fresh yeast is so important for getting your bread to rise and making sure it has the right soft and fluffy texture!
You can test-proof the yeast before adding it to your flour mixture by dissolving it in warm water (between 95 to 100 degrees Fahrenheit) with a little honey or sugar.
If it forms small bubbles and becomes creamy, your yeast is still active. You can also proof yeast in milk or plant-based milk, as used in this recipe.
Other Tips To Keep In Mind:
- Use Room Temperature Ingredients: For baking, room temperature ingredients work best. It’s also important not to substitute any ingredients in this recipe as I can’t guarantee it will turn out as well (bread recipes can be finicky!)
- Try Different Flour Blends: All gluten free flours are slightly different, so you might need to try one or two to get the right texture. Remember trying to make a gluten free bread recipe without xanthan gum added to the mix won’t work.
- Spoon And Level Dry Ingredients: When measuring out your dry ingredients, spoon them into your measuring cup and then level the top. This ensures you don’t end up with too much flour and your bread won’t be overly dense.
- Don’t Use Hot Milk: The ideal temperature for instant yeast is 95 to 110 degrees Fahrenheit (35 to 43 degrees Celsius). If the almond milk is any hotter, it could kill the yeast and your bread will not rise.
- Use A Stand Mixer: I really do recommend using a stand mixer for making your bread batter. It’s much harder to mix it by hand!
- No Need To Knead: My whole grain gluten-free bread recipe with yeast comes together with very little work. It’s as simple as mixing until a smooth batter is formed, allowing it to rise, and then baking it.
- Line Your Bread Pan: If you are using a bread tin or loaf pan, line it with parchment paper to give your loaf a more traditional shape and ensure easy removal. The narrower your bread pan, the taller your bread will be. I used a 13×5 inch pan for this recipe. If you want your bread to be super soft, the Pullman loaf pan is the best choice!
- Find A Warm Dry Place: Make sure you let your bread rise in a warm dry place. Room temperature is fine, but don’t let it rise in the oven or the fridge! The oven is too hot and will kill the yeast, the fridge is too cold and it will take forever to rise.
- Remove From The Pan: Don’t let your bread cool completely in the bread pan. The moisture from the bread will get trapped by the pan and the bottom of your bread will get soggy. Instead, let it cool for 5 minutes in the pan and then transfer it to a wire rack to finish cooling.
- Toast Lightly: My low calorie gluten free bread tastes best slightly toasted and warm, but not so toasted that it becomes crunchy!
✔️ Troubleshooting Gluten-Free Bread Making
Don’t give up if your first attempts at making my low calorie gluten free bread don’t yield a perfect loaf. For the best results, see my expert tips, and try these additional solutions to the most common gluten-free baking issues.
How To Fix Gluten-Free Bread That’s Too Crumbly
With normal bread, chains of gluten proteins help hold the bread together. That’s why so many bread recipes don’t call for many binders, like eggs. But when it comes to gluten-free bread you need something else to help the bread hold together and prevent too much crumbliness.
There are typically 3 reasons why your bread might be too crumbly: 1) You didn’t have enough liquid in the batter, 2) The batter needs more fat 3) You need to use more binder.
Solution: The easiest way to add a little more binding power is to add an egg (or flax-eggs) to your bread to help keep everything together. Chia seeds or even plain flax seeds can also be good options.
How To Fix A Loaf That Is Too Dense
Typically a dense loaf of bread can be caused by two things: 1) Your leavening agent (baking powder, yeast) has expired or is stale, or you need more of it! 2) You didn’t measure the ingredients accurately. If your loaves are too dense (but still taste and look great) then you might want to add a little more leavening to the mix.
Solution: Baking soda, baking powder, and gluten-free yeast are all good options to achieve an airy texture. Yeast especially can also add a little more flavor.
In terms of measuring ingredients, I use the spoon and level method (spooning my ingredients into a measuring cup, level with the back of a knife). I also recommend weighing your ingredients for even more precision.
How To Fix A Gritty Bread Texture
Gritty bread is one of the most common struggles when making gluten free bread. The issue can be either with the flour, or your baking time.
Solution: All gluten free flour blends are slightly different, so the texture of the bread will vary depending on which flour you use. I had to test a few to find the right one when I was making this recipe.
Also, check your baking time, and make sure you’re not trying to bake your bread too quickly which doesn’t give the dough any time to rise and settle.
If you’re still struggling with gritty texture you can try giving your bread batter a little more time to rise before you put it in the oven. The extra time should give the dough a chance to soften and also help bread batters even out.
What To Do If Your Gluten-Free Sandwich Bread Is Too Dry
Moisture is another challenge with any healthy gluten-free bread recipe, but simply adding more water or milk to your dough usually isn’t an option. Instead, try to add moisture by adding a more substantial ingredient that’s less likely to evaporate in the oven.
Solution: Apple sauce is one of my go-to ingredients because it’s a great way to add a little more moisture. For savory breads, sour cream or yogurt can also add some moisture and protein to your finished bread. Just remember that sour cream and yogurt also add to the fat content and increase the calories.
What To Do If Your Bread Has A Mushy Center Or A Dense Bottom
This problem is common in almost all bread baking. Mushy centers and dense bottoms are a sign that your bread is underbaked. It can also sometimes mean that you didn’t use enough leavener, especially if baking longer leads to an overly dense texture or hard bread.
Solution: Start by lowering your oven temperature and extending the cooking time slightly. Try reducing the temperature by degrees Fahrenheit (10 degrees Celsius) and baking for another 20-30 minutes. Make sure to check the bread a couple of times to make sure it isn’t finished baking early.
📖 Variations
Vegan: You can easily turn this into an easy vegan gluten free bread recipe! To make this vegan, I will typically substitute aquafaba for the egg whites. When doing this, I use the ratio of use 6 tablespoons of aquafaba as a replacement for the 3 egg whites to make a gluten-free egg-free bread recipe.
Nut Free: To make gluten-free nut-free bread just use a different plant milk (like unsweetened oat milk or soy milk) instead of the almond milk.
Different Flours: The best flour to use is a gluten free flour blend meant for yeast baking, with xanthan gum added. I like Bob’s Red Mill Gluten Free All Purpose Baking Flour, which is made specifically for baking yeast breads. While I also like Bob’s Red Mill Gluten Free 1:1 Flour, it’s not supposed to work as well for gluten free bread with yeast. I’ve heard that Better Batter and Pillsbury gluten free flour also works well. Keep in mind that if you use the Bob’s Red Mill, you will have to add 3.5 teaspoons of xanthan gum to this yeast bread recipe or your bread won’t rise properly.
Different Toppings: You can easily elevate my gf bread recipe with toppings. I used sesame seeds, but you can use any mixture of nuts or seeds to top this bread! I like the texture and flavor the seeds provide. You can also just omit them altogether.
🍽 Serving Suggestions
My healthy gluten free bread recipe is incredibly versatile and can be used in a variety of dishes. From sandwiches to breakfast ideas, it’s perfect for almost anything you can think of. Here are some delicious ways to enjoy this bread:
For Breakfast: It’s a fantastic base for breakfast toast ideas! My gluten free bread is also wonderful with this low calorie omelette or vegan frittata. You can even use it to make regular healthy french toast or a crock pot french toast casserole.
For Sandwiches: I’ll use this low calorie gluten free bread to make some of my favorite sandwiches like this Panera Mediterranean veggie sandwich copycat recipe or a classic banana peanut butter sandwich. It also makes for a delicious grilled sandwich like this grilled cheese with pickles.
With Soups & Stews: Pair it with your favorite soups and stews. Its soft, chewy texture is perfect for dipping and soaking up flavors. It’s fantastic with this mushroom soup and vegan tomato soup. For a heartier meal, I have served some slices of this low-calorie gf bread with this vegan minestrone or vegan white bean chili. My bread also makes great gluten-free croutons to top your soups and stews with!
🧊 Storage Directions
Fridge: Since my low calorie gluten free bread doesn’t have any preservatives, I recommend storing it in the fridge to maintain freshness. Once the bread has cooled, I slice it and wrap it tightly in plastic wrap, then wrap it in foil and place it in an airtight container. You can store it in the fridge for up to 2 weeks.
Freezer: If you want to make the bread in bulk and use it for months, freezing is the perfect solution. I wrap the loaf tightly and place it in an airtight freezer bag or container. The bread will last in the freezer for up to 3 months. When you’re ready to use it, defrost the bread in the fridge and then heat it in a toaster oven or regular oven.
❓Recipe FAQs
Most yeast is gluten-free, but there are a couple of exceptions. Brewer’s yeast and yeast extract are the types that typically contain gluten. However, these aren’t usually used for baking. The most common types of yeast for baking—baker’s yeast, dry yeast, and instant yeast—are generally gluten-free. To be safe, always choose a gluten-free certified yeast brand before baking!
To ensure your low calorie gluten free bread is fully baked, I recommend using a few simple methods. First, visually inspect the bread: it should be golden brown on top, and the edges should start to pull away from the sides of the pan. Another reliable method is to check the internal temperature with a kitchen thermometer; it should read around 200-210 degrees Fahrenheit (93-99 degrees Celsius).
Yes, but since this is a batter dough and doesn’t hold its shape, you’ll need to use a muffin tin or small molds. Simply pour the batter into the muffin tin or molds, filling each about halfway to allow room for rising. Then bake as directed but keep an eye on them as they will require less time in the oven.
In traditional bread making, gluten is what causes bread to rise. Without gluten, you need a rising agent to help your bread rise! We make our gluten free bread recipe with yeast and baking powder, and choose a flour that has xanthan gum added to help this bread become nice and fluffy. Yeast, baking powder (or baking soda), and xanthan gum are the three ingredients that help gluten-free bread to rise.

Want to Save This Recipe?
Enter your email & I’ll send it to your inbox. Plus, get great new recipes from me every week!
By submitting this form, you consent to receive emails from The Picky Eater.

Love this plant based gluten free recipe? Please leave a 5-star rating 🌟 in the recipe below and/or a review in the comments section further down the page!
You can also FOLLOW ME on FACEBOOK, INSTAGRAM, and PINTEREST to see more delicious, healthy, family-friendly food, and if you have any questions, I’m here to help!
📋 Recipe Card
Easy Low-Calorie Gluten Free Bread Recipe
My homemade healthy gluten-free bread recipe is super easy to make, is low-calorie, and has a soft chewy texture! It’s the perfect substitute for traditional bread for anyone needing a gluten-free option. It slices well and works for sandwiches, toast, and all of your other favorite bread-based meals!
Servings: 8 servings
Calories: 268kcal
Shop Ingredients on JupiterTo Make In The Oven
In a small bowl mix together the yeast, sugar and warm milk. Stir, cover and set aside to proof for approx 10 minutes.
Whisk together the flour, baking powder and salt in the bowl of a stand mixer.
When the yeast starts to bubble add it, along with the apple cider vinegar, oil and egg whites to the flour mixture.
Use the paddle attachment and beat the batter for 30 seconds until combined. Scrape down the edges and continue to beat for a further 3 minutes on a medium speed.
Line a 13 x 5 inch bread tin with baking paper, lightly spray it with oil and fill the tin with batter. Smooth off the top with a spatula.
Sprinkle with sesame seeds if using, loosely cover with plastic wrap and a tea towel and place in a warm spot to allow the dough to rise for 1 hour.
When you have about 15 minutes left for your dough to finish rising, preheat the oven to 350 degrees F / 180 C.
Remove the plastic wrap and place the bread tin in the oven. Cook for 60 – 65 minutes, cover with foil midway through to stop it from burning.
When cooked through, remove from the oven, cool in the tin for 5 minutes then allow to cool completely on a cooling rack.
To Make In A Bread Machine
Note: You will need instant yeast, not active dry yeast for this version. Add your wet ingredients into the bread pan: that would be the almond milk, olive oil, sugar, egg whites, and apple cider vinegar, in that order.
Add your dry ingredients into the bread pan: the flour, baking powder, and salt.
Make a hole in the center of the bread pan, and pour your yeast into the hole. Select the “gluten free bread” setting and start your bread machine.
Alternatively, you could add all the ingredients at once, and if you did that, the order of the ingredients would be: almond milk, egg whites, oil, apple cider vinegar, flour, salt, sugar, yeast. Then you’d select “gluten free bread” for the setting and hit start. Let the bread cool completely before slicing.
Note: If your bread machine does not have a gluten-free setting, choose the setting that has only one mixing cycle (typically it’ll be the “quick” or “basic” or “rapid” cycle). Select light or medium for the crust.
- Add xanthan gum to the mix if the gluten free flour that you’re using doesn’t have it already added.
- There’s no need to knead this bread mixture, it’s as simple as mixing until a smooth batter is formed, allowing it to rise and baking. Super simple!
- Topping your bread with seeds is optional although they do add a delicious flavor.
- Store bread in an airtight container in a cool dry place.
- Allow bread to completely cool before slicing.
- Bread is best used within 24 hours of making.
- This bread toasts really well.
- Use a slightly wet spatula when smoothing off the top of the bread, this helps the batter to smooth evenly in the tin.
- For best results make sure to use baking powder and yeast that are not expired, and are fresh, and that all ingredients are at room temperature.
- Make sure your water is between 95-110 degrees before mixing it with the yeast and other ingredients.
- When you’re measuring out your dry ingredients, spoon both into your measuring cup and then level. That will ensure you don’t end up with too much flour and your bread won’t be overly dense.
Serving: 2slices | Calories: 268kcal | Carbohydrates: 41g | Protein: 8g | Fat: 10g | Saturated Fat: 1g | Polyunsaturated Fat: 2g | Monounsaturated Fat: 6g | Sodium: 363mg | Potassium: 112mg | Fiber: 4g | Sugar: 5g
Source link


By John Daley, Colorado Public Radio
G Kumar’s vaping addiction peaked in college at the University of Colorado, when flavored, disposable vapes were taking off.
“I’d go through, let’s say, 1,200 puffs in a week,” Kumar said.
Vaping became a crutch for them. Like losing a cellphone, losing a vape pen would set off a mad scramble.
“It needs to be right next to my head when I fall asleep at night, and then in the morning, I have to thrash through the sheets and pick it up and find it,” Kumar recalled.
They got sick often, including catching covid-19 — and vaping through all of it.
Kumar, now 24, eventually quit. But many of their generation can’t shake the habit.
“Everyone knows it’s not good for you and everyone wants to stop,” said Jacob Garza, a University of Colorado student who worked to raise awareness about substance use as part of the school’s health promotion program.
“But at this point, doing it all these years … it’s just second nature now,” he said.
Marketing by e-cigarette companies, touting the allure of fruity or candy-like flavors and names, led many teens to try vaping. As more high schoolers and younger kids experimented with e-cigarettes, physicians and researchers warned it could lead to widespread addiction, creating a “Generation Vape.”
Research has shown nicotine is highly rewarding to the brains of young people.
New data on substance use among adults ages 18-24 suggests that many former teen vapers remain e-cigarette users. National vaping rates for young adults increased from 7.6% in 2018 to 11% in 2021.
It’s not surprising that many of them start in high school for social reasons, for all sorts of reasons,” said Delaney Ruston, a primary care physician and documentary filmmaker. “And many of them now — we’re seeing this — have continued to college and beyond.”
Her latest film is “Screenagers Under the Influence: Addressing Vaping, Drugs & Alcohol in the Digital Age.”
In Colorado, the share of those 18 to 24 who regularly vaped rose by about 61% from 2020 to 2022 — to nearly a quarter of that age group.
“That’s an astounding increase in just two years,” Ruston said.
Trends in that state are worth noting because, before the pandemic, Colorado led the nation in youth vaping among high school students, surpassing 36 other states surveyed.
Nationally, vaping rates among high schoolers dropped from 28% in 2019 to 10% in 2023, according to the Annual National Youth Tobacco Survey. But for many young people who started vaping at the height of the trend, a habit was set.
At Children’s Hospital Colorado, pediatric pulmonologist Heather De Keyser displayed on her screen a clouded X-ray of the lung of a young adult damaged by vaping.
For years, doctors like her and public health experts wondered about the potentially harmful impact of vaping on pre-adult bodies and brains — especially the big risk of addiction.
“I think, unfortunately, those lessons that we were worried we were going to be learning, we’re learning,” said De Keyser, an associate professor of pediatrics in the Breathing Institute at Children’s Hospital Colorado.
“We’re seeing increases in those young adults. They weren’t able to stop.”
It’s no coincidence the vaping rates soared during the pandemic, according to several public health experts.
For the past couple of years, undergraduates have talked about the challenges of isolation and using more substances, said Alyssa Wright, who manages early intervention health promotion programs at CU-Boulder.
“Just being home, being bored, being a little bit anxious, not knowing what’s happening in the world,” Wright said. “We don’t have that social connection, and it feels like people are still even trying to catch up from that experience.”
Other factors driving addiction are the high nicotine levels in vaping devices, and “stealth culture,” said Chris Lord, CU-Boulder’s associate director of the Collegiate Recovery Center.
“The products they were using had five times more nicotine than previous vapes had,” he said. “So getting hooked on that was … almost impossible to avoid.”
By “stealth culture,” Lord means that vaping is exciting, something forbidden and secret. “As an adolescent, our brains are kind of wired that way, a lot of us,” Lord said.
All over the U.S., state and local governments have filed suits against Juul Labs, alleging the company misrepresented the health risks of its products.
The lawsuits argued that Juul became a top e-cigarette company by aggressively marketing directly to kids, who then spread the word themselves by posting to social media sites like YouTube, Instagram, and TikTok.
“What vaping has done, getting high schoolers, in some cases even middle schoolers, hooked on vaping, is now playing out,” said Colorado Attorney General Phil Weiser.
Juul agreed to pay hundreds of millions in settlements. The company did not respond to requests for comment on this article.
R.J. Reynolds, which makes another popular vape brand, Vuse, sent this statement: “We steer clear of youth enticing flavors, such as bubble gum and cotton candy, providing a stark juxtaposition to illicit disposable vapor products.”
Other big vape companies, like Esco Bar, Elf Bar, Breeze Smoke, and Puff Bar, didn’t respond to requests for comment.
“If we lived in an ideal world, adults would reach the age of 24 without ever having experimented with adult substances. In reality, young adults experiment,” said Greg Conley, director of legislative and external affairs with American Vapor Manufacturers. “This predates the advent of nicotine vaping.”
The FDA banned flavored vape cartridges in 2020 to crack down on marketing to minors, but the products are still easy to find.
Joe Miklosi, a consultant to the Rocky Mountain Smoke-Free Alliance, a trade group for vape shops, contends the shops are not driving vaping rates among young adults in Colorado. “We keep demographic data in our 125 stores. Our average age [of customers] is 42,” he said.
He has spoken with thousands of consumers who say vaping helped them quit smoking cigarettes, he said. Vape shops sell products to help adult smokers quit, Miklosi said.
Colorado statistics belie that claim, according to longtime tobacco researcher Stanton Glantz. The data is “completely inconsistent with the argument that most e-cigarette use is adult smokers trying to use them to quit,” said Glantz, the former director of the Center for Tobacco Control Research and Education at the University of California-San Francisco.
For recent college graduate G Kumar, now a rock climber, the impetus to quit vaping was more ecological than health-related. They said they were turned off by the amount of trash generated from used vape devices and the amount of money they were spending.
Kumar got help from cessation literature and quitting aids from the university’s health promotion program, including boxes of eucalyptus-flavored toothpicks, which tasted awful but provided a distraction and helped with oral cravings.
It took a while and a lot of willpower to overcome the intense psychological cravings.
“The fact that I could just gnaw on toothpicks for weeks on end was, I think, what kept me sane,” Kumar said.
This article is from a partnership that includes CPR News, NPR, and KFF Health News.
KFF Health News is a national newsroom that produces in-depth journalism about health issues and is one of the core operating programs at KFF—an independent source of health policy research, polling, and journalism. Learn more about KFF.
USE OUR CONTENT
This story can be republished for free (details).
KFF Health News is a national newsroom that produces in-depth journalism about health issues and is one of the core operating programs at KFF—an independent source of health policy research, polling, and journalism. Learn more about KFF.
Subscribe to KFF Health News’ free Morning Briefing.
—
Previously Published on kffhealthnews.org
***
You Might Also Like These From The Good Men Project
Join The Good Men Project as a Premium Member today.
All Premium Members get to view The Good Men Project with NO ADS. A $50 annual membership gives you an all access pass. You can be a part of every call, group, class and community. A $25 annual membership gives you access to one class, one Social Interest group and our online communities. A $12 annual membership gives you access to our Friday calls with the publisher, our online community.
Register New Account
Need more info? A complete list of benefits is here.
—
Photo credit: unsplash

What makes some people more attractive to mosquitoes? Researchers have answers for you.

Summer is just around the corner, and with it, more opportunities to have fun and frolic in the sun. But more time outside means more chances for another common warm-weather annoyance: mosquito bites.
University of Washington researchers are hoping those itchy bumps could soon become a thing of the past.
Jeffrey Riffell, a professor of biology, studies mosquito sensory systems, particularly their sense of smell. He and his team want to understand how mosquitoes find food, whether it be males—who drink nectar—or females, who drink blood when they are trying to produce eggs.
Riffell’s research has shown that hungry female mosquitoes find us by following a trail of scent cues, including chemicals exuded by our skin and sweat, as well as the carbon dioxide gas we exhale with each breath.
Mosquitoes also like colors, at least certain ones. His team is investigating how the visual and olfactory senses work together to help a mosquito zero in for the final strike and get her blood meal.
In the United States, climate change is opening new habitats for mosquitos. Washington currently boasts 20 species, including ones that can transmit West Nile virus.
Knowing what attracts mosquitoes—males to flowers, females to people—can help develop better control and containment efforts against these insects, whose bites can also transmit malaria, Zika, dengue, yellow fever, and other diseases.
Traps that kill or poison mosquitoes, for example, would be more effective if they released a mosquito-attracting scent.
Mosquito-borne illnesses kill hundreds of thousands of people each year. Riffell and his team hope their efforts can help take a bite out of those numbers.
Source: University of Washington
—
Previously Published on futurity.org with Creative Commons License
***
You Might Also Like These From The Good Men Project
Join The Good Men Project as a Premium Member today.
All Premium Members get to view The Good Men Project with NO ADS. A $50 annual membership gives you an all access pass. You can be a part of every call, group, class and community. A $25 annual membership gives you access to one class, one Social Interest group and our online communities. A $12 annual membership gives you access to our Friday calls with the publisher, our online community.
Register New Account
Need more info? A complete list of benefits is here.
—
Photo credit: unsplash
Health
Colon Cancer Rates Are Rising in Young Americans, but Insurance Barriers Are Making Screening Harder

More than 53,000 Americans are projected to die from colorectal cancer this year. Although colorectal cancer is the second-most common cause of cancer deaths in the United States, it can be cured if caught early. Detecting a tumor as soon as possible can help you get treatment as soon as possible, giving you the best chance for survival.
In my work as a gastroenterologist, I treat patients from every background and walk of life. Uniting them are a growing number of insurance barriers threatening access to timely care. All too often, payers take a long time to make coverage determinations, or they even deny them outright.
With the alarming rise of colorectal cancer diagnoses among Americans under 50, it is more important than ever for people to know their cancer risk and when to get screened.
Here are common questions I and other gastroenterologists get from patients about colorectal cancer:
What is my colorectal cancer risk?
Anybody at any age can develop colorectal cancer. However, some people may be more likely to get the disease than others.
For example, people with a family history of colorectal cancer or a personal history of polyps, which are abnormal growths in the tissue of the colon or rectum, may have a higher risk.
Inflammatory bowel diseases like Crohn’s and ulcerative colitis can also increase your risk of developing colorectal cancer. This is because the chronic inflammation associated with these diseases can promote the development of abnormal growths.
Race and ethnicity may also affect colon cancer risk. Black and Indigenous Americans are significantly more likely to develop – and die from – colorectal cancer. While genetics does play a role in disease development, much of the risk of colorectal cancer is linked to environmental factors. These include a person’s income level, types of food and groceries available in the neighborhood, access to primary care providers and specialists, and a wide variety of other social determinants of health.
Lifestyle factors like smoking, not exercising regularly and poor diet can also increase your colon cancer risk. Researchers have shown that red meat releases chemicals that can cause inflammation, while high-fiber foods and vegetables can help lower inflammation. Similarly, a sedentary lifestyle can also increase inflammation. Smoking can lead to harmful genetic changes in colon cells.
What are my screening options?
People with colorectal cancer usually don’t exhibit symptoms until the disease progresses to a later stage. That is why early and regular screening is critical.
The U.S. Preventive Services Task Force recommends Americans begin regular screenings at age 45. Recognizing that the incidence of colorectal cancer has grown among younger adults, the task force lowered the age from 50 in 2021. Screening may start earlier and occur more frequently for people who have an increased risk of colon cancer.
There are various screening methods, and your medical provider can recommend procedures based on your risk factors.
Many people choose to get a colonoscopy, which is a screening test that can also prevent cancer by removing precancerous polyps. It involves using a long, flexible tube with a light and a camera on the end to visually inspect the colon for signs of cancer, abnormalities in the colon lining, or growths such as polyps. Ultimately, colonoscopy screening can significantly reduce the incidence and mortality of colorectal cancer.
Other screening strategies include noninvasive stool testing, imaging scans and a combination of endoscopic visualization with stool-based testing.
Your doctor can help you select a test that aligns with your preferences, values and risk factors. Suggested screening approaches in people with an average colon cancer risk include a colonoscopy every 10 years, stool-based testing every one to three years, or CT scans every five years for those who are unable to have a colonoscopy as an initial screening test. A positive test result for these alternative approaches should be followed by a colonoscopy.
With routine screening, one out of every three colorectal cancer deaths can be avoided.
Why won’t my health insurance pay for my colonoscopy?
While colorectal cancer screening is free as a preventive service under the Affordable Care Act, some insurers are making it harder for people to get care.
For example, Blue Cross Blue Shield of Massachusetts proposed a 2024 policy that would have deemed the use of anesthesia in endoscopies, colonoscopies and other vital procedure as medically unnecessary. This meant patients would have had to pay out of pocket to cover the anesthesia needed for colorectal cancer screenings, potentially creating major cost barriers. The insurance company only reversed course after an outcry from physicians and patients.
Another troubling trend is expanded use of prior authorization, a process some health insurers use to determine if they will cover the cost of a medical procedure, service or medication. Insurers can delay or deny coverage of medically necessary care that physicians and medical guidelines recommend because they deem certain health care services unnecessary for a patient or too expensive to cover.
In 2023, UnitedHealthcare proposed a policy that would have required the 27 million people under their plan to obtain insurance approval before they could get diagnostic or follow-up colonoscopies. After protests from physicians and patients, the insurer put the policy on hold.
UnitedHealthcare has also made plans to introduce a program in 2024 that could involve prior authorization for colonoscopies. The insurer has released little information about why it feels such requirements are necessary, what services would require prior authorization and how it would protect patients from unnecessary delays and denials.
How can I lower my risk of colorectal cancer?
If you haven’t already, look into getting screened for colorectal cancer. Talk with your doctor’s office and check with your insurance company to understand what will be covered before your procedure. If you’re 45 or older, a colonoscopy can screen for and prevent colorectal cancer.
Younger adults can take steps to reduce their risk of colon cancer by adopting healthy eating and lifestyle behaviors. Being aware of personal risk factors and seeking medical attention for symptoms – such as changes in bowel habits, rectal bleeding, abdominal pain or unexplained weight loss – can help you discuss screening options with your health care provider.
If you have already had a colonoscopy and had polyps removed, make sure you know when you are due to return for a follow-up colonoscopy. It could save your life.![]()
![]()
Andrea Shin, Associate Professor of Medicine, University of California, Los Angeles
This article is republished from The Conversation under a Creative Commons license. Read the original article.

Cooper Kupp’s Wife Anna Shares Why 2023 Season Was “So Much More Difficult” for Her Husband

Travis Kelce appears to wipe away tears as Brittany Mahomes comforts him during Taylor Swift Eras Tour stop

How to watch Ariane 6 rocket’s maiden launch on Tuesday

Biden Receives Warm Welcome at Philadelphia Church

‘We hope we don’t see a return to 1930s protectionism’

Christina Applegate Shares Bucket List Amid MS Battle

PGA Tour: Davis Thompson wins in Illinois to secure Open spot

Biden seeks boost in Pennsylvania as calls for him to step aside mount By Reuters

Olympics 2024: Giannis Antetokounmpo leads Greece to spot in Paris

Emma Raducanu knocked out of Wimbledon by Lulu Sun after slipping on Centre Court

A Closer Look: Afro-Mexicans 🇲🇽

Black History Facts I had to Learn on My Own pt.6 📜
A Closer Look: Afro-Mexicans 🇲🇽

Major African Tribes taken away during the Atlantic Slave Trade🌍 #slavetrade #africanamericanhistory

Cameroon 🇨🇲 World Cup History (1962-2022) #football #realmadrid #shorts

Black History Inventors: Mary Kenner 🩸

PROOF AFRICAN AMERICANS AIN'T FROM AFRICA DOCUMENTED EVIDENCE

No African pre-Columbus DNA? 🤯🤯 #history #mesoamerica #mexico #african

Mr Incredible Becoming Canny/Uncanny Mapping (You live in Paraguay 🇵🇾)

How Did Normal Medieval People Survive Winter? | Tudor Monastery Farm | Chronicle

Evidence of African Nobility all over Medieval Europe.

african presence in mexico part 1

Did Africans Discover America Before Christopher Columbus?

The Black Presence in Renaissance Europe in 4K- Historical Paintings of Africans Brought To Life

Africans Visited the Americas Long Before Columbus | African History

Dr. Ivan Van Sertima – African Presence in Early Asia

African Presence in Early Europe – Dr Ivan Sertima – PART 1

History of Cameroon

Black History (It’s Yours) | Black History Month Rap Anthem | Animated Music Video

History of Africa from the 16th to the 20th Century
-
 African History5 years ago
A Closer Look: Afro-Mexicans 🇲🇽
-
 African History5 months ago
Black History Facts I had to Learn on My Own pt.6 📜
-
African History5 years ago
A Closer Look: Afro-Mexicans 🇲🇽
-
 African History1 year ago
Major African Tribes taken away during the Atlantic Slave Trade🌍 #slavetrade #africanamericanhistory
-
 African History1 year ago
Cameroon 🇨🇲 World Cup History (1962-2022) #football #realmadrid #shorts
-
 African History5 months ago
Black History Inventors: Mary Kenner 🩸
-
 African History1 year ago
PROOF AFRICAN AMERICANS AIN'T FROM AFRICA DOCUMENTED EVIDENCE
-
 African History1 year ago
No African pre-Columbus DNA? 🤯🤯 #history #mesoamerica #mexico #african